Are you ready to discover a simple way to make juicy, flavorful chicken that melts in your mouth? Cooking chicken in a Dutch oven is one of the best-kept secrets for creating a meal that feels like it took hours—but really, it doesn’t.
Imagine tender chicken with crispy skin, cooked evenly and full of rich taste. Whether you’re a beginner or looking to improve your cooking skills, this method will change how you cook chicken forever. Keep reading, and you’ll learn easy steps to master this technique and impress everyone at your table.
Credit: www.sugarmaplefarmhouse.com
Choosing The Right Chicken
Choosing the right chicken is the first step to making a delicious meal in your Dutch oven. The type of chicken you pick affects cooking time, flavor, and texture. Knowing the difference between whole chickens and pieces, as well as fresh versus frozen, can help you get the best results.
Whole Vs. Pieces
Deciding between a whole chicken and chicken pieces depends on what you want from your dish. Whole chickens take longer to cook but offer a richer flavor and juicier meat because the bones and skin keep moisture locked in. Pieces, like thighs or breasts, cook faster and are easier to portion for meals.
If you enjoy a hands-on cooking experience, roasting a whole chicken in your Dutch oven allows you to baste and check progress easily. On the other hand, chicken pieces are perfect if you want to cook quickly or try different seasonings on each piece. Which would fit your cooking style better?
Fresh Or Frozen
Fresh chicken often delivers a better texture and flavor, especially when cooked slowly in a Dutch oven. However, frozen chicken can be just as good if you thaw it properly before cooking. Avoid cooking chicken straight from frozen in your Dutch oven because it will cook unevenly and may dry out.
Keep in mind that fresh chicken is more perishable, so plan your meal timing carefully. Frozen chicken gives you flexibility to store and use whenever you want. Do you have a reliable way to thaw chicken safely, or would fresh chicken suit your schedule better?

Credit: www.theseasonedmom.com
Preparing Your Dutch Oven
Preparing your Dutch oven properly sets the stage for perfectly cooked chicken. It’s not just about tossing the bird in the pot; the right size and seasoning of your Dutch oven can make a big difference in flavor and texture. Taking a little time here helps avoid common pitfalls like uneven cooking or sticking.
Selecting The Size
Choosing the right Dutch oven size depends on how much chicken you plan to cook. A 5-7 quart pot works well for a whole chicken or a family-sized meal. If you want to cook smaller portions or just a few pieces, a 3-4 quart Dutch oven might be perfect.
Think about the space your chicken needs to cook evenly. Crowding the pot can lead to steaming instead of roasting, which changes the texture. Have you ever noticed how a cramped pot makes the skin less crispy? That’s why size matters.
Seasoning The Pot
Seasoning your Dutch oven creates a natural non-stick surface and protects the pot from rust. If you have a cast iron Dutch oven, apply a thin layer of vegetable oil all over the inside. Then, heat it in the oven at 350°F (175°C) for about an hour.
This process fills the tiny pores in the iron, making it smoother and easier to clean. Even if your Dutch oven is enameled, wiping the inside with a little oil before cooking can help reduce sticking. Have you tried seasoning your pot before cooking chicken? It often surprises people how much easier cleanup becomes.
Essential Ingredients
Choosing the right ingredients transforms simple chicken into a flavorful meal when cooking in a Dutch oven. The combination of herbs, spices, and liquids enhances the dish’s taste and texture. Understanding these essentials helps you create delicious, comforting meals every time.
Herbs And Spices
Fresh or dried herbs add layers of aroma and depth to your chicken. Rosemary and thyme are classic choices that work well with the slow, even heat of a Dutch oven.
Don’t hesitate to experiment with bold spices like smoked paprika, cumin, or even a pinch of cinnamon for warmth. Salt and pepper are a must, but adding garlic powder or onion flakes can boost flavor without extra effort.
Think about what you enjoy most. Do you prefer a Mediterranean twist with oregano and basil? Or a spicy kick with chili flakes? Your choice of herbs and spices sets the tone for the entire dish.
Liquids And Broths
Liquids are crucial for braising chicken in a Dutch oven. They keep the meat moist and tender throughout the cooking process.
Chicken broth is a go-to option, adding savory depth without overpowering the natural chicken flavor. You can also use vegetable broth or even a splash of white wine for acidity and complexity.
Water works in a pinch, but combining it with aromatics like lemon slices or bay leaves makes a big difference. Have you tried using coconut milk or tomato sauce for a different twist? These liquids can turn a simple chicken dish into an entirely new experience.

Credit: www.365daysofbakingandmore.com
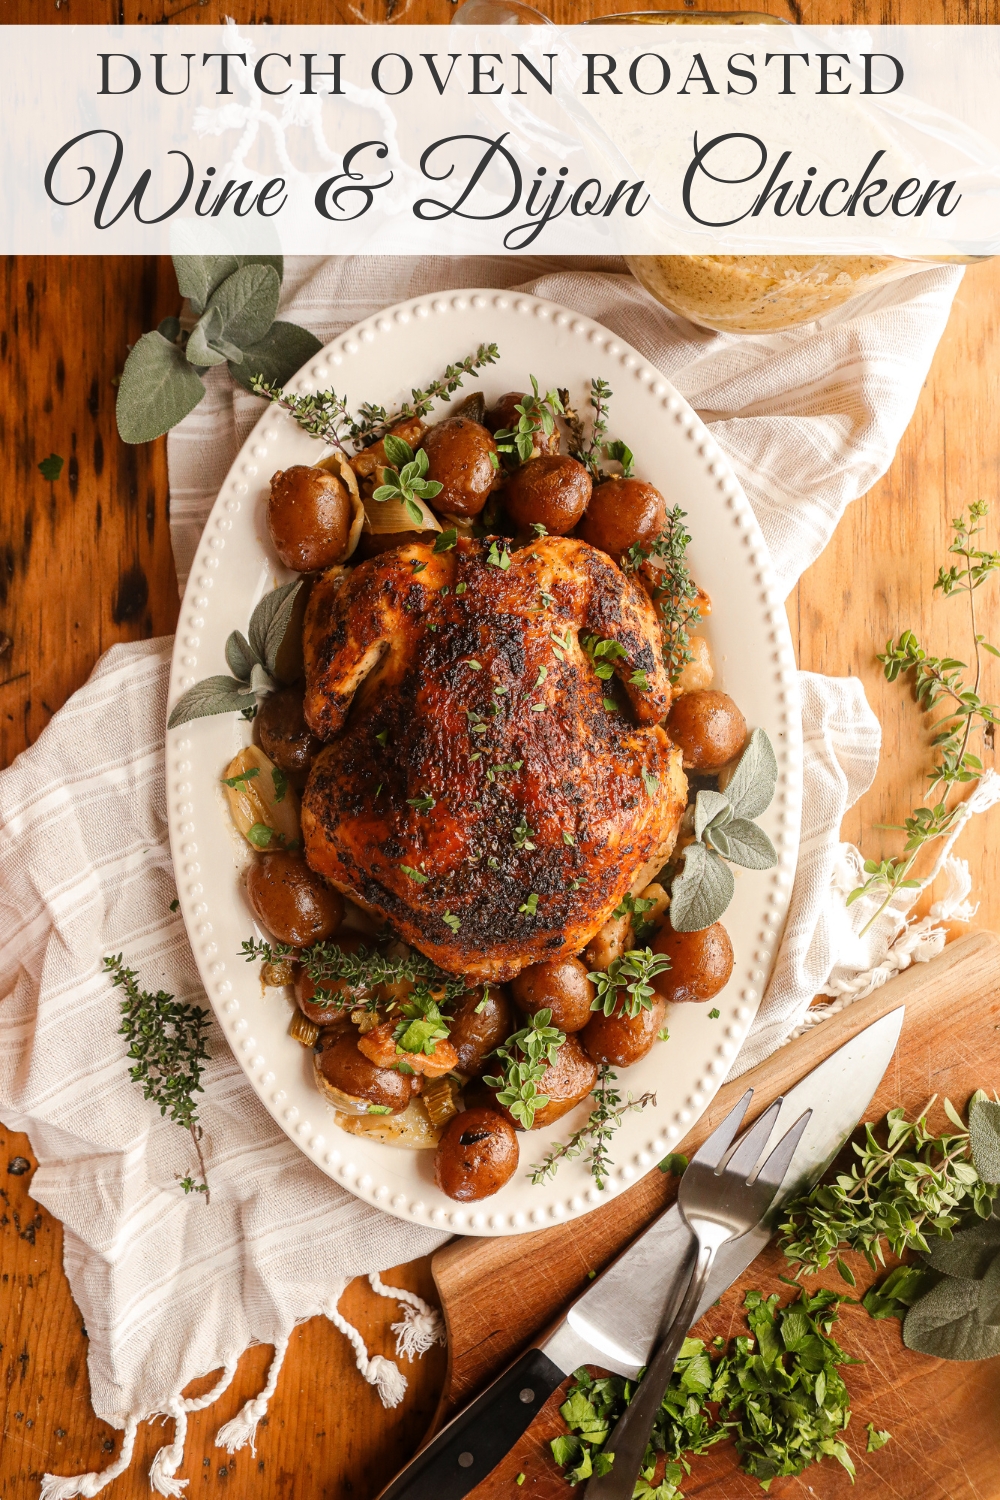
Step-by-step Cooking Process
Cooking chicken in a Dutch oven involves browning the chicken first. Add vegetables and broth, then simmer until tender. This method ensures juicy and flavorful meat.
Cooking chicken in a Dutch oven is a rewarding experience. The process enhances flavors and ensures tender meat. The Dutch oven's versatility allows for a seamless transition from stovetop to oven. Let’s explore the detailed steps to achieve perfectly cooked chicken.
Searing The Chicken
Begin by heating the Dutch oven over medium heat. Add a tablespoon of oil to the pot. Once hot, place the chicken pieces skin-side down. Sear until the skin turns golden brown. This step locks in juices and adds flavor. Turn the chicken to sear the other side. Remove the chicken and set aside.
Adding Aromatics
Use the same Dutch oven for extra flavor. Add chopped onions, garlic, and your favorite herbs. Stir them gently until they become fragrant. This forms the base of your dish. The aroma will fill your kitchen. You can also add vegetables like carrots or celery.
Simmering Techniques
Return the chicken to the Dutch oven. Pour in a liquid such as broth or wine. Ensure the chicken is partially submerged. Bring the liquid to a gentle simmer. Cover the Dutch oven with its lid. Let it cook slowly to blend all flavors. Check occasionally to ensure even cooking. Adjust heat if necessary to maintain a gentle simmer. The chicken should be tender after about 45 minutes.
Tips For Juicy, Tender Chicken
Getting juicy, tender chicken from your Dutch oven is easier than you might think. The key lies in managing heat and giving the meat time to settle after cooking. These simple tips will help you achieve that perfect texture every time.
Temperature Control
Keep the heat moderate to avoid drying out your chicken. High temperatures can make the outside cook too fast, leaving the inside tough. Use a thermometer to check that your chicken reaches an internal temperature of 165°F (75°C).
Start by searing the chicken on medium-high heat to lock in juices. Then, lower the heat to cook it gently. This slow cooking method allows the meat fibers to relax and absorb moisture.
Resting Time
After cooking, resist the urge to cut into the chicken immediately. Let it rest for at least 10 minutes in the Dutch oven or on a plate covered loosely with foil. This resting period lets juices redistribute throughout the meat, making each bite tender and flavorful.
Have you noticed how resting meat changes its texture? Skipping this step often results in a dry, less enjoyable meal. Treat your chicken with patience, and the rewards will show on your plate.
Serving Suggestions
Serving chicken cooked in a Dutch oven offers many tasty options. The rich flavors of the chicken pair well with simple sides and sauces. Thoughtful pairings can make the meal more enjoyable and complete.
Side Dishes
- Roasted vegetables like carrots, potatoes, and Brussels sprouts add color and texture.
- Steamed green beans or asparagus offer a fresh, crisp contrast.
- Buttery mashed potatoes soak up the delicious juices perfectly.
- A light, mixed green salad balances the richness of the chicken.
- Rice pilaf or couscous brings a mild, fluffy base to the plate.
- Crusty bread helps scoop up every bit of sauce and adds crunch.
Sauce Pairings
- A classic gravy made from the chicken drippings enhances the flavor.
- Garlic butter sauce adds a rich, smooth, and aromatic touch.
- Lemon herb sauce brightens the dish with fresh, zesty notes.
- Mushroom cream sauce offers a savory, earthy complement to the chicken.
- Barbecue sauce provides a smoky, tangy contrast for a bolder taste.
- Simple pan jus keeps the flavors light and natural, highlighting the chicken.
Common Mistakes To Avoid
Cooking chicken in a Dutch oven can yield juicy and flavorful results. Avoiding common mistakes ensures the best outcome. Simple errors can dry out the chicken or leave it bland. Pay attention to key steps to get tender, tasty chicken every time.
Overcooking
Overcooking chicken makes it dry and tough. The Dutch oven traps heat well, so cooking times are shorter. Check the chicken early to avoid drying. Use a meat thermometer to ensure the right temperature. Aim for 165°F (74°C) inside the thickest part. Rest the chicken after cooking to keep juices inside.
Skipping Searing
Searing adds flavor and texture. Skipping this step results in bland chicken. Heat the Dutch oven before adding chicken. Brown each side for a few minutes. This locks in juices and creates a nice crust. Searing also adds rich color to the dish. Take the time to sear for a tastier meal.
Cleaning And Maintaining Your Dutch Oven
Cleaning and maintaining your Dutch oven keeps it in great shape for years. Proper care protects its finish and cooking performance. Regular cleaning prevents food buildup and rust. Storage also plays a key role in preserving the pot’s quality.
Proper Cleaning Methods
Use warm water and a soft sponge for daily cleaning. Avoid harsh detergents and steel wool to protect the surface. For stuck-on food, soak the Dutch oven in warm water first. Use a nylon brush or non-abrasive scrubber to remove residue.
Dry the pot completely with a soft towel after washing. Never leave it to air dry, as moisture can cause rust. For cast iron, apply a thin layer of cooking oil to the surface once dry. This keeps the seasoning intact and prevents corrosion.
Storage Tips
Store your Dutch oven with the lid off or slightly ajar. This allows air circulation and stops moisture buildup inside. Keep it in a dry, cool place away from direct sunlight. Avoid stacking heavy items on top to prevent damage.
Place a paper towel or cloth between the lid and pot. It absorbs moisture and protects the seasoning. Check your Dutch oven regularly for any signs of rust or cracks. Early attention helps extend its life and keeps it safe for cooking.
Frequently Asked Questions
How Do You Prepare Chicken For Dutch Oven Cooking?
Start by seasoning the chicken with salt, pepper, and your favorite spices. Sear it in the Dutch oven until golden brown on all sides. This locks in flavor and moisture before slow cooking or braising.
What Is The Best Temperature To Cook Chicken In A Dutch Oven?
Cook chicken over medium heat for searing, then reduce to low or 325°F (163°C) for slow cooking. This ensures even cooking without drying out the meat.
Can You Cook Whole Chicken In A Dutch Oven?
Yes, you can cook a whole chicken in a Dutch oven. Brown it first, then add vegetables and broth. Cover and roast or braise until the chicken reaches 165°F internally.
How Long Does Chicken Take To Cook In A Dutch Oven?
Cooking time varies by recipe, but generally 1 to 1. 5 hours at 325°F (163°C) is sufficient. Use a meat thermometer to ensure the internal temperature reaches 165°F.
Conclusion
Cooking chicken in a Dutch oven is simple and rewarding. The pot keeps heat even and locks in moisture. You get tender, juicy chicken every time. Use basic ingredients and follow clear steps for best results. Experiment with herbs and spices to suit your taste.
This method saves time and effort in the kitchen. Try it out and enjoy a comforting meal with ease. A Dutch oven is a helpful tool for home cooking.