Is your Kenmore ice maker not making ice like it used to? You don’t have to live without ice or call expensive repair services.
Replacing your Kenmore ice maker yourself is easier than you think. In this guide, you’ll find simple, step-by-step instructions that anyone can follow. By the end, you’ll save money, time, and frustration. Ready to get your ice maker working perfectly again?
Let’s dive in!
Tools And Materials Needed
Replacing a Kenmore ice maker requires some specific tools and materials. Having them ready helps the process go smoothly. It saves time and reduces frustration.
Gather all the necessary items before starting. This preparation ensures you can focus on the replacement without interruptions.
Basic Hand Tools
- Screwdriver set (both flathead and Phillips)
- Nut driver or socket wrench (usually 1/4 inch)
- Pliers for gripping and bending wires
- Utility knife for cutting insulation or tape
Replacement Ice Maker Unit
- Compatible Kenmore ice maker model
- Check model number on your refrigerator to match
Safety Equipment
- Gloves to protect your hands
- Safety glasses to shield your eyes
Additional Materials
- Plastic container or towel to catch water spills
- Teflon tape for sealing water line connections
- Cleaning cloth to wipe up any mess
Preparation Steps
Before diving into replacing your Kenmore ice maker, getting your workspace ready is essential. Proper preparation not only saves you time but also prevents accidental damage to your appliance or injury to yourself. Taking a few simple steps first will make the actual replacement process smoother and less stressful.
Unplug The Refrigerator
Safety should always be your top priority. Unplugging your refrigerator cuts off all power, protecting you from electrical shocks while working inside. It’s easy to forget this step, but trust me—once, I skipped it and got a nasty jolt that set me back an hour.
Empty The Freezer Compartment
Removing all food from the freezer gives you clear access to the ice maker and prevents any spills or messes. You can place perishables in a cooler with ice packs to keep them fresh. Think about how much time you’ll save by not having to awkwardly maneuver around frozen bags and boxes.
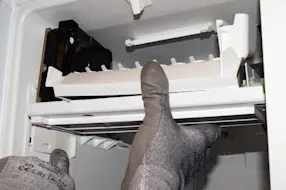
Locate The Ice Maker
Knowing exactly where your ice maker sits in the freezer makes the replacement less of a guessing game. It’s usually mounted on the side or back wall of the freezer compartment. Take a moment to check your Kenmore model’s manual or look for the familiar box-shaped component with wiring attached.
Removing The Old Ice Maker
Removing the old ice maker is the first step in replacing your Kenmore ice maker. This process requires care to avoid damage to the appliance or injury. Follow the steps carefully to detach and remove the ice maker safely.
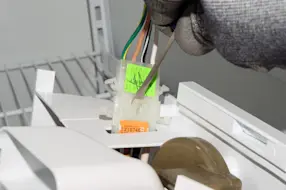
Detach The Wiring Harness
Locate the wiring harness connected to the ice maker. Gently press the clip or tab to release the connector. Pull the wiring harness straight out without twisting to avoid damage.
Unscrew The Mounting Brackets
Find the screws holding the ice maker to the freezer wall. Use a screwdriver to remove these screws completely. Keep the screws safe for installing the new ice maker.
Remove The Ice Maker Unit
After detaching the wiring and unscrewing brackets, carefully pull the ice maker away from the freezer wall. Move slowly to prevent breaking any parts. Set the old ice maker aside for disposal or repair.
Credit: www.searspartsdirect.com
Installing The New Ice Maker
Installing the new ice maker requires careful handling to ensure it fits and works properly. The process starts by placing the ice maker in the correct position inside the freezer. After that, securing it firmly prevents movement or damage. Finally, reconnecting the wiring harness restores power and functionality.
Position The New Ice Maker
Align the new ice maker with the mounting slots inside the freezer. Make sure the ice maker sits flush against the back wall. Check that the water inlet valve is accessible and not bent or blocked. The ice maker should fit snugly without forcing it in place.
Secure With Mounting Brackets
Use the screws from the old ice maker or new ones provided. Attach the mounting brackets firmly to hold the ice maker steady. Tighten the screws evenly to avoid tilting or loosening. Double-check that the ice maker cannot move or wobble after securing.
Reconnect The Wiring Harness
Locate the wiring harness plug inside the freezer compartment. Connect the plug to the new ice maker’s socket firmly until it clicks. Ensure no wires are loose or exposed. Proper connection is vital for the ice maker to receive power and signals.
Testing The New Ice Maker
Testing the new ice maker is crucial after installation. It confirms the unit works correctly and prevents future problems. This process involves powering the refrigerator, inspecting for leaks, and verifying ice production. Each step ensures the ice maker functions smoothly and efficiently.
Plug In The Refrigerator
Reconnect the refrigerator to the power source. Wait a few minutes for the system to start. Listen for sounds indicating the ice maker is running. The motor and water valve should activate shortly. This confirms the ice maker is receiving power.
Check For Water Leaks
Look carefully around the ice maker and water line. Use a dry cloth to detect any wet spots. Leaks may appear near the water inlet or connections. Fix any leaks immediately to avoid water damage. A tight seal ensures the ice maker fills properly.
Ensure Ice Production
Allow several hours for the ice maker to produce ice. Check the ice bin to see if cubes form. The ice should be clear and solid. If no ice appears, recheck the installation and power supply. Proper ice production means the ice maker works well.
Credit: www.searspartsdirect.com
Maintenance Tips
Proper maintenance extends the life of your Kenmore ice maker. It helps avoid frequent repairs and keeps ice fresh and clean. Simple care routines save time and money. Follow these tips to keep your ice maker working well.
Regular Cleaning
Clean the ice maker every few months. Remove ice buildup and any dirt inside. Use warm water and mild soap. Avoid harsh chemicals that can damage parts. Dry all areas before turning the ice maker back on.
Inspecting For Wear
Check moving parts regularly. Look for cracks or worn-out pieces. Replace any damaged parts quickly. This prevents bigger problems later. Inspect electrical connections for rust or loose wires.
Optimizing Performance
Keep the ice maker level for best results. Ensure proper water supply and good water quality. Avoid overfilling the ice tray. Set the freezer temperature between 0 and 5 degrees Fahrenheit. This helps ice freeze faster and stay solid.

Credit: www.searshomeservices.com
Frequently Asked Questions
How Do I Know If My Kenmore Ice Maker Needs Replacement?
If your Kenmore ice maker stops producing ice, makes unusual noises, or leaks water, it likely needs replacement. Check for ice jams or power issues first. Consistent problems despite troubleshooting indicate the need for a new ice maker unit.
What Tools Are Required To Replace A Kenmore Ice Maker?
You need a screwdriver, nut driver, and possibly pliers. A socket set may also be helpful. Always unplug the refrigerator before starting. These basic tools allow you to remove and install the ice maker safely and efficiently.
How Long Does It Take To Replace A Kenmore Ice Maker?
Replacing a Kenmore ice maker typically takes 30 to 60 minutes. Time depends on your familiarity with appliance repairs. Careful removal and installation ensure proper operation and avoid damage.
Can I Replace The Ice Maker Myself Without Professional Help?
Yes, most Kenmore ice makers are designed for DIY replacement. Follow instructions carefully and disconnect power first. If unsure, consult the manual or a professional to avoid damage or injury.
Conclusion
Replacing a Kenmore ice maker can save you time and money. Follow each step carefully to avoid mistakes. Take your time and work safely with tools. A good replacement keeps your ice fresh and your fridge working well. Soon, you will enjoy cold ice cubes again.
Remember, small repairs can make a big difference at home. Keep this guide handy for future use. Simple steps lead to great results.