Have you ever wanted to make cute, fluffy pom poms but didn’t have the right tools? What if I told you that you can create perfect pom poms using something as simple as a fork?
Yes, your everyday kitchen fork can help you craft beautiful decorations, cozy accessories, and fun DIY projects. In this guide, you’ll learn easy steps to turn yarn into soft pom poms quickly and effortlessly. Ready to add a splash of creativity to your crafts?
Keep reading, and let’s get started!
Materials Needed
Gathering the right materials makes pom pom crafting simple and fun. Each item plays a role in creating a perfect pom pom using a fork. Keep these essentials close to start crafting right away.
Yarn
Choose soft yarn for fluffy pom poms. Acrylic or wool yarn works well. Pick colors you like for your project.
Fork
Use a standard kitchen fork with four tines. The fork size affects the pom pom size. A medium-sized fork is perfect for most pom poms.
Scissors
Sharp scissors help cut yarn cleanly. Small scissors are easier to handle for trimming pom poms. Keep scissors nearby for quick cuts.
Needle Or Crochet Hook
A yarn needle or a thin crochet hook helps tie the yarn. It makes securing the center tight and neat. Use whichever is easier to handle.
Surface Or Mat
Work on a flat surface to keep yarn tidy. A small mat or cloth can catch yarn scraps. It keeps your workspace clean and organized.

Credit: www.clairefairalldesigns.com
Choosing The Right Yarn
Choosing the right yarn can make a huge difference in how your pom pom turns out. The texture, thickness, and color all affect the final look and feel. Picking the yarn carefully helps you create a pom pom that matches your project perfectly.
Understanding Yarn Thickness
Yarn thickness, or weight, impacts the fluffiness of your pom pom. Thicker yarn creates a fuller, denser pom pom, while thinner yarn results in a smaller, more delicate one.
If you want a bold and fluffy pom pom, try using bulky or chunky yarn. For a subtle, lightweight look, choose sport or DK weight yarn instead.
Choosing Yarn Texture
The texture of the yarn also matters a lot. Smooth yarns make your pom pom look neat and tidy, while fuzzy or fluffy yarns give a soft, cloud-like effect.
Think about what suits your project best. Do you want a sleek finish or a cozy, fuzzy feel? Your choice will guide which yarn to pick.
Selecting The Right Color
Color can bring your pom pom to life or make it blend in. Bright colors add a fun, playful touch, while neutral tones give a classic, versatile look.
Consider the project where the pom pom will go. Will it be a pop of color on a hat or a subtle accent on a scarf? Matching or contrasting colors can both work well depending on your style.
Material Matters: Wool, Acrylic, Or Cotton?
Different yarn materials affect durability and softness. Wool feels warm and natural but can be itchy for some. Acrylic is soft, budget-friendly, and easy to clean.
Cotton yarns offer breathability and a matte finish but might not be as fluffy. Think about how your pom pom will be used and choose the material that fits those needs.
Preparing The Fork
Preparing the fork is the first step in making a pom pom. A simple kitchen fork transforms into a handy tool for crafting soft, fluffy pom poms. Proper preparation ensures the yarn wraps neatly and holds together well.
Choose a standard fork with four tines. Avoid forks that are too wide or too narrow. The size of the fork affects the size of the pom pom you will create.
Clean the fork before use. Remove any food residue or dirt. A clean fork prevents yarn from slipping and keeps your pom pom tidy.
Choosing The Right Fork Size
Pick a fork size based on your pom pom needs. A larger fork creates a bigger pom pom. A smaller fork works well for tiny, delicate pom poms.
Test different forks to find the best fit. Consider the thickness of your yarn too. Thick yarn needs a larger fork for easier wrapping.
Inspecting The Fork Tines
Check the fork’s tines for smooth edges. Rough or bent tines can snag the yarn. Smooth tines help the yarn slide easily during wrapping.
Use sandpaper to smooth any sharp edges if needed. This step prevents yarn from fraying or breaking while making your pom pom.
Positioning The Fork For Wrapping
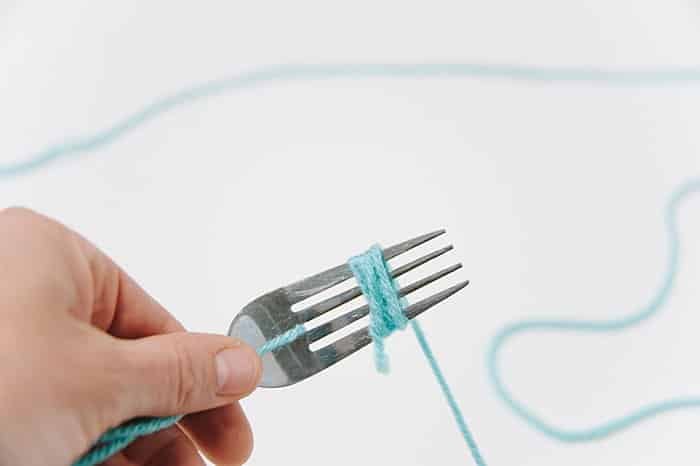
Hold the fork with the tines facing up. Keep the handle steady in your hand. This position makes it easy to wrap yarn around the tines evenly.
Make sure your workspace has good lighting. Clear space helps you wrap yarn without tangling or dropping it.
Wrapping The Yarn
Wrapping the yarn around the fork is the key step in making a pom pom. This process creates the fluffy core of your pom pom. The way you wrap affects the shape and fullness. Taking time here ensures a neat and even pom pom.
How Much Yarn To Wrap
Use enough yarn to make a dense bundle. About 50 to 100 wraps usually work well. More wraps create a thicker pom pom. Fewer wraps make a smaller, less fluffy pom pom. Adjust the amount depending on the size you want.
Tips For Even Wrapping
- Keep the yarn tight but not too tight.
- Wrap the yarn evenly across the fork’s tines.
- Move back and forth to cover all sides.
- Check your work as you go to avoid gaps.
- Use smooth, steady motions for a clean wrap.
Tying The Pom Pom
Wrap yarn around the fork’s prongs several times. Tie a piece of yarn tightly in the middle, then cut the loops to form a fluffy pom pom.
Creating a pom pom can be a delightful craft project that brings a splash of color and texture to your creations. Tying the pom pom is a critical step that ensures your fluffy adornment stays intact. Let's explore the best techniques for tying your pom pom with precision and flair.
Selecting The Right Thread
Choosing the right thread is crucial for a sturdy pom pom. Opt for a strong and durable thread that won’t snap under tension. Many crafters prefer embroidery floss or a robust cotton thread because of their strength and ease of handling. Avoid using thin or weak threads; they might break when you tie them tight. Consider matching the thread color to your pom pom yarn for a seamless look. Alternatively, contrast colors can add a playful touch if that's your style.
Securing The Knot
Once you've wrapped your yarn around the fork and are ready to tie, the knot is your hero. Wrap the thread around the center of the yarn bundle tightly. The tighter you pull, the fluffier your pom pom will be. Secure the knot with a double knot to ensure it stays in place. Don't worry if your first knot isn't perfect; practice makes perfect. If you're crafting with kids, this is a great opportunity to teach them how to tie a secure knot. Have you ever thought about how a simple knot can make all the difference in your crafting project? Make sure your knot is as tight as possible without breaking the thread. A well-secured knot ensures your pom pom stays intact even through the wildest of dance parties or the toughest of playtimes.

Credit: www.momsandcrafters.com
Cutting The Yarn Loops
Cut the yarn loops carefully between the fork tines to create a fluffy pom pom. Make sure all loops are fully cut for even shape and texture. Trim edges to smooth out any uneven strands.
Cutting the yarn loops is a crucial step in making pom poms with a fork. This step gives your pom pom its fluffy and full shape. After wrapping the yarn around the fork, you need to cut the loops to release the pom pom. Cutting the loops evenly ensures your pom pom looks perfect and tidy.
Best Cutting Tools
A sharp pair of scissors is essential for this task. Choose scissors with a fine tip for precise cutting. Small embroidery scissors work well for this. They allow you to cut the loops without damaging the yarn. Avoid dull scissors, as they can cause the yarn to fray. Frayed yarn can lead to an untidy pom pom. Keep your scissors clean and sharp for the best results.
Safety Tips
Always handle scissors with care to avoid injury. Ensure your fingers are clear of the cutting area. Cutting near your fingers can be dangerous. Consider using scissors with a safety lock feature. This feature prevents accidental cuts when not in use. Keep scissors out of reach of young children. Supervise children closely if they are involved in the craft. Safety should always be a priority during crafting activities.
Shaping The Pom Pom
After you’ve wrapped the yarn around your fork and tied it securely, shaping the pom pom is the step that turns a bunch of yarn into a charming, fluffy decoration. This part requires a bit of patience and a sharp eye. How round and full your pom pom looks depends largely on how you trim and fluff it.
Trimming For Roundness
Grab a pair of sharp scissors and start trimming the yarn ends. Your goal is to create an even, spherical shape, so focus on cutting stray or uneven strands first.
Don’t rush—trim a little at a time and rotate the pom pom to check its shape from all angles. You might be surprised how small snips can dramatically improve the look.
If your pom pom feels flat on one side, cut the longer strands there slightly shorter. This helps balance the shape and gives a polished finish.
Fluffing Techniques
Once trimmed, it’s time to fluff your pom pom. Hold it gently and pull apart the yarn strands with your fingers to loosen them.
Shake it lightly or roll it between your palms to add volume. This simple action spreads the yarn fibers and makes the pom pom look fuller and softer.
Try teasing the strands apart using a fine-tooth comb or even a pet brush for extra fluffiness. Have you noticed how a little fluffing can completely change the vibe of your pom pom?
Credit: www.lauraradniecki.com
Creative Uses For Fork Pom Poms
Fork pom poms are small, fluffy, and fun to make. Their size and texture make them perfect for many creative projects. These tiny pom poms can brighten up spaces and add charm to everyday items. Use them to add color, texture, and a playful touch wherever you want. Here are some creative ways to use fork pom poms.
Decorations
- Attach pom poms to string lights for a cozy glow.
- Glue them on wreaths for a soft, festive look.
- Use pom poms to decorate picture frames or jars.
- Make garlands by threading pom poms on twine.
- Stick pom poms on planters to brighten indoor plants.
Accessories
- Glue pom poms to hair clips or headbands.
- Sew them onto scarves or hats for added flair.
- Create fun keychains by attaching pom poms to rings.
- Add pom poms to shoes for a playful style.
- Decorate phone cases with small pom poms for a unique look.
Gift Wrapping
- Use pom poms as cute gift toppers instead of bows.
- Tie pom poms to ribbons for colorful accents.
- Attach pom poms to gift tags for a personal touch.
- Wrap pom pom garlands around presents for charm.
- Use pom poms to decorate gift bags and boxes.
Troubleshooting Common Issues
Making a pom pom with a fork is simple, but sometimes things don’t go as planned. You might find your pom pom too loose, uneven, or falling apart. These common issues can be fixed with a few easy adjustments, so don’t get discouraged.
Fixing A Loose Pom Pom
If your pom pom feels too loose and falls apart easily, it usually means the yarn isn’t wrapped tightly enough around the fork. Try wrapping the yarn more times, making sure each layer is snug against the last.
After cutting the yarn loops, tie the center tightly with a strong knot. You can even double-knot for extra security. Do you notice your pom pom losing shape after a while? A tighter tie will help it hold together better.
Making Your Pom Pom Fluffy And Even
Uneven or flat pom poms happen when the yarn strands are not cut evenly or the wrapping is uneven. To fix this, trim the pom pom carefully with sharp scissors, cutting longer strands to match the shorter ones.
Don’t forget to fluff the pom pom by gently pulling and spreading the strands apart with your fingers. This makes it look fuller. Are you skipping the fluffing step? It can make a big difference in the final look.
Preventing Yarn From Slipping Off The Fork
Sometimes the yarn slips off the fork while wrapping, which can be frustrating. To avoid this, hold the yarn firmly with one hand and wrap slowly with the other, keeping tension consistent.
You might also try using a fork with wider tines or wrapping a small piece of tape on the fork prongs for extra grip. Have you tried these little tricks? They help keep the yarn in place and make wrapping easier.
Frequently Asked Questions
How Do You Start Making A Pom Pom With A Fork?
Begin by wrapping yarn around the fork’s prongs about 50 times. Secure the middle with a tight knot. Cut the loops on both sides to form the pom pom. Trim for evenness to finish.
What Type Of Yarn Works Best For Fork Pom Poms?
Medium-weight yarn like acrylic or wool is ideal. It’s easy to wrap, cut, and fluffs nicely. Avoid thin or very thick yarns, as they can be hard to manage with a fork.
How Can I Make My Fork Pom Pom Fluffier?
Use more yarn layers when wrapping the fork. After cutting, shake and trim the pom pom to even the strands. Fluff with your fingers to add volume.
Can I Use Different Fork Sizes For Pom Poms?
Yes, larger forks create bigger pom poms. Smaller forks produce smaller, denser pom poms. Choose fork size based on your desired pom pom size.
Conclusion
Making a pom pom with a fork is simple and fun. You only need yarn and a fork to start. This craft lets you create soft, fluffy pom poms quickly. You can use them to decorate hats, gifts, or clothes.
Try different yarn colors to make unique designs. Practice a few times, and your pom poms will look great. Everyone can enjoy this easy project. Give it a try today and add a little charm to your crafts!