Cooking a whole chicken in a Dutch oven is easier than you might think. Imagine juicy, tender meat with crispy skin, all made in one pot.
You don’t need to be a pro chef to get perfect results. Whether you’re cooking for your family or hosting friends, this method saves you time and effort. You’ll discover simple steps and insider tips to make your chicken delicious every time.
Ready to impress your taste buds? Keep reading and learn how to master this classic cooking technique.
Credit: www.theseasonedmom.com
Choosing The Right Chicken
Choosing the right chicken sets the stage for a perfect Dutch oven roast. The bird you pick affects flavor, cooking time, and even how the meat holds moisture. Before you start, consider these key factors to make sure your chicken turns out juicy and delicious.
Fresh Vs Frozen
Fresh chicken often has better texture and flavor because it hasn’t been through the freezing process. If you buy fresh, check the sell-by date and look for firm, moist skin without any discoloration.
Frozen chicken is convenient and usually less expensive, but it requires proper thawing to avoid uneven cooking. If you choose frozen, thaw it in the fridge for at least 24 hours before cooking. Have you ever had a meal ruined by a chicken still icy inside?
Size Matters
The size of your chicken influences cooking time and even how it fits in your Dutch oven. A 3 to 4-pound bird is ideal for most Dutch ovens and fits comfortably without overcrowding.
Larger chickens take longer to cook and may dry out on the edges by the time the center is done. Smaller birds cook faster but may not provide enough servings if you’re feeding a crowd. What size works best for your family or gathering?
Organic And Free-range Options
Organic and free-range chickens often offer richer flavor due to their diet and living conditions. These birds tend to have firmer meat and a more natural taste that you can really notice in slow-cooked dishes.
They usually cost more, but many find the flavor and ethical choice worth the extra expense. If you want a more flavorful roast, consider trying these options next time you shop. Have you tried free-range chicken and noticed a difference?
Selecting The Dutch Oven
Selecting the right Dutch oven is key to cooking a whole chicken perfectly. The pot must hold heat well and fit the bird comfortably. Different materials, sizes, and lids affect cooking results. Choose wisely for tender, juicy chicken every time.
Material Types
Dutch ovens come in several materials. Cast iron is popular for even heat and durability. Enamel-coated cast iron offers easy cleaning and no seasoning. Aluminum heats quickly but may not retain heat as well. Each material changes cooking speed and flavor.
Size Considerations
The size must fit the whole chicken without crowding. A 5 to 7-quart Dutch oven suits most whole chickens. Too small a pot will steam instead of roast. Too large can dry out the meat. Pick a size that holds your chicken and some space for air circulation.
Lid Importance
A tight-fitting lid traps moisture and heat inside. This helps cook the chicken evenly and keeps it juicy. Some lids have a self-basting design to circulate moisture. A loose lid lets steam escape, causing dry chicken. Always use a lid that seals well for best results.
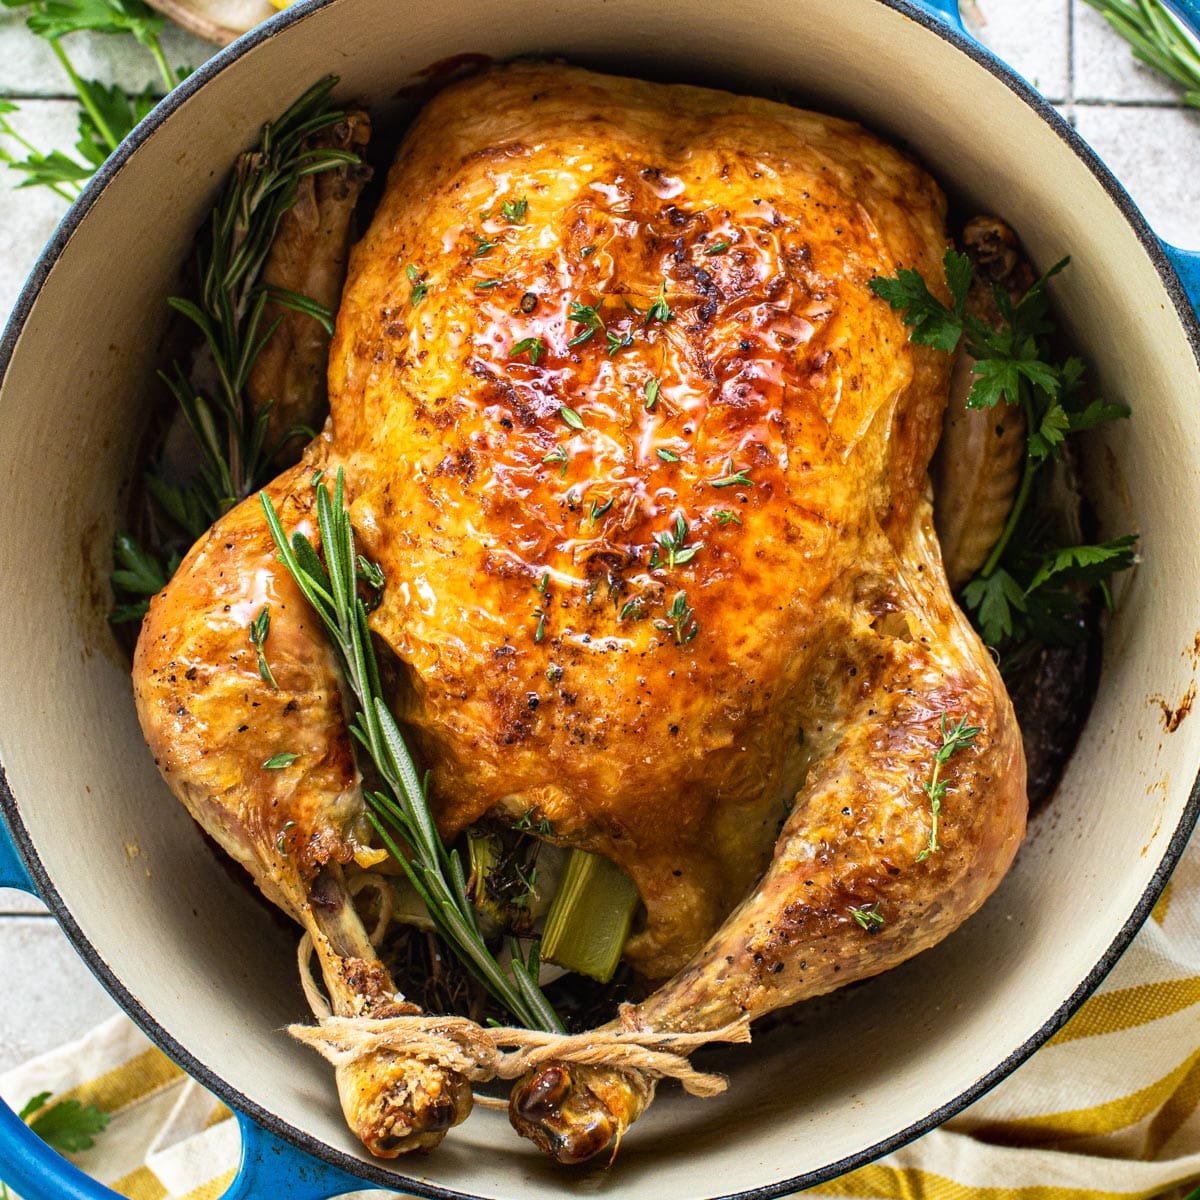
Preparing The Chicken
Preparing the chicken is the first key to a delicious meal. Clean and trim the bird carefully. Proper seasoning makes flavors stand out. Stuff the chicken to add taste and moisture. Each step shapes the final dish.
Cleaning And Trimming
Rinse the chicken under cold water. Remove any leftover feathers or giblets. Pat the chicken dry with paper towels. Trim excess fat and skin around the neck and cavity. This helps the chicken cook evenly and stay juicy.
Seasoning Techniques
Rub salt and pepper all over the chicken. Use your hands to spread spices under the skin. Try herbs like rosemary, thyme, or paprika. Drizzle olive oil or melted butter for crisp skin. Let the chicken rest for 15 minutes before cooking.
Stuffing Ideas
Stuff the cavity with simple ingredients to boost flavor. Use lemon halves and garlic cloves for freshness. Add onion wedges and fresh herbs for aroma. Avoid overfilling to ensure even cooking. Stuffing keeps the chicken moist from inside.

Credit: www.theseasonedmom.com
Cooking Process
The cooking process of a whole chicken in a Dutch oven is simple and rewarding. This method ensures juicy meat and crispy skin. Follow these steps for a delicious meal.
Preheating The Dutch Oven
Preheat your Dutch oven before adding the chicken. This ensures even cooking. Place the oven on the stovetop over medium heat. Allow it to warm up for about 10 minutes. A hot Dutch oven helps in browning the chicken nicely.
Searing The Chicken
Once the Dutch oven is hot, add a little oil. Place the chicken in the pot, breast side down. Sear for about 5 minutes to achieve a golden-brown color. Turn the chicken using tongs and sear the other side. Searing locks in the flavors, giving a rich taste.
Oven Temperature And Timing
After searing, preheat your regular oven to 375°F (190°C). Transfer the Dutch oven with the chicken into it. Cook the chicken for about 1.5 to 2 hours. Use a meat thermometer to check doneness. The internal temperature should reach 165°F (74°C). Let the chicken rest before carving. This allows the juices to redistribute, ensuring tender meat.
Tips For Juicy Results
Getting a juicy whole chicken from your Dutch oven is all about technique and attention to detail. Small steps during cooking can make a big difference in moisture and flavor. Here are some practical tips to help you achieve that tender, juicy result every time.
Basting Methods
Basting keeps the chicken moist and adds flavor. Use a spoon or a bulb baster to scoop up the juices from the bottom of the Dutch oven and gently pour them over the chicken skin every 20-30 minutes.
Some cooks swear by adding butter or olive oil mixed with herbs to the basting liquid. This not only helps with moisture but also creates a beautiful, golden crust.
Think about the last time you skipped basting—did your chicken feel dry? Give it a try and notice the difference in texture and taste.
Using Aromatics
Aromatics like garlic, onions, lemons, and fresh herbs do more than just flavor the chicken; they help lock in moisture. Place these ingredients inside the cavity and around the chicken in the Dutch oven.
The steam released from these aromatics during cooking infuses the meat with subtle, savory notes. You can even add a splash of broth or wine to enhance the moisture inside the pot.
Have you ever roasted a chicken without any aromatics? Try adding them next time and see how much juicier and tastier your chicken becomes.
Resting Time
Resting the chicken after cooking is crucial for juicy meat. Let it sit, tented loosely with foil, for at least 15 minutes before carving.
This pause allows the juices to redistribute evenly throughout the meat instead of spilling out the moment you cut in. Skipping this step often results in dry slices.
Try to be patient here—your taste buds will thank you once you slice into a perfectly rested, juicy chicken.
Serving Suggestions
Serving a whole chicken cooked in a Dutch oven invites plenty of delicious possibilities. How you present it can elevate your meal and impress your guests or family. Think about complementary flavors, practical carving, and smart storage to get the most out of your effort.
Side Dishes Pairing
Choose sides that soak up the rich juices and balance the hearty chicken. Roasted root vegetables like carrots, potatoes, and parsnips add earthiness and texture. A fresh green salad with a tangy vinaigrette cuts through the richness and refreshes your palate.
Steamed green beans or sautéed spinach are also great to include for a pop of color and nutrition. Don’t forget crusty bread or dinner rolls to mop up every bit of flavorful sauce. What sides make your meal feel complete and satisfying?
Carving Tips
Carving a whole chicken might seem tricky, but it’s easier than you think. Let the chicken rest for about 10 minutes after cooking; this locks in the juices. Use a sharp knife and start by removing the legs and thighs with a gentle twist.
Next, slice off the wings, then carefully carve the breast meat in thin, even slices. Keep the skin attached for extra flavor and moisture. How do you make sure every slice is tender and juicy?
Storing Leftovers
Leftover chicken can be just as exciting as the first meal if stored right. Cool the chicken completely before placing it in an airtight container. Store it in the refrigerator for up to 3-4 days to keep it safe and tasty.
For longer storage, freeze cooked chicken in portions with some cooking juices to prevent dryness. Use leftovers in salads, sandwiches, or soups to avoid waste and enjoy your hard work again. Have you tried any creative ways to reinvent leftover chicken?
Troubleshooting Common Issues
Cooking a whole chicken in a Dutch oven is rewarding, but it doesn’t always go perfectly. Issues like dry meat, uneven cooking, and lackluster flavor can sneak in, even if you follow the recipe. Let’s tackle these common problems so your chicken turns out juicy, evenly cooked, and packed with flavor every time.
Dry Meat Solutions
If your chicken turns out dry, it’s often a sign of overcooking or insufficient moisture. Try lowering the oven temperature slightly and increase cooking time to avoid drying out the meat. Adding a bit of broth or water to the Dutch oven helps keep the environment moist and prevents the chicken from drying.
Another trick I use is to brine the chicken before cooking. Even a simple saltwater soak for an hour makes a big difference in juiciness. Don’t forget to baste the chicken occasionally with its own juices during cooking to maintain moisture.
Uneven Cooking Fixes
Uneven cooking can leave some parts underdone while others are overcooked. This often happens if the chicken isn’t positioned properly in the Dutch oven. Make sure the chicken rests breast-side up and that it’s not touching the sides of the pot.
Using a rack inside the Dutch oven can also promote even heat circulation. If you notice hot spots in your oven, rotate the Dutch oven halfway through cooking. This simple step can save you from biting into dry or raw spots.
Flavor Enhancements
Flavor can sometimes fall flat if you skip seasoning or aromatics. Don’t just salt the surface—season inside the cavity with herbs, garlic, and lemon slices. These infuse the meat with subtle, delicious flavors.
Consider adding vegetables like onions, carrots, and celery to the bottom of the Dutch oven. They release juices that mingle with the chicken’s drippings, creating a richer taste. Want to elevate it further? Finish with a sprinkle of fresh herbs right before serving for a burst of freshness.

Credit: www.itisakeeper.com
Frequently Asked Questions
How Long To Cook A Whole Chicken In A Dutch Oven?
Cook a whole chicken in a Dutch oven for 1 to 1. 5 hours. The cooking time depends on the chicken size and oven temperature, usually 350°F (175°C). Use a meat thermometer to check for an internal temperature of 165°F (74°C) for safe consumption.
What Seasoning Works Best For Dutch Oven Chicken?
Simple seasonings like salt, pepper, garlic, and rosemary work best. You can also add lemon, thyme, and paprika for extra flavor. Season the chicken inside and out to enhance taste during slow cooking in the Dutch oven.
Can I Cook Vegetables With The Chicken?
Yes, you can cook vegetables like potatoes, carrots, and onions with the chicken. Add them around the chicken in the Dutch oven for a complete meal. Vegetables absorb the chicken’s juices, making them tender and flavorful.
Should I Cover The Dutch Oven While Cooking?
Always cover the Dutch oven with its lid while cooking. This traps heat and moisture, ensuring the chicken cooks evenly and stays juicy. Uncover only in the last few minutes if you want crispier skin.
Conclusion
Cooking a whole chicken in a Dutch oven is simple and rewarding. The pot keeps heat and moisture inside, making the chicken tender and juicy. You only need basic ingredients and easy steps to get great flavor. Try adding herbs or vegetables to make it your own.
This method saves time and gives you a delicious meal. Give it a try for a comforting, homemade dish everyone will enjoy. Cooking at home can be fun and tasty. Why not start today?