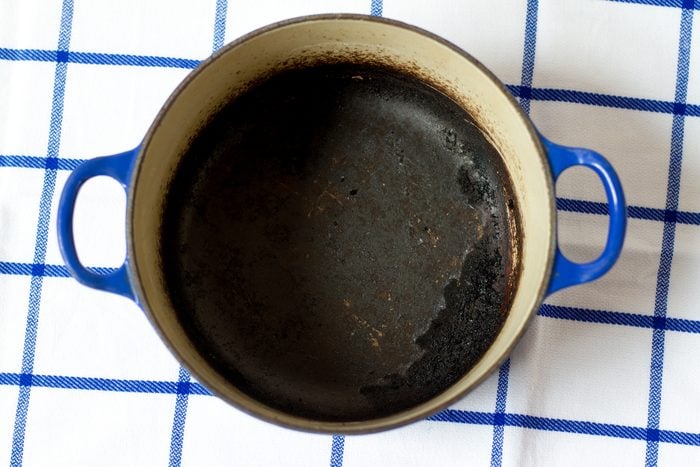
If you’ve ever cooked a delicious meal in your Dutch oven only to find stubborn burnt-on food stuck to the bottom, you know how frustrating it can be. You want to clean it without damaging your favorite pot, but scrubbing feels like a never-ending battle.
What if you could restore your Dutch oven to its shiny, like-new condition with simple, effective steps? In this guide, you’ll discover easy and safe ways to tackle burnt food, saving you time and effort while keeping your Dutch oven ready for your next culinary creation.
Keep reading—you’ll be amazed at how simple it is to bring your pot back to life!

Why Burnt Food Happens
Burnt food sticking to your Dutch oven can be frustrating, especially after preparing a delicious meal. Understanding why food burns in the first place helps you avoid the hassle of tough cleaning jobs. It also protects your cookware, keeping it in great shape for years.
Common Causes
Burnt food usually happens because of too much heat or cooking for too long without stirring. If your Dutch oven gets hotter than necessary, food will quickly stick and burn on the surface.
Using the wrong type of oil or not enough oil can also cause burning. Oils with low smoke points break down easily and contribute to food sticking and charring.
Sometimes, uneven heat distribution is the culprit. If the heat is not spread evenly across the pot, some areas get hotter and burn food faster.
Effects On Dutch Oven
Burnt food doesn’t just ruin your meal—it can damage your Dutch oven’s surface. Stubborn burnt bits can scratch or wear down the enamel coating, making it less effective and harder to clean over time.
Repeated burning can lead to discoloration and even weaken the pot’s material. This shortens the lifespan of your Dutch oven and affects how your food cooks in the future.
Have you noticed your Dutch oven getting harder to clean or the food sticking more often? These signs might mean it’s time to adjust your cooking habits to protect your cookware better.
Immediate Steps After Cooking
Cleaning a Dutch oven right after cooking helps keep it in great shape. The food stuck on the pot is easier to remove before it hardens. Acting quickly reduces tough stains and saves time. Knowing the best first actions protects the enamel and metal underneath.
Soaking Techniques
Fill the Dutch oven with warm water. Use enough water to cover the burnt areas. Add a small amount of mild dish soap. Let it soak for 15 to 30 minutes. This softens the burnt food without scrubbing.
For tougher stains, use a mix of water and baking soda. Baking soda helps lift burnt bits gently. Avoid soaking for too long to protect the enamel. After soaking, use a soft sponge to wipe away the residue.
Avoiding Scratches
Never use metal scrubbers or steel wool on your Dutch oven. These tools can scratch the enamel surface. Use soft sponges or nylon scrubbers instead. Clean with gentle circular motions.
Avoid harsh chemical cleaners. They can damage the finish and change the color. Stick to mild soaps and natural cleaners like baking soda. Always rinse the pot well after cleaning.
Cleaning Methods For Burnt Food
Cleaning burnt food from your Dutch oven can feel like a tough task, but the right approach makes it much easier. Different cleaning methods work best depending on how stubborn the burnt residue is. Here are some practical and effective ways to restore your Dutch oven’s surface without damaging it.
Boiling Water And Baking Soda
This method uses simple kitchen staples to loosen burnt food. Start by filling your Dutch oven with water, enough to cover the burnt areas. Add a few tablespoons of baking soda, then bring the water to a boil.
Let it simmer for 10 to 15 minutes. The boiling water softens the burnt food, while the baking soda helps break down the residue. After cooling, you’ll find it easier to scrub off the burnt bits with a non-abrasive sponge. Have you ever noticed how gentle heat and baking soda can work wonders on stubborn stains?
Using Vinegar Solutions
Vinegar is a natural cleaner that cuts through burnt-on grime effectively. Pour equal parts of water and white vinegar into your Dutch oven until the burnt spots are submerged. Heat this mixture until it starts to simmer.
Turn off the heat and let it sit for about 30 minutes. The acidity of vinegar helps dissolve burnt food, making it easier to wipe away. After soaking, try scrubbing with a soft brush. You might be surprised at how vinegar can revive your cookware with minimal effort.
Scrubbing With Salt
If you prefer a more hands-on approach, coarse salt can act as a gentle abrasive. Sprinkle a generous amount of coarse salt over the burnt areas. Add a small amount of water to form a paste.
Use a sponge or cloth to scrub the salt paste in circular motions. The salt helps lift burnt bits without scratching the enamel surface. This method is particularly useful for light to moderate burns. How often do you find that simple ingredients like salt can replace harsh chemicals?
Commercial Cleaners
For really tough burnt-on food, commercial cleaners designed for enamel cookware can be a good choice. Always choose a cleaner that specifies it’s safe for Dutch ovens. Follow the instructions carefully to avoid damaging your pot.
These cleaners often contain powerful ingredients that break down burnt residue efficiently. Use gloves to protect your hands and ensure good ventilation. Sometimes, investing in a specialized product saves time and effort, especially when home remedies don’t do the trick.
Tools To Use And Avoid
Soft scrub brushes and nylon sponges work well to remove burnt food without damaging the surface. Avoid metal scouring pads, as they can scratch and ruin the Dutch oven’s coating. Gentle cleaners like baking soda mixed with water help loosen burnt residue safely.
Cleaning a Dutch oven with burnt-on food can be daunting. Choosing the right tools makes the task easier and protects your cookware. Some tools are safe and effective, while others can damage your Dutch oven. Knowing the difference helps you clean efficiently and maintain your cookware's longevity.
Safe Scrubbing Tools
Using the right scrubbing tools ensures your Dutch oven remains in top condition. Here are a few safe options:
- Soft sponge: Ideal for everyday cleaning. Gentle on surfaces.
- Plastic scraper: Removes stubborn bits without scratching.
- Baking soda paste: Mix with water for a mild abrasive solution.
- Soft-bristle brush: Good for more persistent residue.
These tools clean effectively while being gentle on the surface.
Tools To Avoid
Certain tools can harm your Dutch oven's surface. Avoid using these:
- Metal scouring pads: Can scratch and damage the enamel.
- Harsh chemicals: May strip the protective layer.
- Steel wool: Too abrasive, risks chipping the surface.
Steering clear of these tools preserves the quality of your Dutch oven.
Restoring Seasoning And Finish
After removing burnt food, restoring the Dutch oven’s seasoning and finish is vital. This step protects the cookware and improves cooking performance. Proper care keeps the cast iron smooth and the enamel bright.
Both cast iron and enameled Dutch ovens need attention to maintain their quality. Each requires a different approach to restore and preserve their surface.
Re-seasoning Cast Iron
Cast iron Dutch ovens rely on seasoning for a natural non-stick surface. Burnt food can damage this layer, so re-seasoning helps restore it.
- Clean the pot thoroughly with warm water and a gentle scrubber.
- Dry completely to avoid rust.
- Apply a thin coat of vegetable oil or flaxseed oil inside and out.
- Heat the oven to 350°F (175°C) and place the Dutch oven upside down on the rack.
- Bake for one hour, then turn off the heat and let it cool inside the oven.
This process creates a protective layer and keeps the cast iron smooth. Repeat seasoning regularly to maintain the finish.
Maintaining Enamel Coating
Enamel-coated Dutch ovens have a glass-like surface that needs careful handling. Avoid harsh scrubbing to prevent chipping.
- Use warm soapy water and a soft sponge for cleaning.
- Remove stubborn stains with a paste of baking soda and water.
- Rinse well and dry with a soft cloth.
- Avoid metal utensils to protect the enamel surface.
- Store with the lid off to prevent moisture buildup.
Proper care preserves the glossy finish and extends the cookware’s lifespan. Handle enamel with care to keep it looking new.
Preventing Burnt Food In Future
Preventing burnt food in your Dutch oven saves time and effort during cleaning. It helps keep the cookware in great shape. Small changes in your cooking habits can reduce burnt residue significantly. Follow simple guidelines to protect your Dutch oven.
Cooking Tips
- Always preheat the Dutch oven on low to medium heat.
- Use enough oil or butter to create a non-stick surface.
- Stir food regularly to avoid sticking and burning.
- Add liquids like broth or water early in the cooking process.
- Cook slow and steady rather than fast and hot.
Proper Heat Control
- Avoid high heat settings that cause food to burn quickly.
- Use a heat diffuser if your stove runs hot.
- Reduce heat once the Dutch oven reaches the right temperature.
- Watch food closely during the last cooking minutes.
- Turn off heat slightly before the food is fully cooked.
Regular Maintenance
- Clean the Dutch oven after each use with warm water and mild soap.
- Dry it completely to prevent rust and damage.
- Season the cast iron Dutch oven regularly to maintain its coating.
- Check for cracks or chips that can trap food particles.
- Store with the lid off to avoid moisture buildup.

Frequently Asked Questions
How Do I Remove Burnt Food From A Dutch Oven?
Soak the Dutch oven in warm, soapy water for an hour. Use a non-abrasive scrubber to gently remove the burnt food. Baking soda paste can help loosen tough spots without damaging the surface.
Can I Use Vinegar To Clean Burnt Dutch Ovens?
Yes, vinegar effectively breaks down burnt residue. Boil a mixture of equal parts water and vinegar in the Dutch oven. Let it cool, then scrub gently to remove the burnt food.
What Household Items Clean Burnt Dutch Ovens Safely?
Baking soda, vinegar, and dish soap are safe and effective. Avoid harsh chemicals or abrasive tools that can damage the enamel coating. These household items clean thoroughly without scratching the surface.
Is It Safe To Use Steel Wool On A Dutch Oven?
No, steel wool can scratch and damage the enamel. Use soft sponges or nylon scrubbers instead. Gentle cleaning preserves the Dutch oven’s finish and prolongs its life.
Conclusion
Cleaning a Dutch oven with burnt food takes patience and care. Use gentle scrubbing tools to avoid damage. Baking soda and vinegar help lift tough stains. Soak the pot to make cleaning easier. Regular cleaning keeps your Dutch oven in good shape.
These simple steps save you time and effort. Your Dutch oven will look fresh and ready to cook again. Keep it clean to enjoy many delicious meals ahead. Easy and effective—no need to stress over burnt food.