Is your ice maker leaving you with cloudy or smelly ice? Cleaning your refrigerator’s ice maker might seem like a hassle, but it’s easier than you think—and it makes a big difference.
When you know the right steps, you can enjoy fresh, clear ice every time. In this guide, you’ll discover simple tips to clean your ice maker quickly and safely. Keep reading to learn how to keep your ice tasting great and your fridge running smoothly.
Preparing For Cleaning
Preparing to clean your refrigerator's ice maker sets the stage for a smooth process. Proper preparation helps avoid messes and ensures effective cleaning. Taking time to gather supplies and safely turn off the ice maker protects both you and your appliance.
Follow these steps to get ready before diving into the cleaning task.
Gather Necessary Supplies
Collect items needed for cleaning to avoid interruptions. Common supplies include:
- Mild dish soap
- Warm water
- Soft cloth or sponge
- Small brush or toothbrush
- Towel for drying
- Optional: white vinegar for disinfecting
Having everything ready keeps the process quick and efficient.
Turn Off The Ice Maker
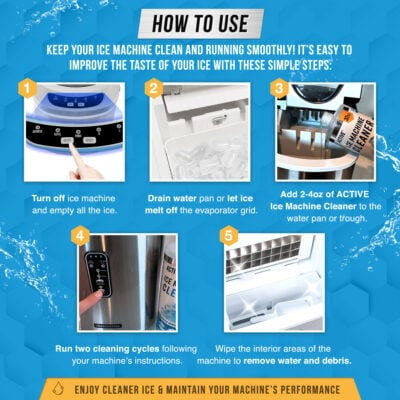
Switch off the ice maker to stop ice production. This prevents new ice from forming during cleaning. Locate the control switch or use the refrigerator’s settings panel.
Turning off the ice maker reduces water leaks and electrical risks.
Empty The Ice Bin
Remove all ice cubes from the bin and discard them. Old ice can harbor bacteria or odors. Take out the ice bin carefully to avoid spills.
Cleaning an empty bin is easier and more thorough. Place the bin on a towel or sink for cleaning.
Disassembling The Ice Maker
Disassembling the ice maker is a key step for thorough cleaning. It allows access to hidden parts where dirt and mold hide. Removing these parts carefully helps keep the ice fresh and safe. Follow these simple steps to disassemble your ice maker properly.
Remove The Ice Bin
The ice bin collects and stores ice cubes. It is usually easy to remove by sliding it out. Clear all ice cubes before removal to avoid spills. Use both hands to pull the bin gently but firmly. Place the bin on a clean surface for washing.
Detach Ice Maker Components
Detach small parts to clean them separately. These parts include the ice tray, ejector arm, and water inlet. Look for screws or clips holding the components in place. Use a screwdriver or your fingers to release them carefully. Keep track of all parts to avoid losing any.
Cleaning The Ice Maker Components
Cleaning the ice maker components is important for fresh, clear ice. Dirt and bacteria can build up inside the parts. Regular cleaning keeps your ice maker working well. It also helps stop bad smells and tastes in your ice. Focus on key parts like the ice bin, ice tray, and removable pieces for the best results.
Wash The Ice Bin
Remove the ice bin from the freezer carefully. Empty out any remaining ice cubes. Use warm water and mild soap to wash the bin. Scrub all surfaces gently with a soft cloth or sponge. Rinse the bin thoroughly to remove all soap. Dry the bin with a clean towel before placing it back.
Clean The Ice Tray
Take out the ice tray if your model has one. Fill a basin with warm water and a small amount of dish soap. Soak the tray for a few minutes to loosen dirt. Use a soft brush to clean each compartment well. Rinse the tray with clean water to remove soap. Dry completely before refilling with water.
Sanitize Removable Parts
Remove any other parts that come off easily. Prepare a sanitizing solution using one tablespoon of bleach per gallon of water. Soak the parts in this solution for five minutes. Rinse all parts with clean water to remove bleach. Let the parts air dry on a clean cloth. Sanitize regularly to keep bacteria and mold away.
Credit: collegeofems.com
Cleaning The Interior
Cleaning the interior of your refrigerator’s ice maker is important for fresh, clean ice. Dirt and mold can build up inside. This affects taste and safety. Regular cleaning keeps the ice maker working well.
Wipe Down The Interior
Start by unplugging the ice maker. Remove any ice cubes and trays. Use a soft cloth or sponge to wipe the inside. Focus on corners and crevices where dirt hides. Avoid harsh scrubbing that can damage parts.
Use warm water to dampen the cloth. This helps loosen grime. Wipe all surfaces gently. Dry the interior with a clean towel to prevent moisture buildup.
Sanitize With A Mild Solution
Prepare a mild cleaning solution using water and white vinegar or dish soap. Vinegar kills bacteria and helps remove odors. Avoid strong chemicals that can harm the ice maker.
- Mix one part vinegar with two parts water.
- Dip a clean cloth in the solution.
- Wipe the interior surfaces thoroughly.
- Let the solution sit for 5 minutes for better cleaning.
Rinse the cloth with clean water. Wipe again to remove any residue. Dry all surfaces completely before turning the ice maker back on. This stops mold and keeps ice fresh.
Reassembling The Ice Maker
Reassembling the ice maker is a careful process that ensures everything works properly. After cleaning, put each part back in its place. This keeps the ice maker running smoothly and makes fresh ice again.
Reattach Ice Maker Components
Start by reconnecting all the parts you removed. Check each piece for damage or wear before putting it back. Align the components carefully to avoid breaking any parts. Secure screws and clips tightly to keep parts stable. Make sure the wiring is connected correctly for the ice maker to function.
Replace The Ice Bin
Slide the ice bin back into its spot in the freezer. Make sure it fits snugly without forcing it. The bin should sit flat and not block the ice maker’s mechanism. Test by gently pulling the bin to confirm it stays in place. Proper placement helps the ice maker work without jams or spills.
Restarting The Ice Maker
Restarting the ice maker is the final step after cleaning. It helps ensure the machine works smoothly again. This process resets the system and clears any minor issues.
Turn On The Ice Maker
Locate the ice maker’s switch or lever inside the freezer. Flip the switch to the “on” position or push the lever down. Some models may have a button to press for restarting. Wait a few seconds for the ice maker to begin its cycle.
Test For Proper Function
Check if the ice maker starts making ice within 30 minutes. Listen for water filling the tray or ice dropping sounds. Inspect the ice bin after a few hours to confirm ice production. If ice does not form, repeat the restart steps or check for other issues.
Regular Maintenance Tips
Keeping your ice maker clean helps it work well and last longer. Regular maintenance stops dirt and grime from building up. It also keeps the ice fresh and safe to use.
Simple, regular checks make a big difference. You can avoid big problems by staying on top of small tasks. These tips guide you to keep your ice maker in good shape all year.
Schedule Regular Cleanings
Set a cleaning routine every few months. Use warm water and mild detergent to clean parts. Remove ice and unplug the machine before cleaning. Rinse all surfaces well to remove soap. Dry with a clean cloth before turning it back on.
Monitor Ice Quality
Look at the ice often. Clear and odorless ice means the machine is clean. Cloudy or smelly ice signals a need for cleaning. Check for unusual shapes or stuck ice cubes. These signs show buildup or blockages inside the machine.
Check For Leaks
Watch for water puddles near the ice maker. Leaks can damage your fridge and waste water. Inspect water lines and connections regularly. Tighten loose fittings and replace damaged hoses. Fix leaks quickly to keep your ice maker working well.

Credit: www.searshomeservices.com

Credit: www.housework.com
Frequently Asked Questions
How Often Should I Clean My Refrigerator Ice Maker?
Clean your ice maker every 3 to 6 months. Regular cleaning prevents mold, bacteria, and bad odors. It ensures fresh, clean ice and improves appliance efficiency.
What Supplies Do I Need To Clean An Ice Maker?
You need warm water, mild detergent, a soft cloth, and a toothbrush. Avoid harsh chemicals or abrasive tools to protect the ice maker parts.
Can I Use Vinegar To Clean My Ice Maker?
Yes, vinegar is effective for removing mineral deposits. Mix vinegar with water, clean the ice tray and parts, then rinse thoroughly to avoid taste issues.
How Do I Safely Disconnect The Ice Maker For Cleaning?
Turn off the refrigerator and unplug it. Shut off the water supply and remove the ice bin carefully before cleaning to avoid leaks or damage.
Conclusion
Cleaning your refrigerator’s ice maker keeps ice fresh and tasty. Regular care stops bad smells and clogs. It also helps the ice maker work well longer. Use simple cleaning steps and mild cleaners to avoid damage. Remember to clean every few months or when ice tastes odd.
A clean ice maker means cleaner ice for your drinks. Keep it tidy, and enjoy fresh ice anytime. Easy to do, and worth the effort.