Is your Ge refrigerator’s water not tasting as fresh as it used to? Changing the water filter might be the simple fix you need.
You don’t have to call a technician or spend hours figuring it out. With just a few easy steps, you can replace the filter yourself and enjoy clean, crisp water again. In this guide, you’ll learn exactly how to change the water filter in your Ge refrigerator quickly and without hassle.
Keep reading—you’re just moments away from fresher water at home.
Signs To Replace Your Water Filter
Knowing when to replace your water filter in a GE refrigerator is key to keeping your water clean and tasting fresh. Ignoring signs of a clogged filter can lead to poor water quality and even damage your appliance. Pay attention to these signals so you can act before problems arise.
Common Indicators Of A Clogged Filter
You might notice your water flow slows down significantly. This is often the first sign the filter is clogged. Another clear indicator is if your ice maker starts producing smaller or oddly shaped ice cubes.
Look for any unusual noises coming from the water dispenser. These sounds can mean the filter is struggling to push water through. If your refrigerator has a filter replacement indicator light, don’t ignore it—it’s there for a reason.
Impact On Water Taste And Quality
Have you ever tasted water from your fridge and noticed a strange or bitter flavor? That’s a strong hint your filter needs changing. A clogged filter can’t remove impurities properly, leading to unpleasant taste and odor.
Cloudy or discolored water is another warning sign. Drinking water that looks off can be unsafe, so don’t take chances with your family’s health. Changing the filter regularly ensures your water stays crisp and clean every time.
Credit: www.consumerreports.org
Tools Needed For Replacement
Changing the water filter in a GE refrigerator is simple with the right tools. Having these tools ready saves time and effort. It also helps avoid mistakes during replacement.
Gathering everything before starting makes the process smooth. Knowing what you need prevents interruptions. Here is a list of tools to prepare.
Essential Items To Have Ready
- New GE water filter compatible with your model
- Soft cloth or towel to catch drips
- Bucket or small container for excess water
- Gloves to keep hands clean and dry
- Flathead screwdriver for some filter covers
- Flashlight for better visibility inside the fridge
Safety Precautions
- Turn off the water supply before starting
- Unplug the refrigerator for electrical safety
- Wear gloves to avoid contact with water or sharp edges
- Keep the area dry to prevent slips or falls
- Handle the filter carefully to avoid damage
Locating The Water Filter
Locating the water filter in a GE refrigerator is simple. Knowing its exact position makes replacement easier. Most models have standard spots for the filter. Recognizing these spots saves time and effort.
Typical Filter Positions In Ge Refrigerators
The water filter usually sits in one of these places:
- Inside the refrigerator compartment, near the top right or left corner
- At the base grille, just below the fridge doors
- Behind a small door or panel inside the fridge
Filters are often easy to spot. They are usually white or clear with a twist or push mechanism.
Accessing The Filter Compartment
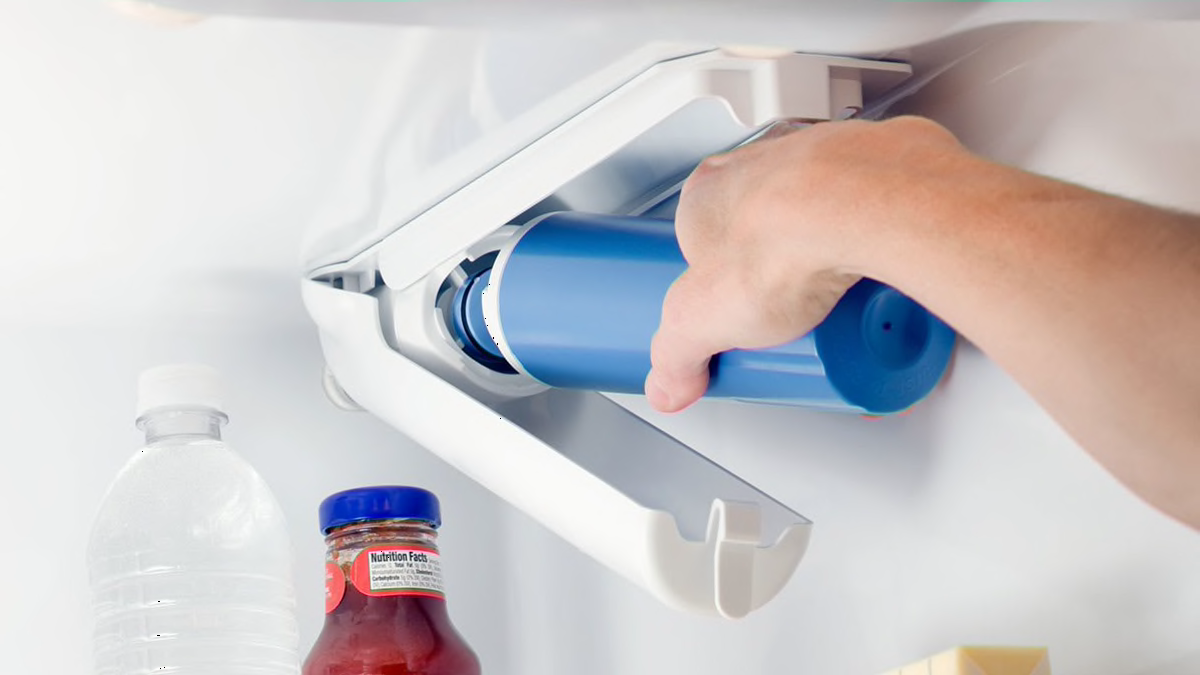
Open the fridge door fully. Look for a round or rectangular cover. This cover protects the filter.
Push or twist the cover to open it. Some models use a button release. Others require a gentle pull.
Once open, the filter should be visible. It may have arrows or instructions printed nearby. These guide the filter removal and installation.
Removing The Old Filter
Gently twist and pull out the old filter from the GE refrigerator. Dispose of it responsibly.
Removing the old water filter from your GE refrigerator is essential. This ensures the appliance functions efficiently. Start by locating the filter. It is usually inside the fridge or at the base. Before beginning, gather necessary tools and have a towel ready.
Step-by-step Removal Process
- Open the refrigerator door or panel where the filter is located.
- Turn the filter counterclockwise to unlock it.
- Gently pull the filter out from its housing.
- Ensure the O-rings are not stuck inside the housing.
Handling The Used Filter
Dispose of the used filter responsibly. Check local regulations for recycling. Place the used filter in a plastic bag if it drips. Avoid spilling residual water on the floor. This keeps your kitchen tidy and safe.
Installing The New Filter
Installing the new water filter in your GE refrigerator is a straightforward process that ensures clean, fresh-tasting water and ice. Handling this step carefully can prevent leaks and maintain the quality of your water. Let’s focus on how to prepare the new filter and install it correctly so you avoid common mistakes and keep your refrigerator running smoothly.
Preparing The Replacement Filter
Start by removing the new filter from its packaging. Take a moment to check for any protective caps or seals on the filter and remove them before installation. These caps are often easy to overlook but must come off to allow water flow.
Next, give the filter a quick rinse under cold water for about 2 minutes. This step flushes out any loose carbon particles that might cause discoloration or taste issues. Have you ever noticed black specks in your water right after changing a filter? This rinse helps prevent that.
Make sure your hands are clean before handling the filter to avoid introducing dirt or oils that could affect the filter's performance. Also, compare the new filter with the old one to confirm it’s the exact model recommended for your GE refrigerator.
Proper Installation Techniques
Locate the filter housing inside your refrigerator, usually in the upper right corner or in the grille at the base. Align the new filter properly with the housing; the tabs or arrows on the filter should match the slots or markings on the housing.
Push the filter firmly into place but don’t force it. It should click or twist into position smoothly. If you feel resistance, double-check the alignment to avoid damaging the filter or housing.
After installing, run water through your dispenser for about 3 to 5 minutes to flush the system. This clears any trapped air and primes the new filter. Have you noticed your dispenser sputtering right after a change? That’s normal and usually settles quickly with flushing.
Finally, reset the filter indicator light on your refrigerator's control panel to remind yourself when the next replacement is due. This small step helps you maintain water quality and avoid forgetting future changes.

Credit: www.searshomeservices.com
Resetting The Filter Indicator
Resetting the filter indicator on your GE refrigerator is essential after changing the water filter. This step helps the fridge recognize the new filter and stops the reminder light. A reset ensures the filter status is accurate, keeping your water fresh and clean. Different GE models have unique ways to reset the indicator. Knowing the right method saves time and avoids confusion.
Methods For Different Ge Models
GE refrigerators use various control panels. Each model may require a different reset process. Some models have a touchpad, others use buttons. Follow these common methods:
- Touchscreen Models:Press and hold the "Filter Reset" or "Reset Water Filter" button for 3 to 5 seconds. The indicator light should turn off.
- Button-Control Models:Press and hold the "Water Filter" button or "Alarm/Reset" button until the light blinks or turns off.
- Models without a Reset Button:Press and hold the "Ice Type" or "Light" button for several seconds. Check your user manual for exact instructions.
Verifying The Reset
After resetting, check the filter indicator light. It should be off or show a green light. If it still shows red or orange, repeat the reset steps. Run water through the dispenser to confirm the filter works properly. Regularly checking helps maintain water quality and appliance performance.
Flushing The New Filter
Flushing the new filter in your GE refrigerator is a key step after installation. It clears out any loose particles and activates the filter. This process helps improve water taste and ensures clean, fresh water.
Why Flushing Is Important
New filters contain small carbon dust and debris. Flushing removes these impurities before use. It stops cloudy or bad-tasting water from coming out. Flushing also helps the filter work at its best. Without flushing, the water flow might be slow or uneven.
How To Flush Correctly
Start by running water through the dispenser for several minutes. Use cold water only to protect the filter. The water should run continuously without pauses.
- Place a large container under the dispenser.
- Press and hold the water dispenser lever.
- Keep water running for about 5 minutes or 2-3 gallons.
- Check for clear water flow without particles.
After flushing, discard the first batch of water. This water may contain trapped dust and is not for drinking. Your filter is now ready to provide clean, fresh water daily.

Credit: www.searshomeservices.com
Troubleshooting Common Issues
Troubleshooting common issues while changing the water filter in your GE refrigerator can save you time and frustration. Some problems might seem tricky, but most have simple solutions you can handle yourself. Let’s look at two frequent issues you might face and how to fix them effectively.
Leaks And Water Flow Problems
If you notice leaks around the filter area or weak water flow, start by checking if the filter is properly installed. A loose or improperly seated filter often causes leaks. Turn off the water supply before removing the filter to avoid a mess.
Inspect the O-rings or seals on the filter. If they’re cracked or missing, water can escape. Replacing these small parts can stop leaks instantly. Also, dirt or debris in the filter housing might block water flow. Cleaning the housing gently with a damp cloth can help restore proper flow.
Have you checked the water pressure in your home? Low pressure can reduce water flow through the filter. Try running water from other faucets to compare. If pressure is consistently low, contacting a plumber might be necessary.
Filter Indicator Not Resetting
The filter indicator light is a handy reminder, but sometimes it won’t reset after changing the filter. This can confuse you about when to replace the filter next. Make sure you follow the reset instructions exactly as per your model’s manual.
Usually, holding down the reset button for a few seconds does the trick. If this doesn’t work, try unplugging the refrigerator for a minute and plugging it back in before attempting the reset again. Sometimes, the electronic system just needs a quick reboot.
If the indicator still won’t reset, check if you’re using a genuine GE filter. Non-genuine filters can interfere with the sensor’s ability to reset. Using the correct filter often solves this issue immediately.
Frequently Asked Questions
How Often Should I Change The Water Filter In A Ge Refrigerator?
You should replace the water filter every 6 months or after filtering 300 gallons. This ensures clean water and optimal refrigerator performance.
What Tools Do I Need To Change A Ge Refrigerator Water Filter?
No special tools are required. Typically, you only need your hands to twist and remove the old filter and install the new one.
How Do I Locate The Water Filter In My Ge Refrigerator?
The water filter is usually inside the fridge compartment, near the top right corner or at the base grille, depending on the model.
Can I Use Any Water Filter For My Ge Refrigerator?
No, use only GE-approved water filters. Using the wrong filter can harm water quality and damage your refrigerator.
Conclusion
Changing the water filter in your GE refrigerator keeps water clean and fresh. It takes only a few minutes and needs no special tools. Replace the filter every six months for best results. Clean water means better taste and healthier drinks for your family.
Remember these simple steps next time you change the filter. Keep your refrigerator working well and enjoy fresh water all year. Easy, quick, and important. You’ve got this!