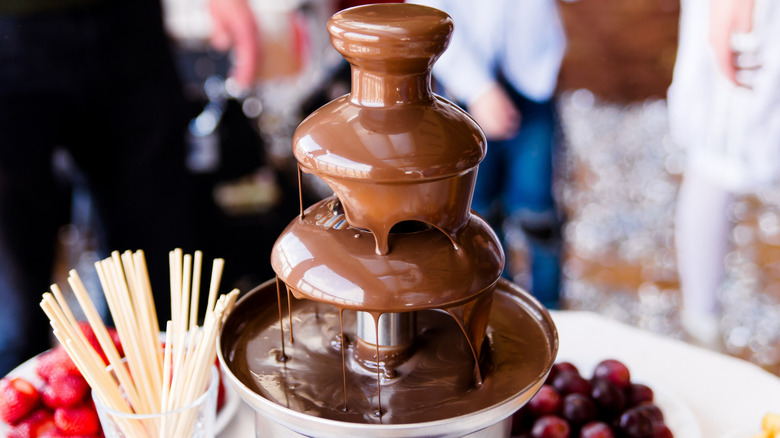
Are you ready to make your next party unforgettable with a chocolate fountain? Before you see that smooth, flowing chocolate cascade, you need to master one key step: melting the chocolate just right.
If your chocolate is too thick or burns, the fountain won’t work properly—and your guests might be disappointed. But don’t worry, melting chocolate for a fountain is easier than you think. In this guide, you’ll discover simple, foolproof tips to get perfectly melted chocolate every time.
Keep reading, and soon you’ll be dipping fruits, marshmallows, and more into a delicious, glossy chocolate waterfall that everyone will love!
Choosing The Right Chocolate
Choosing the right chocolate is the first and most crucial step in creating a smooth, flowing chocolate fountain. Not all chocolates behave the same when melted, and using the wrong type can clog your fountain or leave you with a less enjoyable experience. Understanding what makes chocolate fountain-friendly can save you time and frustration.
Types Of Chocolate Suitable For Fountains
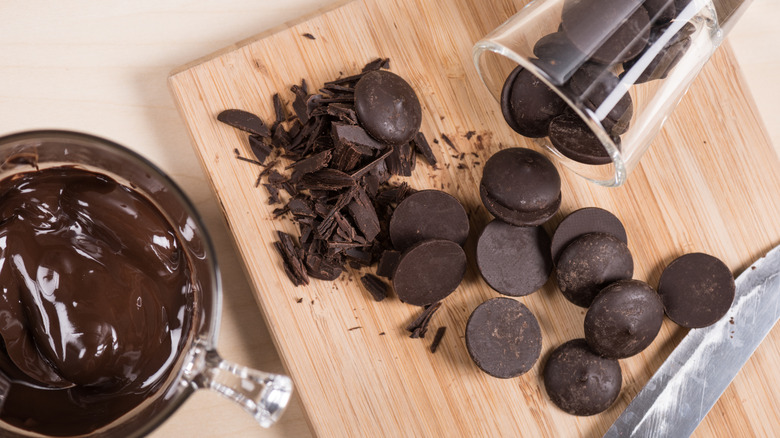
Not every chocolate bar or chip will work well in a fountain. You want chocolate that melts easily and flows smoothly without hardening quickly.
- Couverture Chocolate:This is the preferred choice. It contains higher cocoa butter, which helps it melt evenly and stay liquid.
- Chocolate Chips:Regular chips often don’t melt smoothly because they are designed to hold their shape during baking. Look for those labeled as “melting” or “baking” chocolate.
- Chocolate Melting Wafers:These are specially made for melting and are easy to use but may lack rich flavor compared to couverture.
Have you ever noticed how some chocolates get lumpy or thick as they melt? That’s exactly what you want to avoid with a fountain.
Importance Of Cocoa Butter Content
Cocoa butter is the fat in chocolate that makes it silky and smooth when melted. The right amount of cocoa butter determines how well your chocolate will flow.
Chocolate with low cocoa butter tends to be thick and clumpy, which can clog your fountain. High cocoa butter chocolates melt into a glossy, liquid form perfect for cascading.
If your chocolate doesn’t have enough cocoa butter, you can add a small amount of vegetable oil to improve flow, but starting with a quality chocolate high in cocoa butter is better. Have you checked the ingredient list on your chocolate before melting it for your fountain?
Credit: www.chowhound.com
Preparing Chocolate For Melting
Preparing chocolate for melting is an essential step to ensure your chocolate fountain flows smoothly and tastes perfect. The way you handle the chocolate before melting can affect its texture, consistency, and shine. Taking time to prepare it properly makes your chocolate fountain experience much more enjoyable.
Chopping And Measuring Chocolate
Start by chopping your chocolate into small, even pieces. This helps the chocolate melt more evenly and prevents burning. You want pieces that are roughly the same size so they all melt at the same rate.
Next, measure the chocolate carefully. Most fountains require a specific amount of chocolate to work correctly. Too little chocolate can cause the flow to stop, and too much can overflow your fountain.
Using a kitchen scale is the easiest way to get the right amount. If you don’t have one, use measuring cups and remember that chocolate chips and chopped chocolate don’t weigh the same even if the volume looks similar.
Avoiding Moisture Contamination
Chocolate and water don’t mix well. Even a tiny drop of moisture can cause your chocolate to seize and turn grainy. This happens because water makes the sugar in chocolate clump together.
Keep all your utensils and bowls completely dry before starting. Avoid steam from kettles or pots near your chocolate. If you accidentally get water in the chocolate, try adding a little vegetable oil or cocoa butter to smooth it out, but prevention is always better.
Have you ever noticed your chocolate turning thick and clumpy? That’s usually moisture contamination. Taking care to keep everything dry will save you frustration and keep your chocolate fountain running perfectly.
Melting Methods
Melting chocolate for a chocolate fountain requires care and the right method. The goal is smooth, flowing chocolate without burning or seizing. Using gentle heat sources helps achieve the perfect melt. Here are common ways to melt chocolate safely.
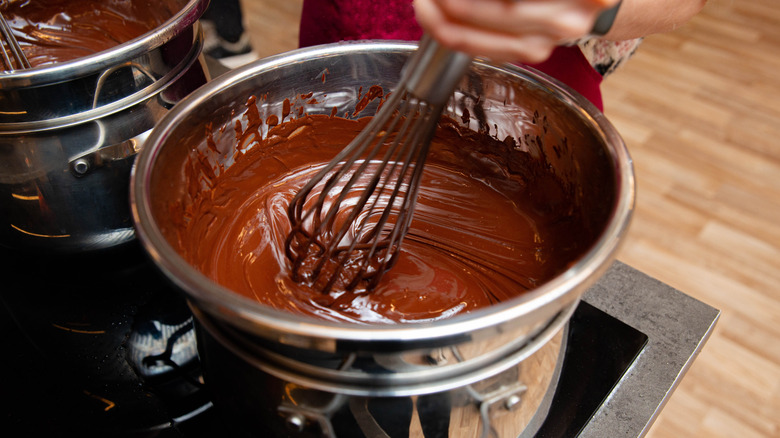
Using A Double Boiler
A double boiler uses steam heat to melt chocolate slowly. Place a heatproof bowl over a pot of simmering water. Make sure the bowl does not touch the water. Stir chocolate often until it melts completely. This method prevents direct heat, reducing burning risk. It gives you control over the melting process.
Microwave Melting Technique
Microwaving chocolate is fast and easy. Use a microwave-safe bowl and chop chocolate into small pieces. Heat in short bursts of 15 to 20 seconds. Stir between each burst to distribute heat evenly. Stop heating when most chocolate is melted. Stirring finishes melting the rest. This method requires close attention to avoid overheating.
Slow Cooker Option
A slow cooker can melt large amounts of chocolate gently. Set it on low heat and place chocolate inside. Stir occasionally to ensure smooth melting. This hands-off method suits long events or parties. It keeps chocolate warm and ready for the fountain without burning.
Achieving The Perfect Consistency
Melting chocolate for a fountain requires smooth, creamy texture without lumps. Gently heat chocolate in short bursts, stirring often to keep it even. Achieving the right flow means avoiding overheating and adding a little oil if needed.
Achieving the perfect consistency for a chocolate fountain can be a delightful experience. The key lies in ensuring the chocolate flows smoothly without clumps. This requires careful melting and the right additives. Let's explore how to achieve that perfect, silky flow.
Adding Oil Or Cocoa Butter
Using oil or cocoa butter helps in thinning the chocolate. It ensures a smooth and consistent flow. Choose a neutral oil like vegetable or canola. About one tablespoon of oil per cup of chocolate works well. Cocoa butter is also a great alternative. It maintains the chocolate’s rich taste. Melt the chocolate over low heat first. Then add the oil or cocoa butter slowly. Stir gently to mix it evenly. Ensure no lumps remain for the best texture.
Stirring Tips For Smooth Texture
Stirring is crucial for a smooth chocolate texture. Use a silicone spatula to stir the chocolate. It helps in scraping the sides of the bowl. Stir continuously while melting to prevent burning. If chocolate is too thick, add a bit more oil. This helps achieve the ideal consistency. Avoid water contact to prevent seizing. Keep the heat low to maintain the chocolate’s quality.
Maintaining Chocolate Temperature
Maintaining the right temperature for your chocolate is key to keeping it smooth and flowing perfectly in your chocolate fountain. If the chocolate gets too hot, it can burn or seize, ruining the texture. Too cool, and it will thicken or stop flowing altogether, which can be frustrating during your event.
Ideal Temperature Range
Chocolate for fountains should stay warm but never overheated. The ideal temperature range is typically between 110°F to 120°F (43°C to 49°C). Within this range, the chocolate remains fluid and glossy, making it easy to dip fruits or treats without clumps.
Have you noticed your chocolate thickening after a while? That’s usually a sign it’s dropping below this range. Using a kitchen thermometer can help you keep a constant check, so you don’t have to guess or rely on appearance alone.
Using Fountain Heater Effectively
Your fountain’s built-in heater is designed to hold chocolate at the right temperature, but it’s important to use it wisely. Turn the heater on before adding the melted chocolate to ensure the base is warm enough to prevent sudden cooling.
If you’re running the fountain for hours, adjust the heat setting if your model allows it. Too high, and the chocolate might burn; too low, and it will thicken. Stir the chocolate occasionally with a heatproof spatula to distribute warmth evenly.
Ever tried topping off your fountain mid-event? If you add more chocolate, melt it separately and warm it to the ideal range before pouring it in. This avoids temperature shocks that can cause clumps or blockages in the flow.
Troubleshooting Common Issues
Troubleshooting common issues with melting chocolate for your chocolate fountain can save your event from last-minute stress. Melting chocolate seems straightforward, but problems like seizing or graininess can turn your smooth flow into a sticky mess. Knowing how to fix these issues quickly helps keep your fountain running perfectly.
Fixing Seized Chocolate
Seized chocolate happens when a small amount of water touches the chocolate, causing it to clump and become grainy. If this happens, don’t panic. You can fix it by slowly adding a teaspoon of warm milk or cream while stirring constantly until the chocolate smooths out again.
Keep your utensils and bowls completely dry before starting to melt chocolate. Even a drop of water can cause seizing. Have you ever noticed how a tiny splash can ruin an entire batch? That’s why drying everything well is crucial.
Handling Clumps And Graininess
If your melted chocolate looks grainy or has small clumps, it might have overheated or been stirred too vigorously. To fix this, gently heat the chocolate over a double boiler, stirring slowly and steadily.
Another trick is to strain the melted chocolate through a fine mesh sieve to remove any lumps. This step can make a big difference if you want a silky flow in your fountain.
Also, consider the chocolate type you use. Chocolates with added ingredients like nuts or fillings can cause clumps. Stick to high-quality couverture chocolate designed for melting to avoid this issue.
Cleaning And Storing Chocolate Fountain
Cleaning and storing your chocolate fountain properly ensures it stays in great condition for many delicious events to come. Neglecting this can lead to clogged mechanisms or leftover chocolate turning rancid, which no one wants. Taking time to clean and store the fountain carefully saves you frustration and keeps your chocolate flowing smoothly.
Post-use Cleaning Tips
After your chocolate fountain has been used, it’s crucial to clean it before the chocolate hardens. Start by unplugging the fountain and letting it cool down a bit, but not completely so the chocolate remains soft and easier to remove.
- Remove any leftover chocolate by gently scraping it off with a soft spatula or cloth.
- Disassemble the fountain parts according to the manufacturer’s instructions.
- Wash all removable pieces with warm, soapy water—avoid harsh scrubbing to prevent damage.
- Use a soft brush or cloth to clean the base and motor area carefully, wiping away any chocolate residue.
- Dry all parts thoroughly before reassembling or storing to prevent mold or rust.
Have you ever left chocolate to dry on your fountain? It turns into a stubborn mess that's tough to clean. Cleaning right away helps avoid this hassle.
Proper Storage For Next Use
Once your fountain is clean and dry, storing it correctly is just as important. Keep all parts together in a clean, dry box or container to prevent dust and dirt buildup.
- Store the fountain in a cool, dry place away from direct sunlight to avoid damage to plastic or metal parts.
- Wrap cords and small components separately to prevent tangling or loss.
- Consider labeling the storage container with the date of last use to remind yourself when it’s time for another clean before the next event.
Have you noticed how a well-stored fountain works better the next time you use it? Proper storage keeps your investment safe and ready for more chocolatey fun.
Credit: www.chowhound.com
Credit: www.chowhound.com
Frequently Asked Questions
How Do You Melt Chocolate For A Fountain?
Melt chocolate using a double boiler or microwave to avoid burning. Stir frequently until smooth. Use chocolate with added cocoa butter for best flow.
What Chocolate Is Best For Chocolate Fountains?
Choose couverture or fountain-specific chocolate. These chocolates have higher cocoa butter content, ensuring smooth flow. Avoid regular baking chocolate; it clogs the fountain.
Can You Melt Chocolate In A Microwave Safely?
Yes, microwave chocolate in short bursts (15-20 seconds). Stir between intervals to prevent overheating and burning. Use low power for even melting.
How Much Chocolate Do I Need For A Fountain?
Calculate chocolate quantity based on fountain size, usually 2-3 pounds for a small fountain. Overfilling causes overflow; underfilling can clog the pump.
Conclusion
Melting chocolate for a fountain is simple with the right steps. Use low heat to avoid burning the chocolate. Stir often to keep it smooth and shiny. Choose good quality chocolate for the best flow. Patience helps achieve perfect texture every time.
Enjoy your chocolate fountain at parties or gatherings. Your guests will love the rich, melted chocolate. Keep practicing to get better and more confident. This easy process makes any event sweeter and more fun.