Have you ever wanted to make a cute, fluffy pom pom but didn’t have the special tools? What if I told you that all you need is a simple fork sitting right in your kitchen drawer?
Yes, you can create perfect pom poms quickly and easily using just a fork. In this guide, you’ll discover step-by-step how to turn everyday items into charming decorations. Ready to add a fun, creative touch to your crafts? Keep reading, and you’ll be amazed at how simple and satisfying this trick is.
Materials Needed
Making a pom pom with a fork is simple and fun. You need just a few materials to start. Choosing the right yarn and having the proper tools makes the process easy. Gather everything before you begin to save time and avoid frustration.
Choosing The Right Yarn
Pick a yarn that is soft and easy to wrap. Acrylic or wool yarn works well. Choose a medium-thickness yarn for the best results. Bright colors make your pom pom look lively. Avoid very thin or very thick yarn as it can be hard to work with.
Tools Required
- A standard fork with wide tines
- Scissors to cut the yarn
- A small piece of string or yarn to tie the pom pom
- A ruler to measure yarn length (optional)
These simple tools are usually found at home. No need for special craft supplies. Having sharp scissors makes cutting easier and cleaner.
Credit: www.lauraradniecki.com
Preparing The Fork
Preparing the fork is an important part of making a pom pom. The right fork helps you wrap the yarn easily and keeps the pom pom neat. Taking a moment to prepare the fork makes the whole process smoother and more fun.
Selecting The Fork Size
Choose a fork that fits your pom pom size. A small fork works well for tiny pom poms. A larger fork helps with bigger, fluffier pom poms. Check the number of tines too. Four-tine forks are common and easy to use. Avoid forks with very wide spaces between tines. The yarn can slip through and make wrapping hard.
Cleaning And Safety Tips
- Wash the fork with warm water and soap before use.
- Dry it well to avoid slipping while wrapping yarn.
- Use a fork that is not sharp to avoid yarn damage.
- Check for bent or broken tines to prevent accidents.
- Keep the fork away from children when not in use.
Wrapping The Yarn
Wrapping the yarn around the fork is the key step in making a pom pom. It creates the thickness and fluffiness of the final product. The way you wrap the yarn affects the shape and fullness of your pom pom. Taking time to wrap evenly and using the right amount of yarn gives the best results.
How Much Yarn To Use
The amount of yarn you wrap affects how full your pom pom will be. Use more yarn for a bigger, fluffier pom pom. Less yarn makes a smaller, tighter pom pom. A good start is to wrap the yarn around the fork 50 to 100 times. You can add more wraps if you want a denser pom pom.
Thick yarn needs fewer wraps, while thin yarn needs more. Keep the yarn thickness in mind as you wrap.
Techniques For Even Wrapping
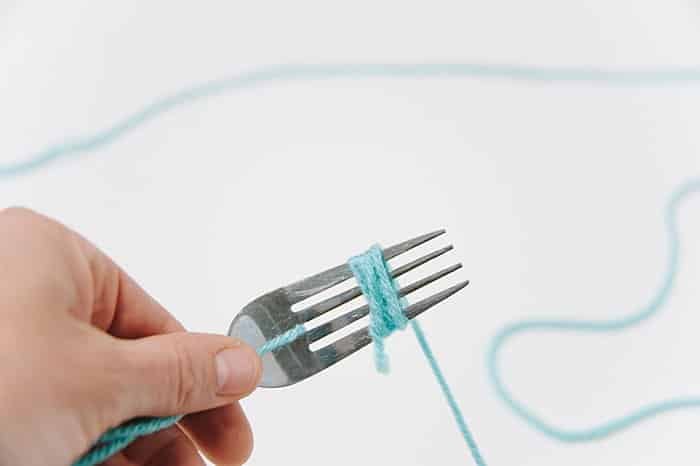
Even wrapping helps your pom pom look neat and round. Hold the fork steady and wrap the yarn around the prongs carefully. Try to cover the entire width of the fork evenly.
- Wrap the yarn smoothly without gaps or bunches.
- Keep the yarn tension firm but not too tight.
- Make sure the yarn lies flat and does not twist.
- Change wrapping direction slightly to fill all spaces.
Even wrapping creates a balanced shape and makes trimming easier later. Take your time and wrap slowly for the best effect.

Credit: www.momsandcrafters.com
Tying The Pom Pom
Tying the Pom Pom Create a colorful pom pom using a fork. Wrap yarn around the fork, then tie it tightly in the middle. Slide off the fork, cut the loops, and fluff to shape.
Creating a pom pom with a fork is a fun and easy craft that anyone can try. The magic moment of pom pom making is when you tie the yarn to secure your fluffy creation. This step might seem simple, yet it’s crucial for ensuring your pom pom stays intact.
Choosing The Right Knot
Selecting the appropriate knot can make all the difference in the durability of your pom pom. A double knot is often recommended because it holds tightly. You might wonder why a double knot? Well, it provides extra security, ensuring your pom pom doesn’t unravel over time. Have you ever had a pom pom fall apart unexpectedly? A double knot can prevent those crafting disasters.
Securing The Yarn Properly
Properly securing the yarn is key to a well-formed pom pom. Begin by wrapping the yarn tightly around the center of your fork. Once you have your knot, pull it as snugly as possible. A tight tie ensures that the strands stay in place, maintaining the round shape of your pom pom. Think of how satisfying it feels when you pull that final string and everything just stays put. Your pom pom will thank you for the extra effort, rewarding you with a perfectly rounded, fluffy creation every time.
Cutting And Shaping
After wrapping your yarn around the fork, the next important phase is cutting and shaping your pom pom. This stage determines how neat and fluffy your pom pom will look. Taking your time here will pay off with a polished, professional finish.
Trimming The Yarn Ends
Start by carefully sliding the yarn bundle off the fork. Hold it tightly in the middle, where you tied it, to keep everything together.
Use sharp scissors to cut through the loops on both ends of the yarn. Be precise—uneven cuts make your pom pom look messy.
At this point, you might notice some strands longer than others. Don’t rush to cut everything at once. Instead, go over the edges slowly to avoid cutting too much.
Creating A Round Shape
Once the yarn ends are trimmed, your pom pom will look like a rough ball of yarn. Now, it’s time to shape it perfectly round.
Use your scissors to carefully trim any stray longer strands, rotating the pom pom as you go. Focus on symmetry—check the shape from all angles.
Ask yourself: does it look balanced? If not, trim a little more from the fuller sides. This process takes patience but results in a neat, fluffy pom pom ready for any project.
Creative Variations
Adding creative variations to your pom pom-making process can turn a simple craft into something truly unique and fun. Experimenting with colors and sizes not only enhances the visual appeal but also allows you to tailor your pom poms to fit different projects. Have you ever thought about how small changes can make a big impact?
Using Different Yarn Colors
Mixing yarn colors is a simple way to create eye-catching pom poms. You can wrap multiple colors around the fork at once to get a blended, multicolored effect. Try alternating between two or three shades to make stripes or a gradient look.
Using variegated yarns that naturally change colors adds a surprise element as you wrap. Don’t hesitate to combine contrasting colors like bright red with soft pastels for a bold statement. How could you match your pom poms to your room décor or gift wrapping?
Making Mini Pom Poms
Mini pom poms are adorable and perfect for adding detail to crafts like keychains, phone charms, or even doll clothes. To make smaller pom poms, use a smaller fork or wrap less yarn around the tines. The tighter you wrap, the fluffier and denser your mini pom pom will be.
These tiny pom poms can be grouped together for a fun texture or scattered individually for subtle decoration. Have you tried using mini pom poms to brighten up your stationery or accessories? They offer endless possibilities for small but impactful accents.
Common Mistakes To Avoid
Making a pom pom with a fork is a fun and simple craft, but there are some common mistakes that can turn your fluffy creation into a frustrating project. Avoiding these pitfalls can save you time and help you achieve a perfect, full pom pom every time. Let’s look at two key areas where crafters often slip up and how you can fix them.
Loose Ties
One of the biggest issues is not tying the yarn tightly enough around the fork. If your tie is loose, the pom pom will fall apart or look messy. Think about how you secure your shoelaces—if they’re too loose, they come undone easily.
After wrapping your yarn, use a strong knot and pull it as tight as possible before cutting. You can even double knot for extra security. If you’ve ever had a pom pom unravel in the middle of your project, this is usually why.
Uneven Cutting
Cutting the yarn unevenly after wrapping can leave your pom pom looking lopsided or sparse on one side. It’s tempting to rush this part, but careful trimming makes all the difference. Imagine trimming a haircut unevenly—it doesn’t look good and takes more effort to fix.
Use sharp scissors and take your time cutting each loop on the fork. Rotate the pom pom as you cut to keep the shape balanced. If you notice some strands are longer, trim them down gradually instead of all at once.

Credit: www.clairefairalldesigns.com
Pom Pom Uses And Ideas
Pom poms made with a fork are small, colorful, and easy to create. But what can you do with them? These little balls of yarn add a fun and creative touch to many everyday items. Whether you want to brighten up your wardrobe or add personality to your living space, pom poms offer endless possibilities.
Decorating Clothing
Adding pom poms to your clothes is a simple way to customize your style. You can sew them along the edges of a sweater or scarf to give it a playful look.
Try attaching pom poms to the tips of shoelaces or the corners of a hat. This small detail can make your outfit stand out and show off your creativity.
Have you ever thought about transforming a plain bag with pom poms? They are perfect for creating a unique accessory that matches your personality.
Home Decor Projects
Pom poms are perfect for brightening up your living space. String them together to make colorful garlands for your walls or windows.
Try gluing pom poms around the edges of cushions or picture frames to add texture and warmth to your home.
Have you considered making a pom pom rug or coaster? These projects are not only fun but also add a cozy, handcrafted feel to any room.
Frequently Asked Questions
How Do You Start Making A Pom Pom With A Fork?
Begin by wrapping yarn around the fork’s tines about 30-40 times. This creates the pom pom’s fullness and shape.
What Type Of Yarn Works Best For Fork Pom Poms?
Use medium-thickness yarn like acrylic or wool. These yarns are easy to wrap and create fluffy, durable pom poms.
How Do You Secure Yarn When Making A Fork Pom Pom?
Tie a tight knot with a separate yarn piece around the wrapped yarn at the fork’s base. This holds the shape firmly.
How Do You Finish Trimming A Fork-made Pom Pom?
Slide the wrapped yarn off the fork carefully. Trim uneven ends evenly to form a round, fluffy pom pom.
Conclusion
Making a pom pom with a fork is simple and fun. You only need yarn, a fork, and scissors. Wrap the yarn around the fork, tie it tightly, and cut the loops. This easy craft adds a soft touch to hats, scarves, or gifts.
Try different yarn colors for unique results. With just a few steps, you can create cute pom poms anytime. Give it a try and enjoy your new skill!