Have you ever tried to cook a meal only to find that your stove won’t light? The pilot light is the small flame that keeps your stove ready to use, but when it goes out, it can be frustrating and confusing.
Don’t worry—lighting a pilot light is easier than you think. In this guide, you’ll discover simple, step-by-step instructions to get your stove working safely and quickly. Keep reading, and you’ll be back to cooking in no time.

Credit: www.homeofintegrity.com
Check Stove And Safety
Before you light the pilot light on your stove, it's important to check the stove and ensure safety measures are in place. Taking these precautions can prevent accidents and protect you from gas leaks or fire hazards. Let’s look at some essential safety checks you should perform.
Turn Off Gas Supply
Always make sure the gas supply to your stove is completely turned off before you start. This prevents any unexpected gas leaks while you’re working. Locate the gas valve and twist it to the off position; it’s usually near the stove or on the gas line.
Have you ever smelled gas before lighting a pilot? If so, don’t ignore it. Turn off the gas immediately and ventilate the area before proceeding.
Ventilate The Area
Open windows and doors to allow fresh air in. Proper ventilation helps clear any gas that might have leaked, reducing the risk of an explosion. You want the area well-ventilated, but avoid creating strong drafts that could blow out a pilot light once lit.
Consider using a fan to increase airflow if the room is small or poorly ventilated. Safety is your top priority, so never skip this step even if you think no gas is present.
Inspect Pilot Light Area
Take a close look at the pilot light area before lighting it. Check for dirt, dust, or debris that could block the flame or cause uneven burning. A clogged pilot light can prevent ignition or cause the flame to go out frequently.
- Look for cracks or damage in the pilot tube.
- Make sure the igniter or spark device is clean and working.
- Check that the flame sensor (if your stove has one) is free from buildup.
Have you noticed your pilot light going out more often? This inspection could reveal the cause. Fixing small issues here can save you time and frustration later.
Locate Pilot Light
Locating the pilot light on your stove is the first step to lighting it safely. The pilot light is a small flame that ignites the burner when you turn the knob. It often hides in a spot that is not easy to see. Knowing where to find it can save time and avoid frustration.
Every stove model has a slightly different setup. Some pilot lights are near the burner, while others sit inside the stove’s base. Finding the right spot requires careful observation. Always ensure the stove is off before searching for the pilot light.
Find Pilot Light Opening
Look under the stove’s burner or near the base. The pilot light opening is usually a small hole or slit. It allows the gas to flow and the flame to burn. This opening may be covered by a small panel or grate. Remove any covers gently to avoid damage.
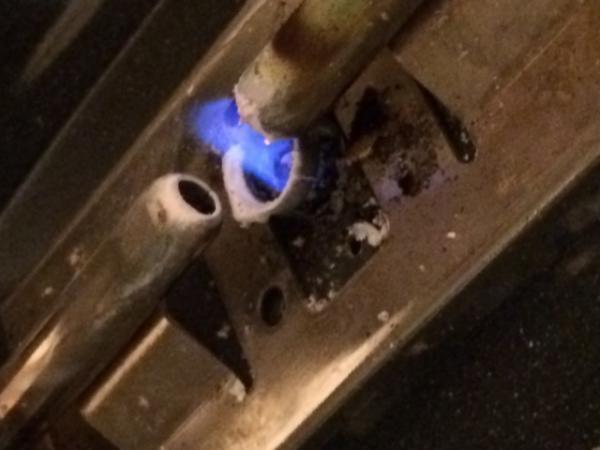
Check for a tiny blue or yellow flame inside the opening. This is the pilot light. If no flame is visible, the pilot light might be out. Some stoves have a glass window to see the pilot light without removing parts. Use a flashlight if the area is dark.
Identify Control Knob
The control knob controls gas flow to the pilot light and burners. It is usually located on the front or side of the stove. The knob may have markings like “Pilot,” “Ignite,” or flame symbols. These indicate the pilot light control position.
Turn the knob slowly to the pilot setting. You should hear a faint gas hiss. This means gas is flowing to the pilot light area. Some stoves require you to press the knob down while lighting. Read any labels near the knob for specific instructions.
Prepare To Light
Getting ready to light your stove's pilot light is a crucial first step that ensures safety and success. Before you even think about sparking the flame, you need to know exactly how to prepare the controls properly. Taking a moment to set the stove controls and hold the knob correctly can make the process smooth and prevent any accidental gas buildup.
Set Control To Pilot
Locate the control knob on your stove that manages the pilot light. Turn this knob slowly until it points to the "Pilot" position. This setting allows a small, controlled amount of gas to flow, which is essential for safely lighting the pilot.
Have you ever accidentally turned the knob too far and released too much gas? It’s a common mistake that can be avoided by moving the control slowly and deliberately. Doing this reduces the risk of gas buildup and helps you maintain control over the flame.
Hold Down Control Knob
Once the control is set to "Pilot," press the knob inward and hold it down firmly. This action keeps the gas flowing steadily to the pilot light area. It also activates the safety valve, allowing the gas to ignite without interruption.
Holding the knob down might feel awkward at first, but it’s essential. If you release it too soon, the pilot light may go out. Think of it as a small test of patience that ensures your stove stays lit and ready for cooking.

Credit: fireandairaz.com
Ignite Pilot Light
Lighting a pilot light on a stove can seem daunting. It's actually straightforward and safe. A few simple steps, and you’re cooking again. Understanding the process ensures safety and efficiency. Let's dive into how to ignite that pilot light.
Use A Long Match Or Lighter
First, gather your tools. A long match or lighter works best. They keep your hand at a safe distance from the flame. You can find them at most stores. They are essential for this task.
Light Pilot Flame
Locate the pilot light opening on your stove. It's usually near the burner. Turn the stove's knob to "Pilot" or "Light" setting. Hold the match or lighter near the opening. Wait for the small flame to appear. Once lit, release the knob slowly. Ensure the flame remains steady.
Confirm Pilot Light Stays Lit
After successfully lighting the pilot light on your stove, it's crucial to make sure it stays lit. A pilot light that won’t stay on can be frustrating and unsafe. Confirming its stability ensures your stove will function properly and helps you avoid repeated attempts to relight it.
Keep Knob Pressed For 30 Seconds
Once the pilot light ignites, keep the control knob pressed down for about 30 seconds. This step allows the thermocouple, a safety device, to heat up and signal the gas valve to stay open.
If you release the knob too soon, the gas supply may cut off, causing the pilot light to go out. Holding the knob patiently during this time is key to ensuring a steady flame.
Release And Check Flame
After 30 seconds, slowly release the knob and watch the pilot light closely. It should remain lit without flickering or dying out. If it goes out immediately, try pressing the knob again and hold it longer, or check for issues like dirt blocking the flame or a faulty thermocouple.
Ask yourself: Is the flame steady and blue? A yellow or weak flame might indicate a problem that needs professional attention. Taking time to observe the flame’s behavior can save you from bigger stove issues down the line.
Credit: www.doityourself.com
Adjust And Use Stove
After successfully lighting the pilot light on your stove, the next important phase is adjusting and using the stove properly. This ensures you get the right amount of heat for cooking and keeps your stove operating safely. Paying close attention during this stage can save you from potential hazards and improve your cooking experience.
Turn Control To Desired Setting
Once the pilot light is stable, gently turn the stove’s control knob to your preferred heat level. Avoid sudden or large adjustments—small, steady turns help maintain a consistent flame. This control lets you customize the heat for different dishes, whether you need a slow simmer or a quick boil.
Have you noticed how subtle changes in flame size affect your cooking speed? Experiment with different settings to find what works best for your recipes. Remember, each stove may feel a bit different, so take your time to get familiar with your model’s controls.
Monitor Flame
Keep a close eye on the flame as you adjust the control. A steady blue flame indicates efficient burning and safety, while yellow or flickering flames might signal a problem. If you see irregular flames, consider turning off the stove and inspecting the burner for dirt or blockages.
Have you ever ignored a strange flame only to later find your food unevenly cooked or your stove malfunctioning? Consistent flame monitoring not only improves cooking quality but also alerts you early to maintenance needs. Your attention here can prevent costly repairs and keep your kitchen safe.
Troubleshoot Common Issues
Troubleshooting common pilot light issues helps keep your stove working safely. Problems with the pilot light can stop your stove from lighting or cause unsafe conditions. Understanding basic fixes can save time and avoid costly repairs. Below are typical problems and easy ways to check and resolve them.
Pilot Light Won’t Stay Lit
A pilot light that won’t stay lit may have a dirty or blocked burner. Dirt blocks gas flow and stops the flame from staying on. Check if the flame goes out soon after lighting.
- Clean the pilot light opening gently with a soft brush.
- Make sure the thermocouple is correctly positioned near the flame.
- Replace a damaged or worn thermocouple to maintain the flame.
Weak Or Yellow Flame
A healthy pilot light has a strong blue flame. A weak or yellow flame means poor gas combustion. This may cause carbon monoxide, which is dangerous.
- Check for dirt or soot buildup around the pilot light.
- Inspect air vents and clear any blockages to improve air flow.
- Call a professional if the flame stays yellow after cleaning.
Gas Odor Safety Tips
Smelling gas near your stove is an emergency. Gas leaks cause fire and health hazards. Act fast and stay safe.
- Do not light matches or turn on electrical switches.
- Open windows and doors to ventilate the area immediately.
- Turn off the gas supply valve if you know how.
- Leave the house and call your gas company or emergency services.
Frequently Asked Questions
How Do You Safely Light A Pilot Light On A Stove?
Turn off the stove and wait 5 minutes. Locate the pilot light knob. Press and hold it while using a lighter to ignite the flame. Keep holding the knob for 30 seconds, then release. Ensure the flame stays lit before using the stove.
Why Won’t My Stove’s Pilot Light Stay Lit?
A dirty or clogged pilot orifice often causes this issue. Clean the pilot assembly using compressed air or a brush. Also, check the thermocouple for damage. Replace any faulty parts to ensure the pilot light remains lit consistently.
How Long Should I Hold The Pilot Knob When Lighting?
Hold the pilot knob for about 30 seconds after ignition. This allows the thermocouple to heat up and signal the gas valve to stay open. Releasing too early may cause the flame to go out.
Can I Light The Pilot Light Without A Match Or Lighter?
Some stoves have an electronic ignition system that lights the pilot automatically. If not, you will need a long lighter or match to safely ignite the pilot light manually.
Conclusion
Lighting a pilot light on your stove is simple and safe. Always check the gas is off before starting. Use a long match or lighter to avoid burns. Hold the flame near the pilot opening until it stays lit. If the light goes out, wait a few minutes before trying again.
Regularly checking the pilot light helps your stove work well. With care and patience, you can do this task easily. Stay safe and enjoy cooking with a properly lit stove.