A dull kitchen knife can slow you down and make cooking frustrating. But sharpening your knife with a whetstone is easier than you think—and it brings your blade back to life.
Imagine slicing through vegetables or meat with smooth, effortless precision every time. In this guide, you’ll learn simple steps to sharpen your kitchen knife at home using a whetstone. By the end, you’ll feel confident handling your knife safely and keeping it razor-sharp for all your cooking needs.
Ready to transform your cutting experience? Let’s get started.

Credit: www.youtube.com
Choosing The Right Whetstone
Choosing the right whetstone is key for sharpening kitchen knives properly. The correct stone ensures a sharp edge without damaging the blade. It depends on the type of knife and how dull it is. Understanding the types of whetstones and their grit levels helps pick the best one. This choice affects the knife’s performance and lifespan.
Types Of Whetstones
Whetstones come in three main types:
- Natural stones:Mined from quarries, they offer a fine finish.
- Synthetic stones:Made from bonded abrasives, common and affordable.
- Ceramic stones:Hard and durable, good for regular maintenance.
Synthetic stones are popular for beginners. Natural stones can give a better polish but need more care.
Grit Levels Explained
Grit level tells how coarse or fine the stone is. Lower grit means rougher stone, good for fixing dull edges. Higher grit means finer stone, perfect for polishing.
| Grit Range | Use |
|---|---|
| 200-600 | Repair chips and very dull knives |
| 800-1500 | Sharpen blades and create an edge |
| 3000-8000 | Polish and refine the blade |
Selecting Based On Knife Type
Different knives need different stones. Soft steel knives sharpen faster and need finer grit. Hard steel knives require coarser stones first.
- Japanese knives often use finer grit stones for sharp edges.
- Western knives may need coarser stones to shape the blade.
- Damascus knives benefit from medium grit stones to protect patterns.
Match the whetstone to your knife for best results. This saves time and keeps the blade strong.
Credit: www.chowhound.com
Preparing Your Whetstone
Preparing your whetstone is the first step to a sharp kitchen knife. Proper preparation ensures the stone works well and protects your blade. It also makes the sharpening process smoother and safer. Take your time with this step for the best results.
Soaking The Stone
Most whetstones need soaking before use. This softens the stone and helps it sharpen better. Use clean, room-temperature water. Submerge the stone completely. Let it soak for 10 to 15 minutes. Small bubbles will stop rising when it is ready. Avoid using oil unless the stone instructions say so.
Setting Up A Stable Surface
A stable surface keeps the stone from slipping. Place the stone on a flat, sturdy countertop. Use a non-slip mat or damp towel underneath. This prevents movement during sharpening. Make sure the stone is level. A steady base helps you control the knife better.
Sharpening Techniques
Sharpening a kitchen knife with a whetstone requires specific techniques to get the best edge. Proper sharpening improves the blade’s performance and safety. Each step in the sharpening process plays a vital role in creating a sharp, durable edge.
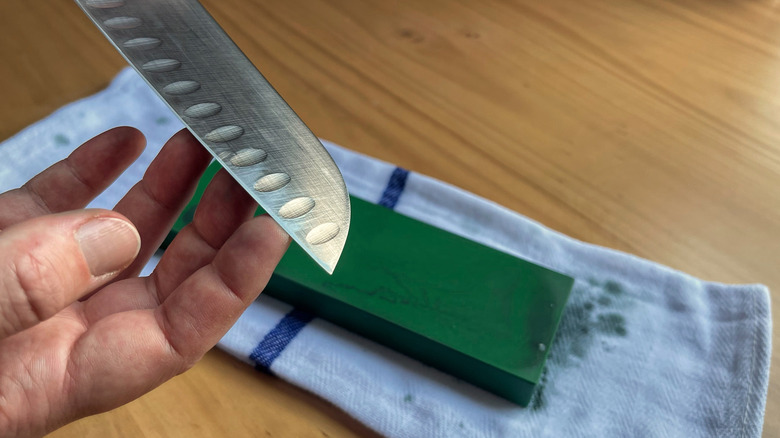
Correct Angle For Sharpening
Maintaining the right angle is key to effective sharpening. Most kitchen knives need a 15 to 20-degree angle. Hold the blade steady and tilt it to this angle against the whetstone. Too steep or too flat an angle can dull the blade or damage it.
Guided Stroke Methods
Use smooth, even strokes across the whetstone. Move the blade from heel to tip in one continuous motion. This helps sharpen the entire edge evenly. Consistency in stroke direction and length prevents uneven sharpening and keeps the blade balanced.
Applying Consistent Pressure
Pressure should be firm but gentle. Pressing too hard can wear down the blade quickly. Too little pressure will not sharpen effectively. Keep your hand steady and apply the same pressure on each stroke for the best results.
Refining The Edge
Sharpening a kitchen knife with a whetstone restores its cutting power and safety. Gently slide the blade against the stone at a steady angle for a smooth edge. Regular sharpening keeps knives effective and easy to use.
Refining the edge of your kitchen knife is crucial. After initial sharpening, the blade needs a finer touch. This ensures a smooth and precise cut. Using a whetstone is a traditional and effective method. It requires patience but gives excellent results.
Using Finer Grits
Start with a finer grit whetstone. Typically, a 1000-3000 grit is suitable. This grit helps in smoothing the rough edges. Place the whetstone on a stable surface. Hold the knife at the same angle as before. Glide the blade gently over the stone. Use short, sweeping strokes. Alternate sides for an even finish. Repeat until the knife feels sharper.
Polishing The Blade
Polishing is the next step. Use a whetstone with a grit of 4000 or higher. This step makes the knife edge shine. It also removes any fine scratches. Hold the knife at a consistent angle. Move it smoothly across the stone. This creates a polished, mirror-like finish. It also enhances cutting performance.
Removing Burrs
Burrs are tiny metal bits on the edge. They form during sharpening. Removing them is vital for a clean cut. Use a leather strop or fine honing rod. Run the knife lightly across the strop. This action removes burrs and smooths the edge. It also aligns the blade for precise cutting.
Maintaining Your Knife Post-sharpening
Keeping your kitchen knife sharp is only part of the process. Proper care after sharpening extends the blade’s life and ensures safe, efficient use. Post-sharpening maintenance helps avoid rust, dulling, and damage to the edge. Follow simple steps to keep your knife in top shape every day.
Cleaning And Drying
Clean the knife right after sharpening. Use warm water and mild soap to remove metal particles and residue. Avoid harsh detergents that can damage the blade. Rinse thoroughly and dry the knife completely with a soft cloth. Never leave the knife wet or soaking in water. Moisture causes rust and dulls the blade quickly.
Proper Storage Tips
Store the knife safely to protect its edge. Use a knife block, magnetic strip, or blade guard. Avoid tossing knives in drawers where they bump against other utensils. This causes chips and dulls the blade fast. Keep the knife in a dry place to prevent corrosion. Proper storage keeps your knife ready for every kitchen task.
Regular Touch-ups
Sharpening is not a one-time job. Regular touch-ups keep the edge sharp and strong. Use a honing rod to realign the blade edge after each use. This removes small bends and maintains sharpness. Schedule full sharpening sessions with a whetstone every few months. Frequent care prevents major damage and keeps cutting smooth and safe.
Common Mistakes To Avoid
Sharpening your kitchen knife with a whetstone can be satisfying and effective, but it’s easy to make mistakes that reduce the quality of your blade or damage the stone. Knowing what to avoid helps you get the sharp edge you want without frustration or extra expense. Let’s look at some common errors that even experienced cooks sometimes make.
Over-sharpening
It’s tempting to keep sharpening until the blade feels razor-sharp, but too much sharpening wears down your knife unnecessarily. Each pass on the whetstone removes a tiny layer of metal. If you sharpen too often or press too hard, you can shorten the life of your blade.
Have you noticed your knives becoming thinner or less balanced over time? That might be a sign you’re over-sharpening. Instead, focus on maintaining the edge regularly rather than trying to fix a dull blade all at once.
Incorrect Angles
Keeping the right angle between your knife and the whetstone is crucial. Most kitchen knives need a sharpening angle between 15 and 20 degrees. If you go too steep or too shallow, the edge won’t form properly and can even dull faster.
Try using a guide or simply practice holding your knife steady. If the edge feels rough or uneven after sharpening, your angle might be off. Would you rather have a consistent angle or guess every time you sharpen?
Neglecting Stone Maintenance
Your whetstone needs care too. If you don’t clean and flatten it regularly, the surface becomes uneven and clogged with metal particles. This reduces sharpening efficiency and can damage your blade.
After every use, rinse your stone and remove any residue. Periodically flatten it with a lapping plate or another stone. Have you checked the flatness of your whetstone recently? Ignoring this can make all your sharpening efforts less effective.

Credit: www.yahoo.com
Frequently Asked Questions
How Often Should I Sharpen My Kitchen Knife With A Whetstone?
Sharpen your kitchen knife every 1 to 3 months, depending on use. Frequent cooks may need to sharpen more often. Regular sharpening keeps blades sharp and safe for cutting tasks.
What Grit Whetstone Is Best For Kitchen Knives?
Use a 1000-grit whetstone for regular sharpening and a 3000-6000 grit for polishing. Lower grit stones fix dull edges, higher grit stones refine the blade.
How Do I Maintain The Angle When Sharpening On A Whetstone?
Maintain a 15 to 20-degree angle between the blade and stone. Consistency is key for a sharp edge. Use guides if you struggle to hold the angle.
Can I Use A Whetstone On All Kitchen Knife Types?
Yes, whetstones work on most kitchen knives, including stainless steel and carbon steel. Avoid using stones on serrated or ceramic blades, which require special tools.
Conclusion
Sharpening a kitchen knife with a whetstone takes practice but is simple. Keep the stone wet and use steady, even strokes. Check your knife’s edge often to avoid over-sharpening. A sharp knife makes cooking safer and more enjoyable. Take your time and be patient with each step.
Your kitchen tools will thank you with better performance. Try it regularly to keep your knives in top shape. Small effort, big difference in your cooking experience.