
Are you struggling to get your boning knife sharp enough to tackle meat and fish with ease? A dull blade can make your work frustrating and even dangerous.
But don’t worry—sharpening your boning knife is easier than you think. In this guide, you’ll discover simple, effective steps to bring back that razor-sharp edge. Imagine slicing through bones and joints smoothly, saving time and effort every time you cook.
Keep reading, and you’ll learn exactly how to sharpen your boning knife like a pro.
Choosing The Right Tools
Choosing the right tools is key to sharpening a boning knife effectively. The tools you pick affect the sharpness and longevity of your blade. Using proper sharpeners ensures safety and precision. Understanding different tools makes the process easier and faster.
Types Of Sharpeners
Sharpeners come in many forms. Manual sharpening stones offer control and accuracy. Electric sharpeners are fast and user-friendly. Pull-through sharpeners provide quick fixes but less precision. Each type suits different skill levels and budgets.
Selecting The Ideal Stone Grit
Sharpening stones vary by grit size. Coarse grit (200-400) fixes chips and dull blades. Medium grit (800-1000) sharpens edges well. Fine grit (3000-8000) polishes and smooths the blade. Choose grit based on the knife’s condition and desired sharpness.
Using Honing Rods
Honing rods keep edges aligned between sharpenings. They do not remove metal but straighten the blade. Ceramic and steel rods are common choices. Use light pressure and a consistent angle for best results. Regular honing extends your knife’s sharpness.
Credit: www.chowhound.com
Preparing Your Knife
Preparing your boning knife before sharpening is essential. A clean, undamaged blade sharpens better and lasts longer. Taking time to prepare ensures safety and improves sharpening results.
Cleaning The Blade
Remove any dirt, grease, or food particles from the blade. Use warm water and mild soap for cleaning. Dry the knife completely with a soft cloth to prevent rust. A clean blade allows the sharpening tool to work effectively.
Checking For Damage
Inspect the blade carefully for chips, cracks, or bends. Small chips can affect sharpening and cutting performance. Bent blades need straightening before sharpening. Address any damage to avoid worsening the blade condition.
Sharpening Techniques
Sharpening a boning knife is more than just rubbing the blade against a stone. It requires precision, patience, and the right technique to maintain the knife’s delicate edge. Mastering these sharpening techniques ensures your knife stays effective for intricate meat and fish cuts.
Setting The Correct Angle
Maintaining the correct angle is key to a sharp edge. For a boning knife, this angle is usually between 15 and 20 degrees. Holding the blade too steep or too flat can dull the edge or damage it.
Try visualizing this angle by imagining the knife blade’s side gently touching the sharpening surface. You can also use an angle guide if you're unsure, but practicing by eye improves your skill over time. How steady is your hand when you maintain that angle?
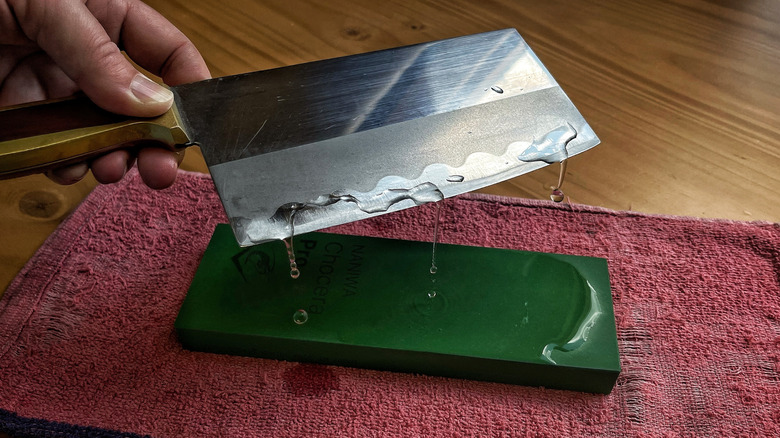
Using A Whetstone Step-by-step
A whetstone is the best tool to sharpen your boning knife effectively. Start by soaking the stone in water for about 10 minutes to soften it.
- Place the stone on a stable surface with the coarse side up.
- Hold your knife at the correct angle and slide the blade across the stone, moving from heel to tip.
- Repeat this motion evenly on both sides until you feel a burr—a tiny raised edge of metal along the blade.
- Flip the stone to the fine grit side and repeat the process to polish and refine the edge.
Don’t rush the strokes; smooth, even movements make a sharper edge. Have you noticed how your control improves as you repeat the motion?
Applying Consistent Pressure
Pressure matters as much as angle and technique. Too much force can ruin the edge, while too little won’t sharpen effectively.
Apply gentle but firm pressure, enough to feel the blade grinding against the stone but not so hard that you risk slipping. Think of it like massaging the edge, not hammering it.
Consistency is vital—try to keep the same pressure on every stroke. If your hand tires, take a short break instead of pressing harder. Can you feel the difference when you adjust your pressure?

Credit: www.coolinastore.com
Honing For Finishing Touches
Honing smooths and refines a boning knife’s edge after sharpening. It removes tiny burrs, making the blade sharper and more precise for delicate cuts. Regular honing keeps the knife ready for clean, easy work.
Honing for Finishing Touches Honing is the art of maintaining your boning knife's edge between sharpenings. Think of it as the gentle nudge your knife needs to stay in top condition. It doesn't remove metal from the blade but realigns its edge, keeping your cuts precise and effortless. Honing is like a regular tune-up for your car; it ensures smooth operation without the need for drastic repairs.
How To Hone Properly
To hone your boning knife effectively, you'll need a honing rod. Hold the rod vertically on a stable surface. Place the blade at a 15-20 degree angle against the rod. Using light pressure, slide the knife down and across the rod, moving from the base of the blade to the tip. Repeat this motion on the opposite side of the blade. Aim for about 5-10 strokes on each side. Remember, consistency is key. Maintain the same angle throughout to ensure a well-honed edge. Practice makes perfect, so don't worry if it feels awkward at first.
When To Hone Your Knife
Honing your boning knife should be a regular habit. Every few uses is a good rule of thumb. If you notice the knife dragging or not cutting as cleanly, it's time to hone. A quick hone before a big task can save you time and effort. It’s a small investment for a big payoff in performance. Ask yourself: How often do you depend on your boning knife for precision? The more you use it, the more frequently honing should be part of your routine.
Testing Sharpness
Testing the sharpness of your boning knife is crucial to ensure it performs well during delicate tasks like deboning meat. A sharp blade not only makes your work easier but also safer, as it requires less force and reduces slipping. Try these simple tests to check if your knife is ready for the job.
Paper Slice Test
Grab a sheet of plain printer paper and hold it firmly. Gently slice the paper with your boning knife at a slight angle.
If the knife is sharp, it will cut cleanly through the paper without tearing or snagging. You should feel little resistance as the blade glides. If the paper crumples or the blade struggles, it’s time to sharpen again.
This test is quick and effective. It helps you notice even small dull spots on the blade’s edge. Have you ever tried slicing paper only to find your knife barely scratches it? That’s a clear sign your blade needs attention.
Tomato Skin Test
Pick a ripe tomato with smooth skin for this test. Try slicing the tomato skin gently with your boning knife.
A sharp knife will slip through the skin effortlessly, leaving a clean cut. If your blade presses down hard or squashes the tomato, it’s dull. The skin should peel back smoothly without tearing.
This test mimics the delicate cuts you’ll make on meat and fish. If your knife can handle a tomato’s thin skin well, it will handle your kitchen tasks confidently. What’s more satisfying than watching a perfect slice fall away cleanly?
Maintaining Your Boning Knife
Keeping your boning knife sharp and ready depends heavily on how you maintain it daily. Proper care extends its life and ensures each cut is clean and precise. Neglecting maintenance can quickly dull the blade, making your work harder and less safe.
Proper Storage Tips
Storing your boning knife correctly prevents damage and keeps the blade sharp longer. Avoid tossing it loosely in a drawer where it can bump against other utensils or get nicked.
- Use a magnetic knife strip to hang your knife safely and keep the blade exposed to air.
- Consider a knife block with slots that fit the blade snugly, protecting the edge from contact.
- If you travel with your knife, invest in a blade guard or a dedicated knife roll for protection.
Have you ever noticed how a dull knife can make you more careless? Proper storage helps avoid this risk by preserving sharpness.
Regular Maintenance Routine
Routine maintenance keeps your boning knife in prime condition and ready for any task. Sharpen your knife regularly using a whetstone or sharpening rod to maintain the edge.
- After each use, wash your knife by hand with warm, soapy water and dry it immediately to prevent rust.
- Hone the blade weekly to realign the edge, which helps maintain sharpness between sharpenings.
- Inspect the knife for any chips or bends and address these issues promptly to avoid bigger problems.
How often do you check your knife's sharpness? Small, consistent efforts in maintenance save time and frustration later on.

Credit: www.yahoo.com
Frequently Asked Questions
How Often Should I Sharpen A Boning Knife?
Sharpen your boning knife every 2 to 3 months for regular use. Frequent sharpening keeps the blade precise and safe. If used heavily, sharpen more often to maintain optimal performance and ease of cutting.
What Is The Best Tool For Sharpening Boning Knives?
A whetstone is ideal for sharpening boning knives. It offers control and precision to maintain the blade’s thin edge. Alternatives like honing rods help maintain sharpness between sharpenings but don’t replace full sharpening.
Can I Use A Regular Knife Sharpener For Boning Knives?
Regular knife sharpeners can work but may damage thin boning knives. Use sharpeners designed for fine blades or whetstones for best results. This preserves the knife’s flexibility and sharpness needed for detailed work.
How Do I Maintain A Boning Knife After Sharpening?
After sharpening, clean and dry the knife thoroughly. Store it in a knife block or sheath to protect the edge. Regular honing helps keep the blade aligned between sharpenings.
Conclusion
Sharpening a boning knife keeps it safe and efficient. Use the right tools and steady hands for best results. Regular sharpening makes cutting easier and more precise. Take small, careful strokes along the blade’s edge. Keep your knife clean and dry after sharpening.
A sharp knife helps you prepare food faster and better. Practice often to improve your sharpening skill. Your boning knife will last longer with good care. Simple steps lead to great results every time.


