If you’ve ever wanted to cook a juicy, flavorful whole chicken without the hassle, roasting it in a Dutch oven is the way to go. This method locks in moisture and creates a crispy, golden skin that will impress everyone at your table.
Whether you’re a beginner or just looking for a foolproof recipe, you’re about to discover simple steps that make roasting a whole chicken easy and rewarding. Keep reading, and you’ll learn how to turn your Dutch oven into a magic tool for a delicious meal your family will love.
Choosing The Right Chicken
Choosing the right chicken is the first step to roasting a whole bird perfectly in your Dutch oven. The quality and size of the chicken you pick will directly affect cooking time, flavor, and texture. Knowing what to look for can save you from a dry or unevenly cooked meal.
Size And Weight Considerations
Your Dutch oven has a limited space, so selecting the right size chicken is crucial. Typically, a chicken weighing between 3 to 4 pounds fits well and cooks evenly inside a standard Dutch oven. Larger birds might not cook through properly, while smaller ones can dry out quickly.
Think about how many people you’re feeding. A 3-pound chicken usually serves 3 to 4 people comfortably. If you’re cooking for a crowd, consider roasting multiple smaller chickens instead of one large bird to ensure consistent cooking.
Fresh Vs. Frozen Chicken
Fresh chicken often has a better texture and flavor, but it requires careful handling to avoid spoilage. If you buy fresh, check the sell-by date and make sure it feels firm and moist—not slimy. Freshness can make a noticeable difference in your roast.
Frozen chicken offers convenience and longer storage but needs proper thawing before cooking. Thaw your bird in the fridge for 24 hours to prevent uneven cooking. Have you ever rushed thawing only to end up with a rubbery texture? Patience here will reward your taste buds.

Credit: www.theseasonedmom.com
Selecting Your Dutch Oven
Choosing the right Dutch oven can make a huge difference in how your whole chicken roasts. It’s more than just picking a pot that looks nice. You need to think about what material will hold heat best and how the size fits your chicken and oven space.
Material And Size Options
Cast iron Dutch ovens are popular because they hold heat evenly and keep the chicken juicy. Enameled versions are easier to clean and don’t require seasoning, but they might be pricier.
Think about the size carefully. A 5 to 7-quart Dutch oven usually fits a whole chicken comfortably with space for vegetables. If your chicken is larger or you want extra room for sides, go bigger. Too small, and the heat won’t circulate well; too large, and it might dry out your bird.
Lid Features And Benefits
The lid plays a key role in roasting. A tight-fitting lid traps moisture and heat, creating a steamy environment that keeps the chicken tender. Some lids have self-basting spikes inside that catch condensation and drip it back onto the chicken, which can improve flavor and prevent drying.
Consider how heavy the lid is as well. A heavier lid seals better but can be harder to handle safely when hot. Look for lids that fit securely without gaps to make sure your roast cooks evenly.
Preparing The Chicken
Preparing the chicken properly sets the foundation for a delicious roast in your Dutch oven. It’s not just about tossing spices on the bird; the way you clean, dry, and season it deeply influences the final flavor and texture. Taking a few extra minutes here can make your roast truly stand out.
Cleaning And Patting Dry
Start by rinsing your whole chicken under cold water, both inside and out. Remove any leftover feathers or giblets from the cavity.
After rinsing, pat the chicken dry with paper towels. This step is crucial because moisture on the skin prevents it from crisping up during roasting. Have you noticed how wet skin stays rubbery? Dry skin, on the other hand, roasts to a perfect golden crisp.
Seasoning And Marinades
Season your chicken generously with salt and pepper inside and out. Don’t be shy—seasoning deeply enhances the flavor all through the meat.
You can use a simple mix of olive oil, garlic, and herbs like rosemary or thyme to rub over the skin. For extra flavor, marinate the chicken for a few hours or overnight in the fridge. A quick marinade with lemon juice, olive oil, and crushed garlic adds brightness and tenderizes the meat beautifully.
Stuffing Ideas
Stuffing your chicken isn’t just about filling the cavity—it adds aroma and moisture during roasting.
Try classic aromatics like quartered onions, garlic cloves, and lemon halves. Fresh herbs such as thyme, rosemary, or parsley bring a fresh herbal note that seeps into the meat as it cooks.
- Apple slices and sage for a touch of sweetness
- Carrot sticks and celery for earthy undertones
- A mix of wild rice and mushrooms for a hearty stuffing
What flavor combination excites your taste buds the most? Experimenting here can turn your roast chicken into a signature dish.
Credit: www.thisvivaciouslife.com
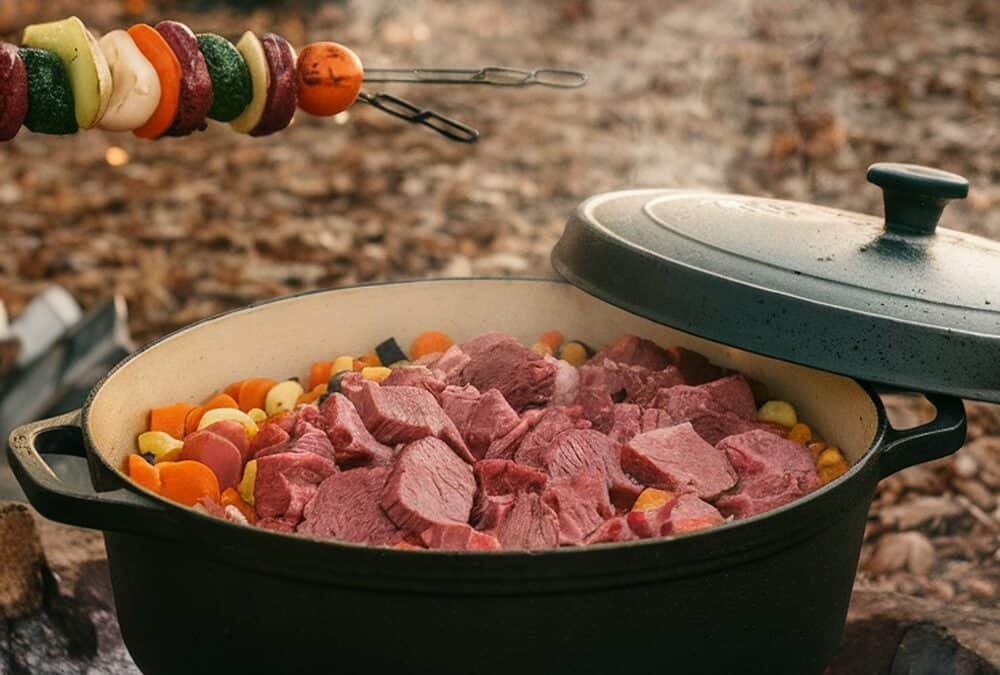
Setting Up The Dutch Oven
A Dutch oven offers an excellent way to roast a whole chicken. Preheat it for even cooking. Add vegetables for extra flavor and a balanced meal. Ensure the lid is tight for juicy, tender results. This method makes a delicious, home-cooked meal easy and satisfying.
Roasting a whole chicken in a Dutch oven is a delightful culinary adventure. The process begins with setting up the Dutch oven, which lays the foundation for a meal bursting with flavor. A well-prepared Dutch oven ensures even cooking and a juicy, perfectly roasted chicken.
Preheating Techniques
Preheating your Dutch oven is crucial. It ensures the chicken cooks evenly and develops a beautiful, crispy skin. Start by placing the empty Dutch oven in your oven and set the temperature to 450°F (232°C). Allow it to preheat for about 20 minutes. This step mimics the effect of professional-grade cookware, creating an environment that seals in moisture while enhancing flavors.
Adding Aromatics And Vegetables
Infuse your chicken with rich flavors by adding aromatics and vegetables. As the Dutch oven heats, gather ingredients like garlic, onions, and herbs such as rosemary and thyme. Place these directly into the preheated Dutch oven. You can also add vegetables like carrots and potatoes for a complete meal. This not only elevates the flavor of the chicken but also creates a savory medley that cooks alongside it. Consider the aroma that fills your kitchen as these ingredients mingle. What unique combinations can you create for a personalized touch?
Roasting Process
The roasting process is where your whole chicken transforms into a juicy, flavorful meal. Using a Dutch oven creates a perfect environment by trapping heat and moisture, ensuring even cooking. Understanding the right temperature, timing, and how to check doneness will help you avoid dry or undercooked chicken.
Temperature Settings
Set your oven between 350°F and 375°F (175°C to 190°C) for roasting a whole chicken in a Dutch oven. This range allows the chicken to cook evenly without burning the skin. Higher temperatures can crisp the skin faster but risk drying the meat inside.
Try starting at 375°F for the first 15 minutes to get a nice golden skin, then lower the heat to 350°F for the rest of the cooking time. Have you noticed how different ovens can affect cooking speed? Adjust your temperature slightly if you see the skin browning too quickly.
Timing Guidelines
Generally, roast the chicken for about 20 minutes per pound (450 grams). For a 4-pound chicken, this means roughly 1 hour and 20 minutes. However, timing depends on your oven and the chicken’s size.
Don’t rely solely on the clock. Keep an eye on the color of the skin and juices running clear. Remember, overcooking leads to dry meat, so it’s better to check a bit earlier than later.
Using A Meat Thermometer
A meat thermometer is your best tool for perfectly roasted chicken. Insert it into the thickest part of the thigh, avoiding bones. The chicken is done when the thermometer reads 165°F (74°C).
I once ignored the thermometer and ended up with a dry breast but undercooked thigh. Since then, I never roast without checking the internal temperature. Are you using your thermometer correctly or just guessing by appearance?
Let the chicken rest for 10-15 minutes after removing it from the oven. This helps redistribute juices and makes carving easier. Checking the temperature after resting ensures you don’t cut into meat that’s still cooking inside.
Tips For Juicy Chicken
Roasting a whole chicken in a Dutch oven can yield tender and juicy meat. The key is to keep moisture locked inside throughout cooking. Small techniques make a big difference in the final taste and texture. Use these tips for juicy chicken that stays flavorful and soft.
Basting Methods
Basting adds moisture and flavor to the chicken skin. Spoon the cooking juices over the chicken every 20 minutes. Use a brush or ladle for even coverage. This creates a golden, crispy skin while keeping the meat moist. Avoid opening the lid too often to keep heat steady.
Resting The Chicken
Resting lets juices settle inside the meat after cooking. Remove the chicken from the Dutch oven and cover it loosely with foil. Let it rest for 10 to 15 minutes before carving. This step stops the juices from running out and keeps the chicken moist.
Avoiding Dryness
Choose a whole chicken with skin on for natural protection. Season the chicken inside and out with salt to hold moisture. Cook at moderate heat to prevent drying. Add vegetables or a small amount of broth to the Dutch oven for extra steam. These help keep the chicken juicy throughout roasting.
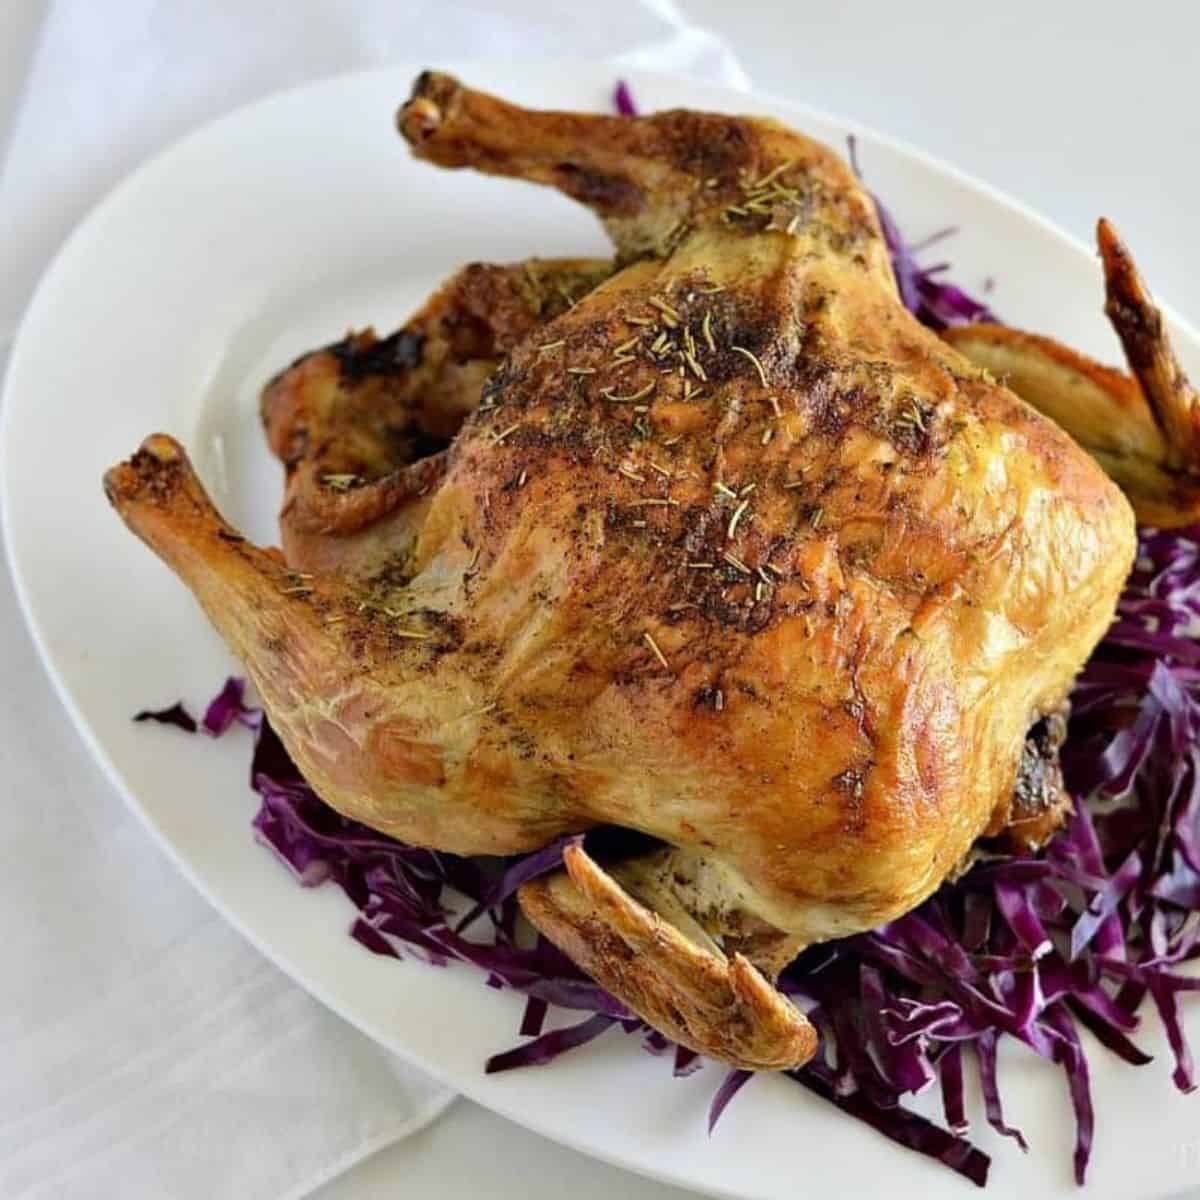
Serving Suggestions
Serving a whole roasted chicken from a Dutch oven is a special moment. It brings family and friends to the table. Presentation and side dishes can make the meal even better. Simple steps will help you carve the chicken and choose perfect sides. These tips will help you serve a delicious and memorable meal.
Carving Tips
Let the chicken rest for 10-15 minutes before carving. This keeps the juices inside. Use a sharp knife for clean cuts. Start by removing the legs and thighs. Cut along the joint to separate them easily.
Next, carve the wings. Pull them away and slice at the joint. Finally, slice the breast meat against the grain. This keeps the meat tender and juicy. Arrange the pieces nicely on a platter. Garnish with fresh herbs for a nice touch.
Side Dish Pairings
Roasted chicken pairs well with many side dishes. Choose sides that complement the rich flavor of the chicken. Here are some easy and tasty options:
- Roasted vegetables like carrots, potatoes, and Brussels sprouts
- Simple green salad with a light vinaigrette
- Buttery mashed potatoes or creamy polenta
- Steamed green beans or asparagus
- Fresh bread or dinner rolls for soaking up juices
Try to keep sides simple to let the chicken shine. A balanced plate makes every bite enjoyable and satisfying.
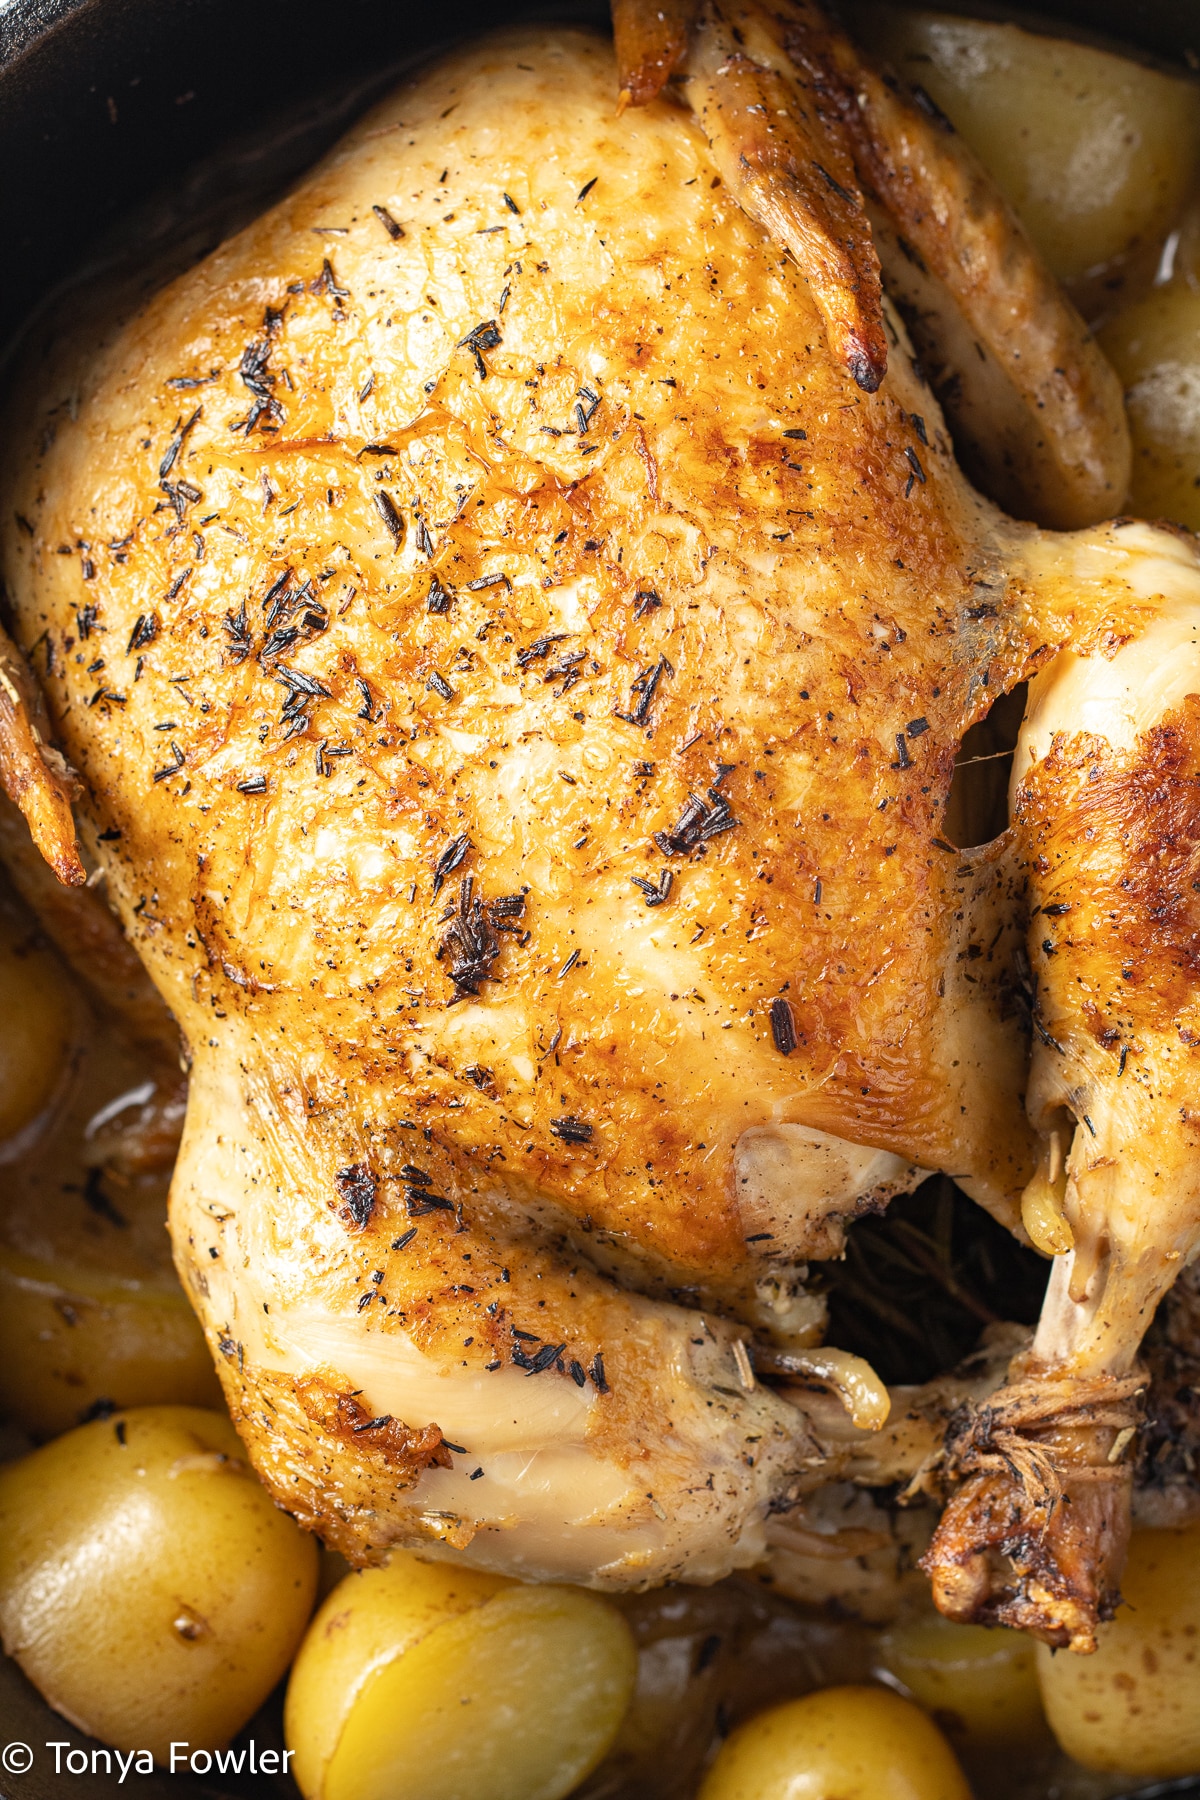
Credit: www.themidwestkitchenblog.com
Cleaning And Maintaining Your Dutch Oven
Your Dutch oven is more than just a cooking pot; it’s an investment in delicious meals like your perfectly roasted whole chicken. Taking care of it properly ensures it lasts for years and keeps performing at its best. Cleaning and maintaining your Dutch oven might seem simple, but doing it right can prevent damage and keep your food tasting fresh every time.
Post-cooking Care
After roasting your chicken, avoid soaking the Dutch oven in water. Instead, let it cool down slightly before cleaning. Sudden temperature changes can cause cracking, especially with cast iron.
Use warm water and a soft sponge to clean the pot. Skip harsh detergents or steel wool as they can strip the seasoning. If food sticks stubbornly, sprinkle coarse salt inside and scrub gently to loosen bits without damaging the surface.
Dry your Dutch oven thoroughly with a towel or by heating it on the stove for a few minutes. This step prevents rust from forming, which can ruin the pot’s seasoning and appearance.
Storage Tips
Store your Dutch oven in a dry place with the lid slightly ajar. This allows air circulation and keeps moisture from building up inside, which could cause rust.
You might also place a paper towel between the pot and the lid. It absorbs any residual moisture and keeps the inside fresh. Have you ever noticed a musty smell when opening your Dutch oven? This simple trick can stop that from happening.
Finally, avoid stacking heavy items on top of your Dutch oven. It can chip the enamel or damage the surface. Treat your Dutch oven like a prized tool in your kitchen, and it will reward you with countless flavorful meals.
Frequently Asked Questions
How Long Does It Take To Roast A Whole Chicken?
Roasting a whole chicken in a Dutch oven usually takes 1 to 1. 5 hours. Cooking time depends on the chicken’s size and oven temperature. Use a meat thermometer to check for 165°F internal temperature to ensure it’s fully cooked and safe to eat.
What Temperature Should I Set To Roast Chicken?
Set your oven to 375°F (190°C) for roasting a whole chicken. This temperature cooks the chicken evenly and keeps it juicy. Higher temperatures may burn the skin, while lower ones can result in undercooked meat.
Can I Roast Chicken With Vegetables In Dutch Oven?
Yes, you can roast vegetables alongside the chicken in a Dutch oven. Add chopped carrots, potatoes, and onions under the chicken. They will absorb the flavors and cook perfectly with the chicken’s drippings.
How Do I Keep The Chicken Moist When Roasting?
To keep chicken moist, roast it covered with the Dutch oven lid. Basting occasionally with its juices also helps. Using a marinade or seasoning under the skin adds extra moisture and flavor during roasting.
Conclusion
Roasting a whole chicken in a Dutch oven brings great flavor and juiciness. You only need a few simple steps to get a tasty meal. The Dutch oven keeps heat even and locks in moisture. This method works well for beginners and cooks alike.
Try adding herbs or vegetables for extra taste. Serve your chicken with your favorite sides. Enjoy a homemade meal that feels warm and satisfying. Cooking this way saves time and effort too. Give it a try and see how easy good cooking can be.