If your Whirlpool refrigerator’s water isn’t tasting as fresh as it used to, it might be time to replace the water filter. You might think this is a complicated job, but it’s actually quick and easy once you know the steps.
Imagine enjoying clean, crisp water every time you open your fridge, without any hassle. In this guide, you’ll learn exactly how to replace your Whirlpool water filter safely and efficiently. Keep reading, and you’ll be surprised at how simple it is to keep your water fresh and your fridge running smoothly.

Credit: www.searshomeservices.com
Identify Your Filter Type
Identifying your Whirlpool refrigerator's water filter type is key to a smooth replacement. Filters vary by model and design. Knowing the exact type helps find the correct replacement part fast.
Check your refrigerator's manual first. It often lists the filter model and number. If the manual is missing, look inside the fridge or freezer compartments for a label or sticker. These usually display the filter type or part number.
Whirlpool uses several common filter types. Recognizing yours ensures the new filter fits perfectly and works well.
Most Whirlpool filters sit inside the fridge, near the top right corner or in the base grille. The housing looks like a small rectangular cover or a round compartment. Spotting the housing helps confirm your filter type.
Check The Filter Shape And Size
Filters come in various shapes: rectangular, cylindrical, or twist-in cartridges. Measure the filter or compare it to images online to narrow down the type. Size and shape are important for compatibility.
Read The Filter Label
Filters often have a label with a model number or code. This code is your best clue. Write it down or take a photo. Use it to search for the exact replacement filter online or in stores.
Identify Common Whirlpool Filter Models
- EveryDrop by Whirlpool: Usually rectangular with a push-button release.
- Whirlpool Twist-In Filter: Cylindrical and twists into place.
- Internal Water Filters: Found inside the fridge, often hidden behind a panel.
Use The Refrigerator Model Number
Find the model number on a sticker inside the fridge. Use it on Whirlpool’s website or filter retailers. This helps find filters designed specifically for your refrigerator.

Credit: www.whirlpool.com
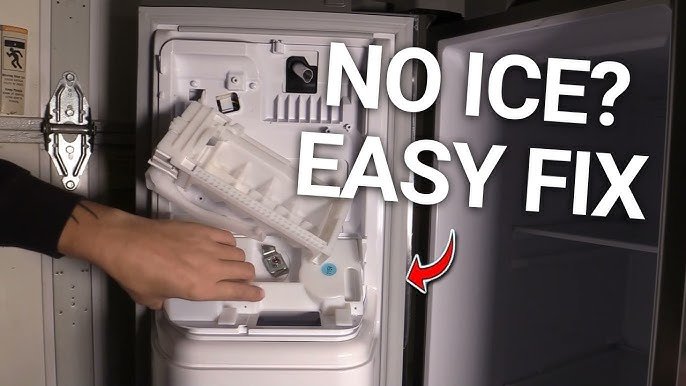
Locate The Filter Housing
Locating the filter housing in your Whirlpool refrigerator is the first step to replacing the water filter. The filter housing holds the water filter securely and ensures clean water flow. Finding it quickly saves time and effort.
Most Whirlpool refrigerators place the filter housing in easy-to-reach spots. It usually looks like a small rectangular or cylindrical compartment. Identifying the exact location helps you prepare for the next steps of replacement.
Check Inside The Refrigerator Compartment
Open the main fridge door and look near the top right or left corner. Many Whirlpool models have the filter housing inside the fridge, near the top shelf. Sometimes it sits behind a small cover that clicks open.
Inspect The Base Grill Or Kickplate
Some Whirlpool refrigerators position the filter housing in the base grill below the fridge doors. This area often has a small door or panel to access the filter. Look for a round or rectangular cover that twists or pulls out.
Look Behind The Refrigerator
In rare models, the filter housing may be located at the back of the fridge. Check around the water supply line connection for a filter compartment. This location requires moving the fridge carefully to access it.
Identify The Filter Type And Housing Design
- Push-in or twist-in filter housing
- Rectangular or cylindrical shape
- Plastic cover or door with a release tab
Knowing the filter design helps you handle the housing correctly. It prevents damage and makes the replacement smooth.
Prepare For Replacement
Preparing for a water filter replacement on your Whirlpool refrigerator is a crucial step to ensure a smooth and hassle-free process. Taking a few moments to get ready can save you from unexpected leaks or difficulties during installation. Let’s focus on two key preparation steps that can make a big difference.
Turn Off Water Supply
Before you touch the filter, locate the water supply valve connected to your refrigerator. Shutting off the water supply prevents any accidental spills or water damage while you remove the old filter.
If you’re unsure where the valve is, check behind or underneath your fridge. Sometimes, it’s near the base or connected to the kitchen plumbing. Have you ever started a repair only to be caught off guard by a sudden stream of water? Turning off the water first avoids that messy surprise.
Gather Necessary Tools
Though replacing the filter is mostly a hands-on task, having the right tools at hand speeds things up. You typically need a clean cloth or towel, a new Whirlpool-compatible water filter, and possibly a pair of gloves for better grip.
Keep a small bucket or bowl nearby to catch any drips. If your model requires a filter wrench, have it ready. Preparing these tools beforehand means you won’t have to pause midway to search for something important.
Remove The Old Filter
Removing the old water filter from your Whirlpool refrigerator is a crucial step before installing a new one. It might seem simple, but taking care during this process ensures you avoid any damage to the filter housing or water lines. Let’s focus on how you can safely and effectively remove the old filter.
Release The Filter
First, locate the filter inside the fridge, usually in the upper right corner or behind the grille at the bottom. Most Whirlpool models have a push-button or a twist mechanism to release the filter.
Press the release button firmly or turn the filter counterclockwise about a quarter turn. You should feel the filter loosen and be able to pull it out gently. If it feels stuck, don’t force it; instead, double-check you’ve fully released the locking mechanism.
Handle With Care
Once the filter is free, remove it slowly to prevent any water spills. Keep a towel handy just in case some water leaks out—this is common but easy to manage.
Dispose of the old filter properly, but also note its orientation and condition. Have you noticed any discoloration or unusual smell in your old filter? This could mean it was time for a replacement even earlier.
Handling the filter carefully helps keep your fridge’s water system intact and ready for the new filter. Are you ready to move on and install the new one? Let’s keep going!
Install The New Filter
Replacing a water filter in your Whirlpool refrigerator can feel daunting, but it's simpler than you might think. You’re almost there once the old filter is out. It’s time to install the new one and ensure your water flows crisp and clean. Let's break it down into straightforward steps so you can confidently tackle this task.
Align And Insert
Begin by carefully unpacking your new water filter. Keep an eye out for the alignment marks, often small arrows or lines. These marks guide you in positioning the filter correctly.
Hold the filter with the alignment mark facing upwards. Gently slide it into the filter housing. You’ll feel a slight resistance, but it should glide in smoothly if aligned correctly.
Ever tried fitting a puzzle piece that just wouldn’t go in? It's a bit like that. A gentle push ensures it sits perfectly without forcing it in.
Secure The Filter
Once inserted, turn the filter clockwise. You should hear a click, indicating that it’s securely in place. If it doesn't click, it might mean the filter isn't inserted fully.
Give it a gentle tug to ensure it's secure. A loose filter can lead to leaks or improper water flow. It’s like fastening your seatbelt; it needs to be snug to work effectively.
Have you ever noticed how a small detail can make a big difference? Ensuring the filter is secure means your water will be as fresh as intended. And just like that, you've installed your new filter!
Feel a sense of accomplishment knowing you’ve extended the life of your refrigerator and improved the quality of your water. Ready for that refreshing glass of water?

Credit: www.youtube.com
Flush The New Filter
Flushing the new filter is a crucial step after installing it in your Whirlpool refrigerator. This process clears out any air and loose carbon particles inside the filter. It also ensures the water tastes fresh and clean. Skipping this step might cause cloudy water or odd taste. Take your time and follow the flushing instructions carefully for best results.
Run Water Through Filter
Start by running cold water through the new filter. Use the water dispenser on your refrigerator. Let the water run for about 3 to 5 minutes. This flushes out any trapped air and loose particles. You might see some water sputtering at first. This is normal. Keep running the water until it flows smoothly and clearly.
Check For Leaks
After flushing, check the filter area for leaks. Look around the filter housing and connections. Use a clean cloth to wipe any moisture. If you see dripping water, the filter may not be seated properly. Turn off the water supply and remove the filter. Reinstall it firmly and try flushing again. No leaks mean the filter is installed correctly and ready to use.
Reset The Filter Indicator
Resetting the filter indicator on your Whirlpool refrigerator is a crucial step after replacing the water filter. This tiny light helps you keep track of the filter's lifespan and ensures your water stays clean and fresh. Ignoring this step might cause the indicator to keep flashing, leading to confusion about the filter’s condition.
Locate The Filter Reset Button
The filter reset button is usually found on the control panel of your refrigerator. It might be labeled as “Filter Reset,” “Reset,” or sometimes just a small icon resembling a water droplet. If you’re unsure, check your user manual or look closely at the buttons near the display screen.
How To Reset The Filter Indicator
Press and hold the filter reset button for about 3 to 5 seconds. You should see the indicator light blink or turn off, confirming the reset. This action tells your fridge that a new filter is installed and ready to work.
What If The Indicator Doesn’t Reset?
If the light keeps flashing after you reset it, double-check that the filter is installed correctly. Sometimes the filter might be slightly loose or not fully seated, which prevents the sensor from recognizing it. Also, try unplugging your refrigerator for a minute and then plugging it back in to refresh the system.
Tips For Maintaining Your Filter Indicator
- Reset the indicator every time you change the filter to avoid false alerts.
- Keep a note of your filter change dates to stay ahead of replacements.
- Clean the area around the filter and sensor to prevent dirt from affecting the indicator.
Have you ever ignored the reset light and later wondered why your water tastes off? Resetting the filter indicator is a small step that keeps your fridge running smoothly and your water tasting great. Don’t overlook it!
Troubleshooting Tips
Check the water filter’s position and gently twist it to remove. Clean the area before inserting a new filter to avoid leaks. Ensure the filter clicks in place for proper installation.
Replacing a water filter on your Whirlpool refrigerator might seem straightforward, but unexpected hiccups can occur. Addressing these issues promptly ensures clean, fresh water without disruption. Here, we will explore some common troubleshooting tips to help you resolve any potential problems swiftly.
Filter Not Fitting
If you've ever found yourself struggling to fit a new filter, you're not alone. Many users experience this issue. First, ensure you're using the correct filter model for your refrigerator. Double-checking the model number can save time and prevent frustration. Sometimes, leftover residue or debris can obstruct the fitting process. Gently clean the filter housing area with a damp cloth. Make sure everything is aligned correctly before attempting to insert the filter again. Have you tried applying a bit more pressure while twisting the filter into place? It often requires a firm hand to ensure it's seated correctly. But be careful not to force it, as this could cause damage.
Water Flow Issues
Is your water flow slower than usual after replacing the filter? This is a common concern. Start by checking if the filter is installed correctly. A loose connection can hinder water flow, so ensure it's tightly secured. Air trapped in the water line might also be causing the slowdown. To fix this, dispense several cups of water to help clear any air pockets. This simple act can often restore the flow to its normal rate. Another factor could be the age of your water lines. Older lines might need a check-up or replacement if they're inhibiting flow. Have you considered consulting the refrigerator's manual for specific guidance tailored to your model? By following these troubleshooting tips, you can quickly resolve common issues and enjoy uninterrupted access to clean, filtered water. Remember, maintaining your refrigerator's filter system is crucial for optimal performance.
Frequently Asked Questions
How Often Should I Replace My Whirlpool Water Filter?
Replace the Whirlpool water filter every six months for optimal performance. Frequent changes ensure clean, fresh-tasting water and prevent clogs. Check your user manual for specific model recommendations. Regular replacement maintains water quality and extends the refrigerator’s lifespan.
How Do I Locate The Water Filter In My Whirlpool Fridge?
The water filter is usually inside the refrigerator compartment, near the top right corner. Some models have it in the base grille. Refer to your Whirlpool manual for exact placement. Locating it is essential for quick and easy replacement.
Can I Use Any Water Filter For Whirlpool Refrigerators?
It’s best to use Whirlpool-certified filters for compatibility and safety. Generic filters may not fit properly or filter contaminants effectively. Certified filters ensure your refrigerator works as intended and maintain water quality.
What Steps Are Involved In Replacing The Whirlpool Water Filter?
First, locate and twist the old filter counterclockwise to remove. Insert the new filter and twist clockwise until secure. Flush the water dispenser for a few minutes to clear air and debris. Always follow your specific model’s instructions for best results.
Conclusion
Replacing a water filter on your Whirlpool refrigerator is simple and quick. Just follow the steps carefully to avoid mistakes. Clean water helps your family stay healthy. Regular filter changes keep your fridge working well. Don’t wait until the water tastes bad or slows down.
Take action now to enjoy fresh, clean water every day. Small effort. Big difference. Your fridge will thank you.