Is your gas grill not heating up like it used to? The problem might be your regulator.
Replacing a regulator on your gas grill can seem tricky, but it’s easier than you think. In this guide, you’ll learn simple, step-by-step instructions to fix your grill and get it cooking perfectly again. Keep reading, and you’ll be back to grilling your favorite meals in no time!
Tools And Materials Needed
Replacing a regulator on a gas grill requires some basic tools and materials. Having the right items ready makes the job easier and safer. Prepare everything before starting the replacement.
Use tools that fit well to avoid damaging parts. Quality materials ensure the grill works properly after the fix. Below is a list of what you need.
Essential Tools For Regulator Replacement
- Adjustable wrench
- Screwdriver (flathead and Phillips)
- Pipe thread sealant or Teflon tape
- Work gloves
- Bucket or container (to catch any gas or debris)
Materials Required
- Replacement gas regulator compatible with your grill
- New gas hose (optional but recommended)
- Soap and water solution (for leak testing)
Safety Equipment
- Protective eyewear
- Fire extinguisher nearby
- Well-ventilated workspace

Credit: www.gok-blog.de
Safety Precautions
Replacing a regulator on a gas grill requires careful attention to safety. The process involves handling gas, which can be dangerous without the right precautions. Always prioritize safety to avoid accidents or injuries during the replacement.
Before starting, make sure the grill is completely cool. Never work on the regulator while the grill is hot. Gas leaks can cause fires or explosions, so thorough checks are essential. Use simple safety steps to protect yourself and others.
Turn Off The Gas Supply
Shut off the gas supply at the tank valve. Confirm no gas is flowing before touching the regulator. Disconnect the propane tank to ensure safety during the replacement.
Work In A Well-ventilated Area
Perform the replacement outdoors or in a space with good airflow. Avoid enclosed areas to reduce the risk of gas build-up. Fresh air helps disperse any accidental leaks quickly.
Check For Gas Leaks
Use a soapy water solution to check connections for leaks. Apply it on joints and watch for bubbles. Bubbles indicate escaping gas that needs fixing before use.
Wear Protective Gear
Wear gloves and safety glasses to protect your hands and eyes. Gas parts can have sharp edges or cause skin irritation. Simple protection reduces the chance of injury.
Avoid Open Flames
Keep all open flames and sparks away during the replacement. Do not smoke near the grill or gas tank. Flames can ignite gas vapors, causing fire or explosion.
Follow Manufacturer Instructions
Read and follow the grill and regulator manual carefully. Correct installation depends on following these guidelines. Use recommended parts to ensure a safe fit and function.
Turning Off The Gas Supply
Turning off the gas supply is the first and most crucial step before you replace a regulator on your gas grill. Handling gas can be risky if not done properly, so making sure the gas flow is completely shut off protects you and your equipment from potential hazards.
Many people overlook this step, rushing into repairs without cutting the gas, which can lead to dangerous leaks or even fires. Taking a moment to ensure the gas is off gives you peace of mind and creates a safer working environment.
Locate The Gas Shut-off Valve
Start by finding the gas shut-off valve on your grill or propane tank. This valve is usually near the tank connection or along the gas line leading to your grill.
If you use a propane tank, the shut-off valve is at the top of the tank and typically has a knob you can turn clockwise to close. For natural gas grills, the valve might be near the wall or under the grill itself.
Turn The Valve Clockwise To Close
Once you find the valve, turn it clockwise until it stops. This motion closes the valve and stops the flow of gas.
Don’t force it beyond the point it stops turning. A firm but gentle twist is enough to ensure the gas supply is off.
Double-check The Gas Is Off
After turning off the valve, test to confirm the gas is no longer flowing. You can do this by trying to light the grill burner or listening closely for any hissing sounds.
- If the burner doesn’t ignite and you don’t hear gas escaping, you’ve successfully turned off the supply.
- If you smell gas or hear a hiss, double-check the valve and connections for leaks or incomplete closure.
Have you ever skipped this step and faced issues? Taking your time here can save you from costly repairs and dangerous situations.
Removing The Old Regulator
Removing the old regulator is a key step in replacing it safely. This part controls gas flow from the tank to the grill. Handling it carefully avoids gas leaks and damage. Follow simple steps to disconnect it properly.
Disconnecting The Regulator Hose
First, turn off the gas supply at the tank. This stops gas flow completely. Next, check that the grill is off. Use a wrench to loosen the hose connection. Turn the fitting counterclockwise to detach the hose. Pull the hose gently away from the regulator. Avoid twisting or bending the hose sharply. Keep the hose clean and free from dirt.
Detaching The Regulator From The Grill
Locate the regulator attached to the grill’s gas valve. It usually screws onto the valve or connects with a clip. Use a wrench to loosen the regulator nut. Turn the nut slowly to prevent damage. Remove the regulator by pulling it straight off. Inspect the area for any dirt or wear. Clean the connection points before installing a new regulator.
Choosing The Right Replacement Regulator
Choosing the right replacement regulator for your gas grill is crucial for safe and efficient grilling. A regulator controls the flow of gas from the tank to the grill, so picking one that matches your grill’s specifications is essential. Getting this wrong can lead to poor grill performance or even safety hazards.
Understanding Your Grill’s Gas Type And Pressure Requirements
First, identify whether your grill uses propane or natural gas. Regulators are designed specifically for one or the other, so using the wrong type can cause malfunctions.
Next, check the pressure rating of your existing regulator. Most propane grills use a low-pressure regulator rated at 11 inches of water column, but some models might differ.
You can usually find this information in your grill’s manual or printed on the original regulator. If you don’t have the manual, look up the model number online or check the label on the gas tank.
Matching The Regulator’s Connection Type
Regulators come with different connection fittings. Some screw directly onto the propane tank, while others connect via a hose.
Make sure the replacement regulator fits your grill’s hose or tank valve. A mismatch here means you won’t be able to attach the regulator properly, which can be frustrating and unsafe.
Take your old regulator to the store or keep a photo of it handy when shopping online to avoid buying the wrong type.
Considering The Regulator’s Flow Capacity
The flow capacity, often measured in pounds per hour (lb/hr), indicates how much gas the regulator can supply. Your grill needs enough flow to maintain consistent heat, especially if it has multiple burners.
If you pick a regulator with too low a capacity, your grill might sputter or fail to reach desired temperatures. Too high, and you risk gas wastage and potential safety issues.
Check your grill’s specifications or ask an expert to confirm the correct flow capacity for your model.
Looking For Safety Certifications And Quality Brands
Safety should be your top priority. Choose regulators that have certifications like CSA, UL, or ANSI. These marks indicate the product meets safety and performance standards.
Brands with a good reputation often provide more reliable and durable regulators. Think of it as an investment in your grill’s longevity and your safety.
Reading customer reviews can reveal real-world experiences that help you pick a trusted product.

Credit: www.keystoneforums.com
Installing The New Regulator
Begin by turning off the gas supply and disconnecting the old regulator from the grill. Carefully attach the new regulator, ensuring all connections are tight and secure to prevent leaks. Test the grill to confirm proper gas flow and safe operation.
Installing the new regulator on your gas grill is a straightforward process that can restore your grill’s efficiency and safety. A regulator ensures that gas flows smoothly from the tank to the burners, so it’s crucial to install it correctly. Follow these steps to get your grill back in action for your next barbecue.
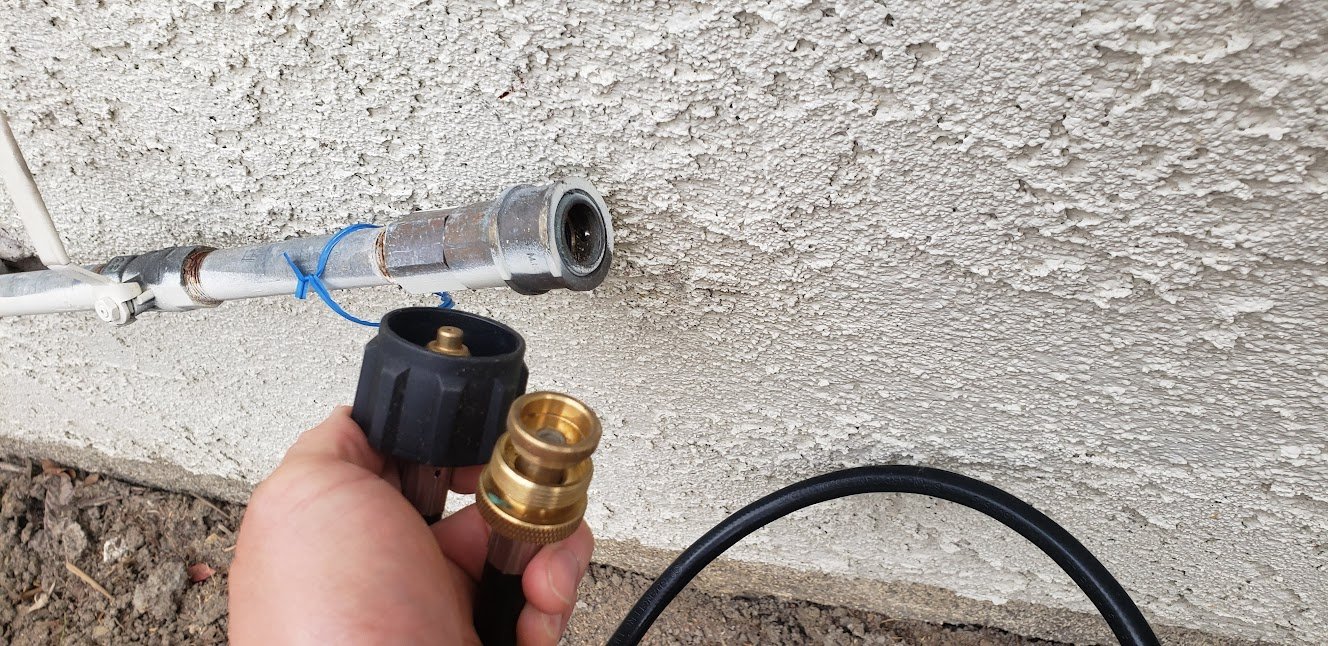
Connecting The Regulator To The Grill
Begin by attaching the new regulator to the grill’s manifold. This is where the gas line connects to the grill's burners. Ensure the connection is tight to prevent any gas leaks. Check the manufacturer's instructions for specific details about your model. If you're unsure, a gentle hand-tightening followed by a quarter-turn with a wrench usually does the trick. Don’t forget to inspect the regulator for any manufacturing defects before connecting it. If you notice any cracks or irregularities, contact the retailer for a replacement.
Securing The Hose Connection
Once the regulator is connected, focus on securing the hose. The hose should fit snugly onto the regulator's outlet. You’ll want to use an adjustable wrench to tighten the connection. A loose hose can lead to dangerous leaks, so double-check for a secure fit. Test the connection by spraying soapy water over it and turning on the gas. If bubbles form, tighten the connection further. Have you ever considered how a small oversight, like a loose hose, could turn your barbecue into a safety hazard? Always err on the side of caution and ensure each connection is secure. Your diligence ensures not only a perfectly grilled meal but also a safe cooking environment.
Checking For Gas Leaks
Ensuring your gas grill is leak-free is a vital safety step after replacing the regulator. Gas leaks can lead to dangerous situations, including fires or explosions. To keep your grilling experience safe and enjoyable, it's essential to perform a simple check for leaks.
Using A Soap Solution
A soap solution is an easy and effective way to detect gas leaks. Start by mixing equal parts of liquid dish soap and water in a spray bottle. Turn on the gas supply, but don't light the grill just yet.
Spray the soap solution generously over the connections between the gas line and the regulator. Watch closely for bubbles to form. If you see bubbles, it indicates a gas leak.
Did you know that a simple soap and water mix can be your best line of defense? It's a tool that anyone, regardless of experience, can use to ensure their grill's safety.
What To Do If Leaks Are Found
If you spot bubbles, it's crucial to act immediately. First, turn off the gas supply to prevent any further leakage. Tighten the connections and respray with the soap solution to check again.
If the leak persists despite your efforts, it might be time to replace the connection fittings or consult a professional. Never use a grill with a known gas leak, as it poses severe risks.
Have you ever thought about how a small leak can escalate into a significant hazard? Addressing it promptly not only ensures your safety but also prolongs the life of your grill.
Testing The Grill
Testing your gas grill after replacing the regulator is a crucial step to ensure safety and proper function. You want to make sure the gas flows smoothly and the flames ignite evenly. Skipping this step could lead to uneven cooking or, worse, dangerous leaks.
Before lighting your grill, check for leaks around the regulator and hose connections. Mix a solution of dish soap and water and apply it to the connections using a brush or spray bottle.
If you see bubbles forming, that means gas is escaping. Tighten the connections and test again until no bubbles appear. This simple test can prevent serious hazards.
Igniting The Grill Safely
Once you’re sure there are no leaks, turn on the gas slowly and ignite the grill. Watch the burners carefully as they light. The flames should be steady and blue, with little yellow tipping.
If the flames are weak or flickering, your regulator might still have an issue or the burner ports could be clogged. Adjust the gas flow or clean the burners and try again.
Adjusting Flame Height And Heat
Your grill’s performance depends on correct flame height. Too high, and you risk burning food; too low, and cooking takes forever. Use the control knob to adjust the flame to a medium height, then observe how the grill heats up.
Does the grill reach the desired temperature quickly? If not, double-check the regulator and hose for blockages or damage. Proper flame control means better grilling results every time.
Maintenance Tips For Longevity
Keeping your gas grill’s regulator in top shape is key to safe and efficient cooking. Proper maintenance extends the life of your regulator and prevents unexpected issues during grilling sessions.
Simple, regular checks can save you time and money while ensuring your grill performs reliably. What small actions can you take to protect your investment and enjoy hassle-free grilling?
Inspect The Regulator And Hose Regularly
Look for cracks, brittleness, or leaks in the hose and regulator. Even minor damage can lead to gas leaks, which are dangerous and reduce performance.
Test for leaks by applying soapy water to connections and watching for bubbles while the gas is on. This quick check can catch problems early before they escalate.
Store Your Grill And Regulator Properly
Protect the regulator from extreme weather. Moisture and cold can cause rust and internal damage, reducing lifespan.
Keep your grill covered and store the regulator indoors during off-seasons. This simple step can prevent many common issues.
Clean The Regulator Connections
Food grease and dirt can build up on connections, affecting the gas flow. Wipe connections with a clean cloth regularly.
Make sure connections are dry before attaching to the tank. This helps maintain a tight, secure seal and prevents corrosion.
Replace The Regulator When Signs Of Wear Appear
Don’t wait for complete failure. If your grill sputters or the flame is uneven, the regulator might be failing.
Replacing it promptly avoids safety risks and keeps your grill operating smoothly. Have a replacement ready, so you’re not caught off guard.

Credit: barbecuesgalore.ca
Frequently Asked Questions
How Do I Know If My Gas Grill Regulator Needs Replacement?
Signs include uneven flame, gas smell, or no heat. If your grill won’t ignite properly, the regulator may be faulty. Always check for cracks or damage before deciding to replace it.
What Tools Are Needed To Replace A Gas Grill Regulator?
You typically need an adjustable wrench, screwdriver, and possibly plumber's tape. Ensure the gas supply is off before starting. These tools help safely disconnect and reconnect the regulator.
How Long Does It Take To Replace A Gas Grill Regulator?
Replacing a regulator usually takes 15 to 30 minutes. It depends on your experience and grill model. Taking safety precautions may add extra time.
Can I Replace The Gas Grill Regulator Myself Safely?
Yes, if you follow safety guidelines and instructions carefully. Turn off the gas supply and check for leaks after replacement. If unsure, consult a professional.
Conclusion
Replacing a gas grill regulator is simple and safe with careful steps. Always turn off the gas before starting the work. Check for leaks after installing the new regulator. This helps keep your grill working well and prevents dangers. Regular maintenance extends your grill's life.
Enjoy cooking outside with confidence and ease. Take your time, follow instructions, and grill on!