
Are you ready to elevate your baking skills to a professional level? Learning how to put together a piping bag is the secret ingredient that will transform your homemade creations into bakery-worthy masterpieces.
Whether you're decorating cupcakes for a birthday party or adding the finishing touches to a wedding cake, mastering this simple yet essential technique can make all the difference. Imagine the satisfaction of creating intricate designs and stunning patterns with ease.
By the end of this guide, you'll have the confidence and know-how to wield a piping bag like a pro. So, let’s dive in and unlock the potential of your baking artistry!
Choosing The Right Piping Bag
Choosing the right piping bag can make a big difference in your decorating experience. The perfect bag feels comfortable in your hands and works well with the icing or filling you want to use. Think about what you’ll be piping and how often you plan to decorate to find the best fit for your needs.
Types Of Piping Bags
There are several types of piping bags to consider, each with its own benefits:
- Disposable bags:Great for quick cleanup and beginners. They’re convenient but not the most eco-friendly option.
- Reusable bags:Made from materials like silicone or nylon, these can be washed and used again. They offer better control but require cleaning after each use.
- Plastic vs. Cloth bags:Plastic bags tend to be stiffer, giving you precise control, while cloth bags are softer and can be easier to handle for larger projects.
Choosing between these depends on how often you decorate and how much effort you want to spend on cleanup.
Materials And Sizes
The material of your piping bag affects durability and flexibility. Silicone bags are very durable and easy to clean, but they may feel stiff at first. Nylon bags are softer and can be more comfortable, especially for longer decorating sessions.
Size is another key factor. Smaller bags (around 12 inches) are perfect for detailed work like writing or fine borders. Larger bags (16 inches or more) hold more icing, ideal for covering cakes or big projects.
Think about the size of your hands and the amount of icing you’ll use. Would a smaller bag give you more control, or would a larger bag save you time refilling?

Credit: www.amazon.ca
Selecting The Best Piping Tips
Selecting the best piping tips is key to decorating success. The right tip shapes and sizes create beautiful designs easily. Choosing tips depends on the effect you want. Knowing common shapes and sizes guides your choice. This helps you achieve neat, professional results with less effort.
Common Tip Shapes
- Round tips:Perfect for dots, writing, and outlining.
- Star tips:Create stars, rosettes, and shells with texture.
- Leaf tips:Shape leaves and petals for floral designs.
- Petal tips:Form ruffles, ribbons, and flower petals.
- Basketweave tips:Make woven patterns with flat or serrated edges.
Tip Sizes For Different Designs
| Tip Size | Best For |
|---|---|
| Small (1-3 mm) | Fine details, writing, small dots |
| Medium (4-7 mm) | Stars, rosettes, medium shells |
| Large (8 mm and above) | Large flowers, borders, bold designs |
Preparing The Piping Bag
Preparing the piping bag is an important first step. It helps keep the bag steady and makes decorating easier. A well-prepared bag prevents mess and ensures smooth icing flow. Follow simple steps to set up your bag correctly before filling it with icing or cream.
Folding The Bag For Stability
Start by opening the piping bag wide. Fold the top edge down about 2 to 3 inches. This creates a cuff that helps hold the bag firmly. The fold also stops icing from spilling out the top. Hold the folded edge with one hand to keep it stable while filling the bag.
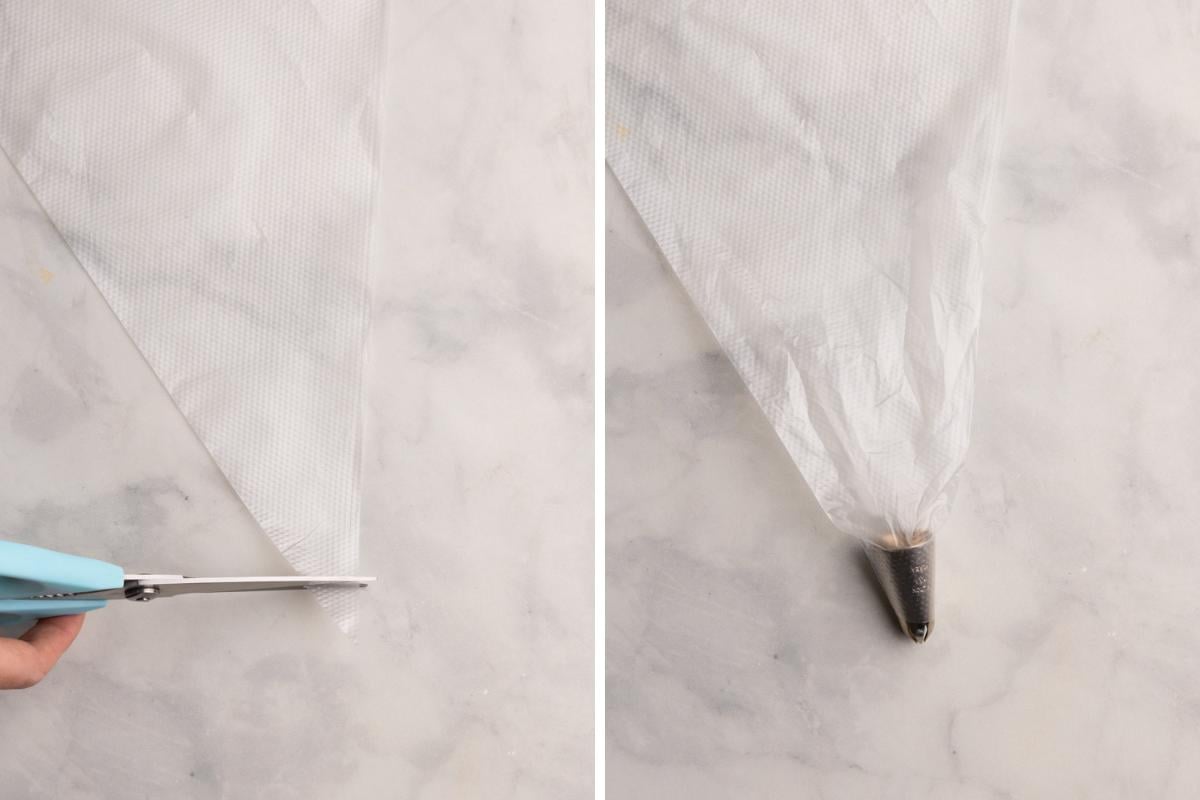
Inserting The Piping Tip
Choose the right piping tip for your design. Push the tip into the narrow end of the bag. Insert it until the tip sticks out slightly. The tip should fit snugly to avoid leaks. If needed, cut a small hole at the tip’s base to fit the bag tightly. Secure the tip by pushing the folded cuff over it.
Credit: partylicious.net
Filling The Piping Bag
Filling the piping bag is a crucial step that can make or break your decorating project. Getting this right means smoother icing flow and better control over your designs. Let’s look at how to fill your bag efficiently and avoid common pitfalls.
Choosing The Right Filling Tool
Using the right tool to fill your piping bag saves time and keeps your work area clean. A large spoon or a small spatula works well for thick icings like buttercream. For thinner fillings, a measuring cup with a spout makes pouring easier and reduces mess.
Some bakers prefer using a tall glass to hold the piping bag open while they fill it. This keeps the bag steady and frees up your hands. Have you tried this trick? It’s a simple way to avoid frustration, especially when working with sticky or runny fillings.
Preventing Air Bubbles
Air bubbles can cause uneven piping and unexpected bursts. To avoid this, don’t just shove the filling in. Instead, gently press the icing down towards the tip and squeeze out any trapped air as you fill.
Once filled, twist the top of the bag tightly to seal it. This keeps pressure consistent as you pipe. Think about the last time your icing sputtered unexpectedly—chances are, a hidden bubble was the culprit.
Sealing And Holding The Bag
Sealing and holding the piping bag correctly is key to smooth, precise decorating. Without a secure seal, frosting can leak out the top or the bag can slip from your grip. Mastering this step gives you full control, letting you focus on the design rather than wrestling with the bag.
Twisting Techniques
Start by filling your bag about two-thirds full to avoid overstuffing. Then, twist the top of the bag tightly to prevent any frosting from escaping.
Try folding the twisted part back on itself, creating a small cuff. This helps keep the twist firm and stops it from unraveling while you pipe.
Have you noticed that some decorators hold the twist with their pinky or ring finger? This little trick adds extra security and lets your dominant hand guide the tip smoothly.
Grip Tips For Control
Hold the twisted top with your non-dominant hand, keeping it steady and firm. Your dominant hand should rest near the tip, gently squeezing to control flow.
Keep your wrist relaxed but your fingers strong. A tight grip can cause shaky lines, while too loose lets frosting escape unpredictably.
Experiment with different hand positions until you find what feels natural. Some find resting their elbow on the table adds stability, especially for detailed work.
Cleaning And Maintaining Tools
Keeping your piping bag and tools clean is key to great baking. Dirty tools can spoil your frosting and cause bacteria build-up. Regular care helps your tools last longer and work better. Follow simple cleaning and storage tips to keep everything fresh and ready.
Washing Tips
Rinse your piping bag and nozzles right after use. Warm water helps remove leftover frosting easily. Use mild soap to clean all parts thoroughly. A small brush can reach inside nozzles for a deep clean. Avoid harsh chemicals that may damage the tools. Dry everything completely before storing to stop mold growth.
Storing For Longevity
Store your piping bag flat or rolled loosely to avoid creases. Keep nozzles in a small container to prevent loss and damage. Choose a dry, cool place away from direct sunlight. Avoid stacking heavy items on your tools. Check your tools regularly for cracks or wear. Replace any damaged parts to keep your baking smooth.

Credit: www.easyonlinebakinglessons.com
Frequently Asked Questions
How Do You Prepare A Piping Bag For Frosting?
Start by folding the bag’s top edge outward for grip. Insert the chosen piping tip inside. Unfold the bag’s edge over the tip. Fill the bag halfway with frosting. Twist the top to prevent leaks and apply even pressure while piping.
What Types Of Piping Bags Are Best For Beginners?
Beginner-friendly piping bags are usually disposable plastic bags. They are affordable, easy to use, and clean. Reusable silicone bags are also good but may require more care. Choose bags with compatible tips and comfortable grip for better control.
How Do You Prevent Frosting From Leaking In A Piping Bag?
Ensure the piping tip fits snugly inside the bag. Avoid overfilling the bag to reduce pressure leaks. Twist the bag’s top tightly before piping. Hold the bag firmly and apply steady pressure to maintain flow and avoid mess.
Can You Reuse Piping Bags Safely?
Reusable piping bags should be washed thoroughly after each use. Use warm, soapy water and allow them to dry fully. Disposable bags are best for one-time use to avoid contamination. Proper cleaning ensures safe reuse and maintains hygiene.
Conclusion
Putting together a piping bag is simple and quick. Choose the right bag and tip for your task. Cut the bag carefully to fit the tip snugly. Fill the bag with your icing or batter without overfilling. Twist the top to keep the contents secure.
Hold the bag firmly and squeeze gently for smooth piping. Practice a few times to feel more confident. This basic skill helps decorate cakes and pastries with ease. Enjoy creating beautiful designs and tasty treats every time.


