Want to make a perfect pie crust without the hassle? Using a food processor can save you time and effort while giving you a flaky, buttery crust every time.
Whether you’re a beginner or just looking for a quicker way, this guide will show you exactly how to make pie crust with a food processor. By the end, you’ll have the confidence to bake pies that impress your family and friends.
Ready to transform your baking game? Let’s dive in!

Credit: sweetiepieandcupcakes.com
Choosing Ingredients
Choosing the right ingredients is the foundation of a perfect pie crust, especially when using a food processor. Each component plays a key role in texture, flavor, and how well the dough holds together. Let’s break down what you need to consider before you start blending your crust.
Selecting The Right Flour
Flour affects the crust’s tenderness and structure. All-purpose flour is a reliable choice because it balances protein content, giving you a crust that’s both flaky and sturdy. If you want a more delicate texture, try using pastry flour, which has less protein and results in a softer bite.
Have you ever noticed how whole wheat flour can make your crust a bit denser? That’s due to its higher fiber content, so if you use it, consider mixing it with all-purpose flour to keep the crust light.
Types Of Fats To Use
The fat you choose defines the flakiness and flavor of your crust. Butter is the classic option, offering rich taste and great texture, but it melts quickly, so keep it cold. Shortening, on the other hand, stays solid longer during processing, creating a tender, flaky crust without much flavor.
Many bakers combine butter and shortening to get the best of both worlds—flavor and flakiness. Have you tried using lard? It’s a traditional fat that produces incredibly flaky crusts, though it’s less common today.
Adding Flavor Enhancers
Simple ingredients can elevate your pie crust beyond basic. A pinch of salt is essential to bring out the flavors of the flour and fat. You might also add a teaspoon of sugar if you want a slightly sweet crust, perfect for fruit pies.
Consider adding a splash of vinegar or lemon juice. These acids help prevent gluten from over-developing, keeping your crust tender. Have you noticed how a tiny twist like this can make a big difference in your baking?
Preparing The Food Processor
Preparing your food processor correctly is key to crafting a perfect pie crust. This step ensures smooth operation and helps maintain the right texture for your dough. Paying attention to these details can make all the difference between a crumbly crust and one that holds together beautifully.
Assembling The Parts
Start by making sure all parts of your food processor are clean and dry. Attach the bowl firmly to the base—you should hear a click or feel it lock into place. Then, insert the metal blade carefully; this sharp blade is essential for cutting the butter or shortening evenly into the flour.
Check that the lid fits securely before you start. A loose lid can cause ingredients to spill out, making a mess and wasting your effort. If your processor has a feed tube, keep it clear for adding extra ingredients later if needed.
Ensuring Proper Chilling
Cold ingredients are vital for a flaky pie crust, so chill your food processor bowl and blade in the fridge for at least 15 minutes before use. This simple trick helps keep the butter from melting too quickly during mixing, which can ruin the dough’s texture.
Have you ever noticed how warm dough can become sticky and hard to handle? Keeping your equipment cold stops that from happening. If your kitchen is warm, consider placing your flour in the fridge as well—this small step can improve your crust's flakiness.
Mixing The Dough
Mixing the dough is where your pie crust starts to take shape. It’s a simple process, but the way you handle each ingredient impacts the final texture. Using a food processor speeds things up, but attention to detail ensures your crust won’t turn out tough or crumbly.
Combining Dry Ingredients
Start by adding your flour and salt into the food processor bowl. Pulse a few times to blend them evenly. This quick step helps distribute the salt thoroughly, so every bite has balanced flavor.
Make sure not to overdo the pulsing here. You want the mixture just combined, not packed down. Have you ever noticed how a well-mixed dry base sets the tone for the whole dough?
Incorporating Fat Quickly
Next, add cold butter or shortening cut into small cubes. Pulse the food processor in short bursts to mix the fat with the flour. The goal is to create pea-sized pieces of fat coated with flour.
This is crucial because these tiny fat pockets create flakiness as the crust bakes. If you over-process, the fat melts too much and the dough loses its texture. I learned this the hard way—rushing this step led to a dense, chewy crust that no one wanted to eat.
Adding Water Gradually
Slowly pour in ice-cold water through the food processor’s feed tube while pulsing. Add just enough water for the dough to start coming together without becoming sticky.
Stop and check frequently. Too much water results in a tough crust, while too little means it won’t hold. Have you ever hesitated, wondering how much water is just right? Trust your eye here—it should look crumbly but hold together when pressed.
Checking Dough Consistency
Dough should hold together without being sticky or dry. Press it gently; it should feel soft and pliable. Adjust flour or water slightly to reach the right texture.
Checking Dough Consistency Getting the right dough consistency is crucial for a flaky, tender pie crust. With a food processor, you can streamline this process, but it's essential to know what to look for. The perfect dough should be cohesive but not sticky, a balance that's easier to achieve with some practice and a few tips.
Recognizing The Right Texture
You'll want your dough to resemble coarse crumbs or small peas. This texture ensures the butter is well-distributed, creating pockets that puff and flake when baked. A quick test is to pinch a bit of dough between your fingers. It should hold together without crumbling. If it does, you're on the right track.
Troubleshooting Common Issues
If your dough feels too dry and crumbly, don't fret. Gradually add cold water, one tablespoon at a time, and pulse the food processor until it just comes together. On the other hand, if it's too sticky, try adding a sprinkle of flour. Be cautious not to over-process, as this can lead to a tough crust. Have you ever found yourself with a pie crust that's not quite right? Addressing these issues promptly can save your dough and your dessert.
Chilling And Rolling
Chilling and rolling are key steps in making a perfect pie crust. Chilling helps the dough rest and the butter firm up. This creates a flaky texture when baked. Rolling the dough evenly ensures it cooks well and fits the pie dish nicely. Careful attention in these steps leads to a tender, crisp crust.
Wrapping And Refrigerating
After mixing, shape the dough into a flat disc. Wrap it tightly in plastic wrap. This prevents drying out and keeps it fresh. Chill the wrapped dough in the refrigerator for at least one hour. This resting time helps the gluten relax. It also chills the fat, which improves flakiness. Avoid skipping this step for the best results.
Rolling Out Evenly
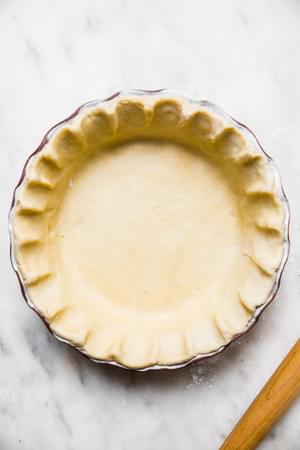
Lightly flour your work surface and rolling pin. Place the chilled dough on the surface. Roll from the center outward in all directions. Turn the dough a quarter turn often to keep it round. Aim for an even thickness of about 1/8 inch. Avoid rolling too thin or thick. Check the size by fitting it over your pie dish. Trim any excess dough before placing it in the dish. This ensures even baking and a neat appearance.
Credit: themodernproper.com
Baking Tips
Baking the perfect pie crust requires a few smart tips to ensure great texture and flavor. These tips help the crust stay crisp and avoid common problems like sogginess. Proper techniques make your pie look and taste better.
Blind Baking Techniques
Blind baking means baking the pie crust before adding the filling. This keeps the crust firm and prevents it from becoming soggy.
- Chill the dough before rolling it out to keep it cold.
- Line the crust with parchment paper or foil after fitting it in the pan.
- Fill the lined crust with pie weights, dried beans, or rice to hold its shape.
- Bake in a preheated oven until the edges turn light golden.
- Remove the weights and lining, then bake a few minutes more for a fully baked crust.
Avoiding Soggy Bottoms
Soggy bottoms ruin a good pie. Use these tips to keep your crust crispy and dry.
- Brush the crust with a thin layer of egg white before baking.
- Use a hot baking sheet under the pie pan to speed up crust cooking.
- Drain juicy fillings well to reduce moisture.
- Partially bake the crust before adding wet fillings.
- Let the pie cool on a wire rack to prevent steam buildup.
Variations And Enhancements
Experimenting with pie crust can elevate your baking from basic to memorable. Small tweaks in the ingredients can add layers of flavor and texture that surprise your guests. How can you make a classic crust uniquely yours? Let’s look at some simple ways to vary and enhance your pie crust using a food processor.
Adding Herbs Or Spices
Adding herbs or spices directly to your pie crust dough can create a subtle but noticeable flavor boost. Try mixing in dried rosemary, thyme, or even a pinch of cinnamon depending on your pie filling. These additions pair well with savory pies or fruit pies alike.
Use your food processor to evenly distribute herbs or spices throughout the dough. This method ensures every bite carries a hint of your chosen flavor. Have you considered how a little sage might complement a butternut squash pie or how nutmeg could enhance an apple pie crust?
Using Alternative Flours
Switching out all-purpose flour for alternative flours can change both the taste and texture of your crust. Almond flour adds a rich, nutty flavor and a tender crumb, while whole wheat flour introduces a hearty, rustic quality. Gluten-free options like oat or rice flour make the crust accessible to more people.
When using a food processor, these flours blend well with cold butter, maintaining the flakiness you want. Keep in mind that hydration levels might need slight adjustments. Have you tried mixing a bit of chickpea flour for a unique taste and added protein?

Credit: kristineskitchenblog.com
Frequently Asked Questions
How Do I Make Pie Crust With A Food Processor?
To make pie crust, pulse flour, salt, and cold butter in a food processor. Add ice water gradually until dough forms. Chill before rolling out.
What Type Of Butter Is Best For Pie Crust?
Use unsalted, cold butter for the best flaky pie crust. Cold butter creates steam pockets, making the crust tender and flaky.
Can I Use A Food Processor For Gluten-free Pie Crust?
Yes, a food processor works well for gluten-free crusts. Use gluten-free flour and pulse ingredients until combined, then chill before rolling.
How Long Should Pie Dough Chill After Processing?
Chill pie dough for at least 1 hour. This firms the butter and relaxes gluten for easier rolling and a flakier crust.
Conclusion
Making pie crust with a food processor saves time and effort. The process is quick and keeps the ingredients cold. This helps create a flaky and tender crust every time. You can customize the crust by adding different flavors or adjusting the thickness.
Practice a few times to get comfortable with the steps. Soon, you will enjoy fresh, homemade pies with little hassle. A food processor makes pie crust easy for beginners and experts alike. Give it a try and enjoy baking with confidence.