Have you ever wondered what to do with the leftover bones after enjoying a delicious rotisserie chicken? Instead of tossing them away, you can turn those scraps into something amazing—homemade chicken broth.
Making broth from rotisserie chicken bones is easier than you think, and it’s packed with rich flavor and nutrients. Imagine having a warm, comforting base ready for your soups, stews, and recipes—all made from what you already have in your kitchen.
Keep reading, and you’ll learn simple steps to create your own flavorful chicken broth that saves money and reduces waste. Your cooking will never be the same!
Gathering Ingredients
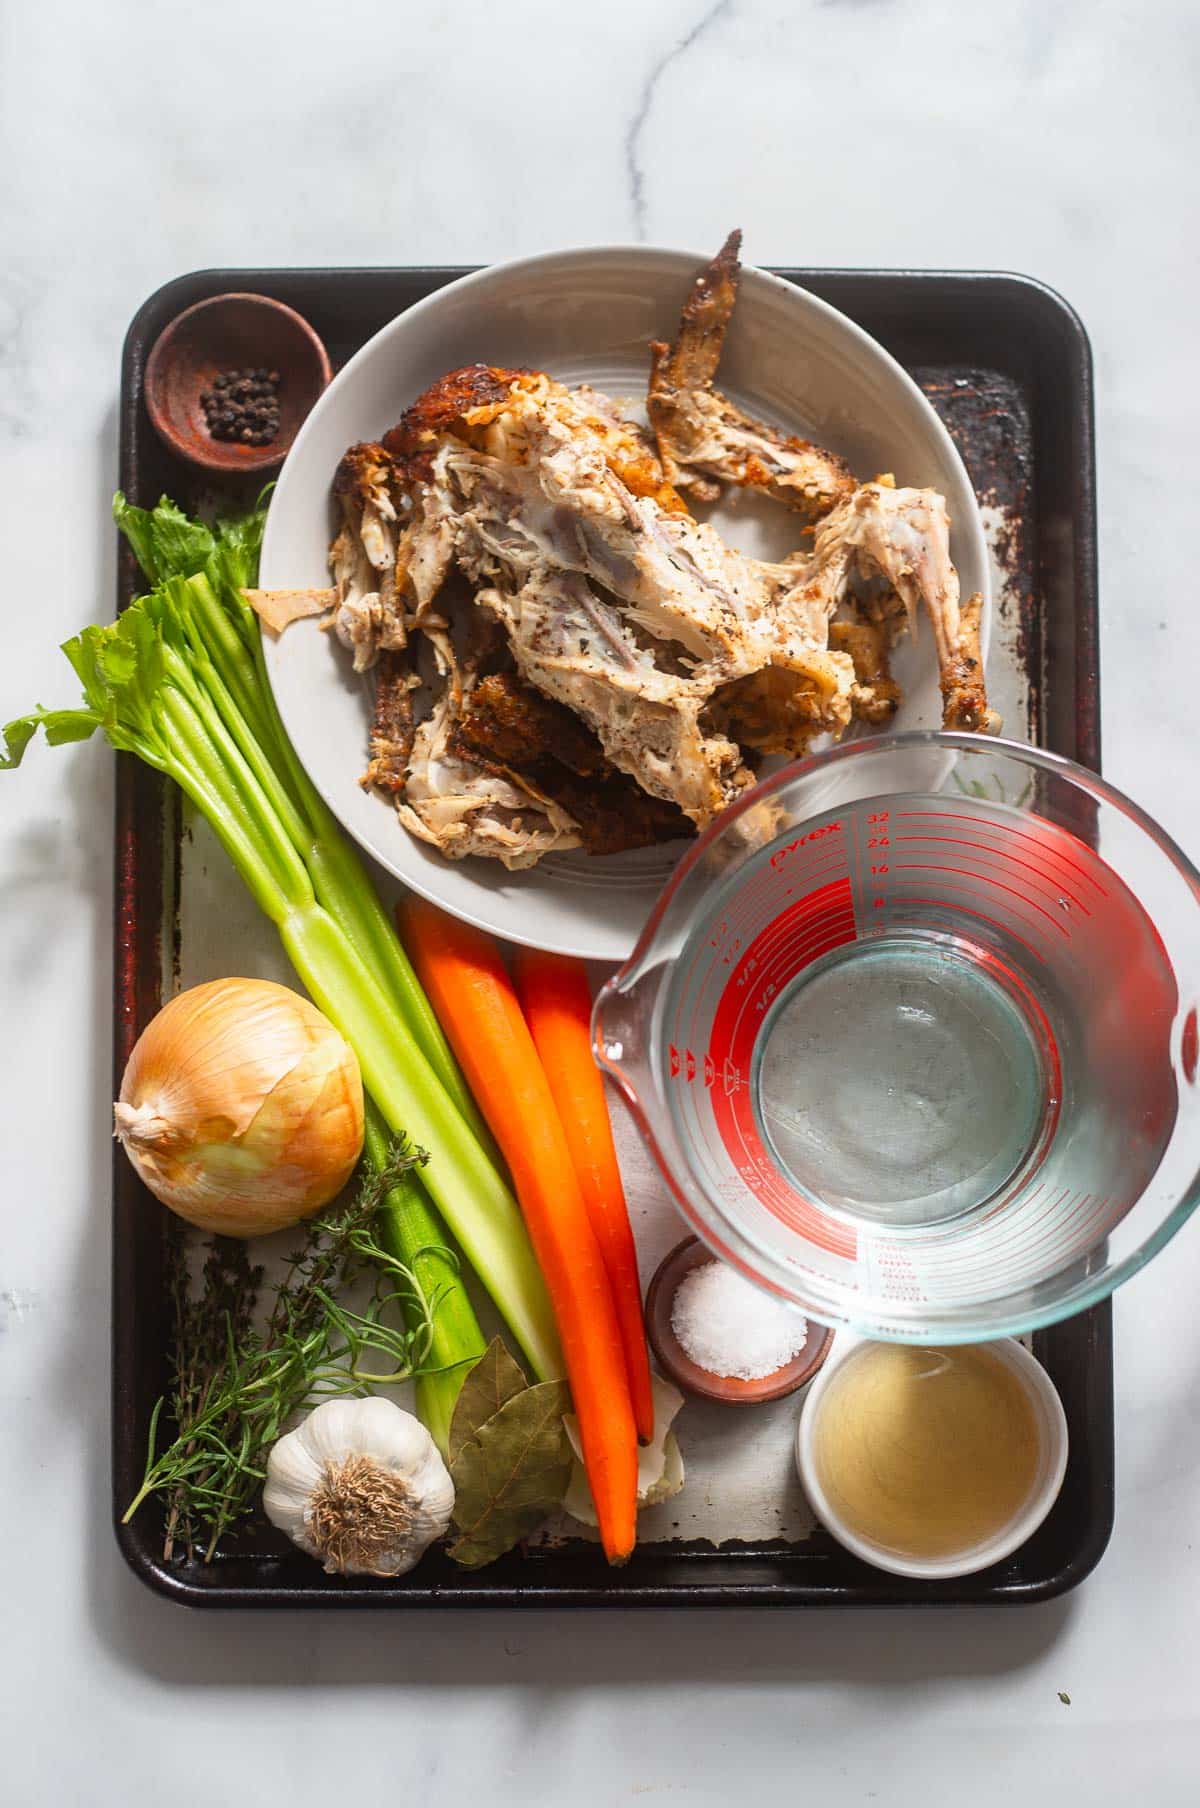
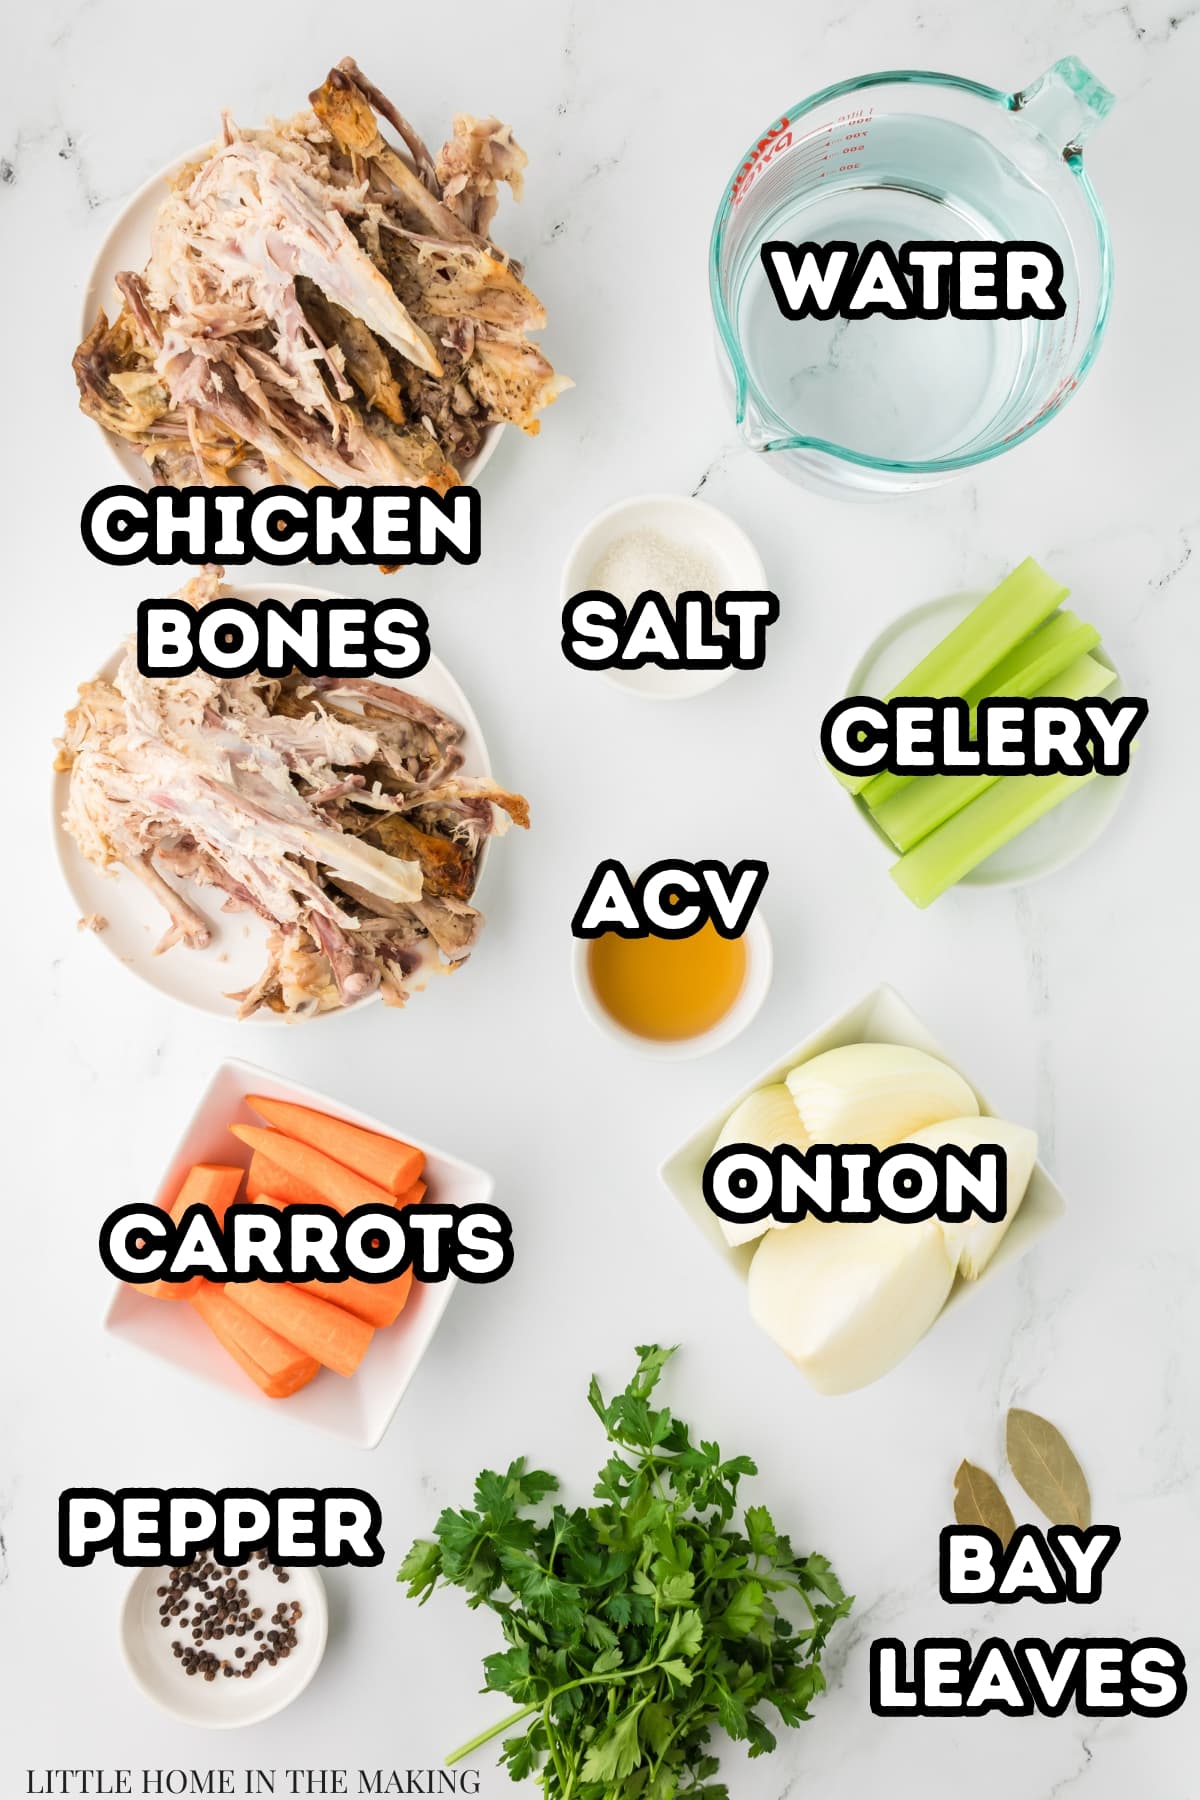
Gathering the right ingredients is the first step to making rich, flavorful chicken broth from rotisserie chicken bones. Using quality components will bring depth and warmth to your broth, turning simple leftovers into a nourishing base for many dishes. Let’s look at what you need to prepare before you start simmering.
Choosing The Right Chicken Bones
Start with the carcass of your rotisserie chicken—this includes bones, cartilage, and any leftover skin. These parts hold the key to a full-bodied broth.
Make sure the bones are free from excess meat scraps or burnt pieces, which can make the broth bitter. If you have a choice, pick bones from chickens that were roasted with minimal seasoning to avoid overpowering flavors.
Essential Vegetables And Herbs
Vegetables add sweetness and complexity. Classic choices are onions, carrots, and celery—often called mirepoix.
- Onions:Use whole or halved, skin on for color.
- Carrots:Roughly chopped to release natural sugars.
- Celery:Adds a subtle earthiness.
Fresh herbs like parsley, thyme, and bay leaves bring freshness and aromatic notes. Don’t worry about exact amounts—adjust to your taste.
Optional Flavor Boosters
Want a deeper flavor? Add garlic cloves, peppercorns, or a splash of apple cider vinegar. Vinegar helps draw minerals from the bones into the broth, enriching its nutrition.
Sometimes, a small piece of ginger or a star anise can add an interesting twist if you’re feeling adventurous. Experiment with what you have on hand—you might discover your perfect broth blend.
Credit: gethealthyu.com
Preparing The Bones
Preparing the bones is a key step in making rich chicken broth. Proper preparation helps extract flavors fully and avoids unwanted tastes. Start by handling the bones carefully and cleaning them well.
Removing Excess Meat
Remove leftover meat from the rotisserie chicken bones. Small bits of meat can burn or make the broth cloudy. Use your fingers or a small knife to pull away the extra meat. Keep some skin and cartilage for added flavor and gelatin.
Roasting For Deeper Flavor
Roasting bones intensifies the broth’s flavor. Spread the bones on a baking sheet in one layer. Roast in the oven at 400°F (200°C) for about 20-30 minutes. Turn the bones halfway for even browning. Darker bones give the broth a richer, more complex taste.
Cooking The Broth
Cooking the broth is where the magic of turning leftover rotisserie chicken bones into a rich, flavorful liquid truly happens. It’s a process that requires the right tools, patience, and a bit of attention to detail. Your choices during this stage will make all the difference in the final taste and clarity of your broth.
Selecting The Cooking Vessel
Choose a large, heavy-bottomed pot or a slow cooker for making your broth. A wide pot allows bones and vegetables to spread out evenly, helping flavors develop better. If you prefer hands-off cooking, a slow cooker is perfect for a long, gentle simmer without constant checking.
Adding Water And Ingredients
Start by placing your cleaned rotisserie chicken bones in the pot. Cover them with cold water—enough to submerge everything comfortably, usually about 8 cups for a full carcass. Add aromatics like onion, carrot, celery, and herbs such as parsley or thyme to boost flavor naturally.
Don’t forget a pinch of salt and a few peppercorns to season the broth from the start. You can also toss in garlic cloves or a bay leaf for extra depth. Avoid adding too much salt early on; you can adjust seasoning after cooking.
Simmering Time And Temperature
Bring the water to a gentle boil, then immediately lower the heat to a simmer. Cooking the broth slowly is key—too high heat will make it cloudy and greasy. Let it simmer uncovered for at least 3 to 4 hours, but 6 to 8 hours yields a more concentrated flavor.
Skim off any foam or impurities that rise to the surface during the first hour. This helps keep your broth clear and clean-tasting. Wondering if you can rush this? Patience here means a broth that tastes like it’s been cooking all day, even if you start with leftovers.
Credit: www.littlehomeinthemaking.com
Straining And Storing
Strain the broth through a fine mesh to remove bones and solids. Let it cool before storing in airtight containers. Keep refrigerated for up to five days or freeze for longer use.
Straining and storing your homemade chicken broth is crucial. Proper techniques ensure a flavorful and safe broth for future use. After simmering your rotisserie chicken bones, attention shifts to removing solids, cooling, and storing.
Removing Solids
Use a fine-mesh sieve to strain the broth. This removes bones and other solids. Pour the broth slowly into the sieve over a large bowl or pot. Press lightly on the solids to extract more liquid. Discard the solids afterward.
Cooling And Refrigeration Tips
Let the broth cool at room temperature for a short time. Transfer it to shallow containers to speed up cooling. Once cool, cover and place in the fridge. Use within four days for best quality.
Freezing For Future Use
For long-term storage, freeze the broth. Pour into ice cube trays or freezer-safe bags. Label with the date for tracking freshness. Use within six months for optimal flavor.
Enhancing Broth Flavor
Enhancing the flavor of chicken broth from rotisserie chicken bones makes a big difference. The basic broth is good, but small tweaks bring out rich, deep tastes. Fresh herbs, spices, and a touch of salt can brighten the broth. Simmering the broth longer helps develop a stronger, fuller flavor. Simple steps create broth that tastes homemade and satisfying.
Adjusting Seasonings
Start with salt and pepper to balance flavors. Add a bay leaf or two for subtle earthiness. Fresh garlic and onion pieces boost savoriness. A few sprigs of thyme or parsley add freshness. Taste the broth often during cooking. Adjust seasoning little by little to avoid overpowering.
Using Broth In Recipes
Chicken broth from rotisserie bones works well in many dishes. Use it as a base for soups and stews. Pour it over rice or grains for extra flavor. Use broth to cook vegetables for a tasty side dish. It also makes sauces richer and more complex. Store broth in the fridge or freezer for easy use.

Credit: nocrumbsleft.net
Frequently Asked Questions
How Long Should I Simmer Rotisserie Chicken Bones?
Simmer rotisserie chicken bones for 4 to 6 hours. This extracts maximum flavor and nutrients. Use low heat to avoid cloudiness. Longer simmering enhances broth richness and gelatin content.
Can I Freeze Homemade Chicken Broth Safely?
Yes, homemade chicken broth freezes well. Cool it completely before freezing. Store in airtight containers or freezer bags. Label with date and use within 3 months for best quality.
What Vegetables Enhance Chicken Broth Flavor?
Common vegetables include onions, carrots, and celery. Garlic, parsley, and thyme add extra aroma. Avoid strong-flavored vegetables like broccoli to keep broth clear and mild.
Is Homemade Chicken Broth Healthier Than Store-bought?
Homemade broth has no preservatives or additives. It retains more nutrients and natural gelatin. Store-bought broth often contains sodium and artificial flavors, making homemade a healthier option.
Conclusion
Making chicken broth from rotisserie chicken bones saves money and reduces waste. It fills your kitchen with a rich, warm aroma. You control the ingredients, so it stays natural and healthy. Use the broth in soups, stews, or sauces for extra flavor.
This simple process turns leftovers into something tasty and useful. Try it once, and you’ll enjoy homemade broth anytime. A small effort brings big rewards in your cooking. Give your meals a cozy, homemade touch today.