Are you ready to create delicious cake pops that look just like they came from a bakery? Making cake pops with a cake pop mold is easier than you think.
Whether you want a fun treat for a party or a sweet snack for yourself, this method helps you get perfect shapes every time. In this guide, you’ll discover simple steps and helpful tips that will turn your cake and frosting into bite-sized delights.
Keep reading, and soon you’ll be impressing friends and family with your homemade cake pops!
Choosing The Right Ingredients
Choosing the right ingredients is key to making delicious cake pops that look as good as they taste. Every element, from the cake base to the coating, impacts the final result. Think about the flavors and textures you want to highlight before you start mixing.
Selecting Cake Mix Or Homemade Batter
You can use a boxed cake mix or whip up your own batter from scratch. Boxed mixes save time and are consistent, perfect if you want a reliable flavor every time.
Homemade batter lets you customize flavors and textures. You could add a pinch of cinnamon or swap regular flour for almond flour to make your cake pops unique. What flavor combinations excite your taste buds?
Picking The Best Frosting
Frosting is what binds your cake crumbs into perfect spheres. Cream cheese frosting adds a tangy richness, while buttercream offers a smooth, sweet option.
Try adjusting the frosting’s sweetness to balance the cake’s flavor. Too much frosting can make the pops heavy, so find the right amount to hold your cake together without overpowering it.
Choosing Coating And Decorations
The coating gives your cake pops their signature look and texture. Candy melts are popular because they come in many colors and harden quickly.
You can also use melted chocolate for a richer taste. Add sprinkles, crushed nuts, or edible glitter to make your pops festive and eye-catching.
What decoration will make your cake pops stand out at your next party?
Preparing The Cake Batter
Preparing the cake batter is the foundation of perfect cake pops. The texture and flavor of your cake depend heavily on how well you mix and bake the batter. Taking your time to get this step right ensures your cake pops will hold their shape and taste delicious.
Mixing Ingredients Properly
Start with fresh ingredients to get the best flavor. Measure your flour, sugar, eggs, and butter accurately—too much or too little can change the texture drastically.
Mix the ingredients gently but thoroughly. Overmixing can make the batter tough, while undermixing leaves lumps and uneven texture. Use a spatula or hand mixer on low speed for a smooth, consistent batter.
Have you noticed how some cakes turn out dry or crumbly? That often happens because the ingredients weren’t mixed well. Taking a little extra time here will make your cake pops much easier to shape.
Baking Cake For Cake Pops
Baking the cake is more than just following time and temperature. Use a shallow pan to ensure even baking and a soft texture, which is crucial for molding cake pops.
Check the cake with a toothpick before taking it out. The toothpick should come out clean or with a few moist crumbs—never wet batter. This helps avoid underbaked centers that can fall apart when shaping.
Once baked, let your cake cool completely before using the mold. Warm cake is fragile and can crumble, making your cake pops difficult to form. Cooling also helps the cake firm up, which improves the final result.
Using The Cake Pop Mold
Using the cake pop mold is a simple way to create perfectly shaped cake pops. This tool helps you make uniform balls quickly and easily. Preparing and using the mold correctly ensures your cake pops bake evenly and come out clean. Follow these tips to get the best results every time.
Greasing And Preparing The Mold
Start by lightly greasing the inside of each mold cavity. Use a small brush or paper towel to apply a thin layer of oil or non-stick spray. This prevents the cake from sticking and helps the pops release easily. Avoid too much grease; a light coating is enough.
Make sure the mold is clean and dry before greasing. Place the mold on a flat surface for easy filling.
Filling The Mold Correctly
Fill each cavity about three-quarters full with your cake batter. Overfilling can cause the batter to overflow during baking. Use a spoon or piping bag for better control. Tap the mold gently on the counter to remove air bubbles and level the batter.
Do not pack the batter tightly. Let it settle naturally inside the mold.
Baking Time And Temperature Tips
Set your oven temperature according to the recipe, usually around 325°F to 350°F (160°C to 175°C). Bake the cake pops for 15 to 20 minutes, but check often. Insert a toothpick to see if it comes out clean.
Let the mold cool for a few minutes after baking. Carefully remove the cake pops by gently pressing from the back of each cavity. Cool completely before decorating.
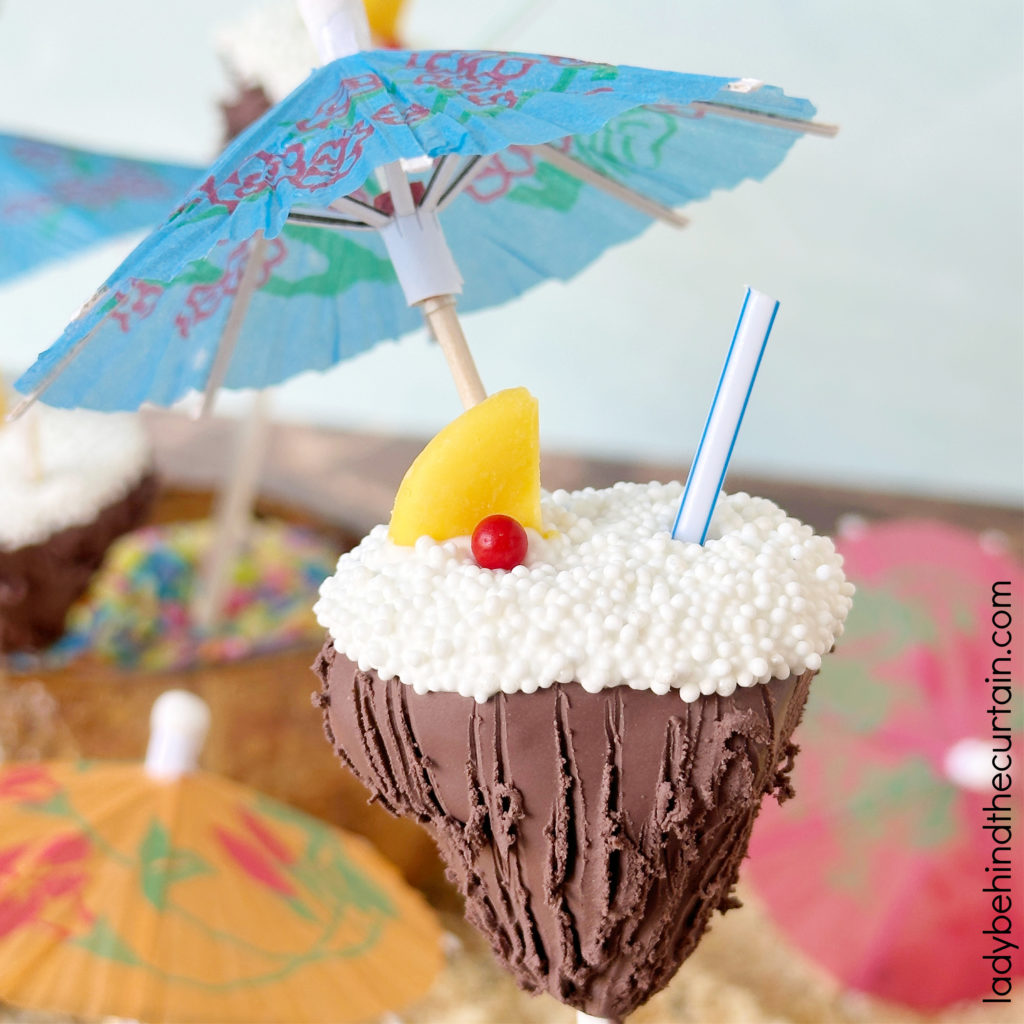
Credit: www.ladybehindthecurtain.com
Shaping And Cooling Cake Pops
Press the cake mixture firmly into the cake pop mold to shape perfect spheres. Chill the shaped cake pops in the freezer until firm for easy handling and coating.
Shaping and cooling cake pops are crucial steps in making these sweet treats. Proper shaping ensures a neat appearance, while cooling sets them perfectly. Let's dive into how you can achieve this with ease.
Removing Pops From Mold
Once your cake mixture is ready, place it in the mold. Ensure the mold is filled evenly. This helps each pop maintain a uniform shape. Close the mold tightly. Press it gently to ensure the cake mixture is compact. After baking, allow the mold to cool slightly. Open the mold carefully. Use a gentle hand to remove each cake pop. Avoid using too much force. This prevents breaking or deforming the pops.
Cooling And Setting Cake Pops
After removing, place the cake pops on a cooling rack. Ensure they are spaced apart. This allows air to circulate. Let them sit for about 10 minutes. This initial cooling helps them firm up slightly. Once cooled, transfer them to the refrigerator. Chill for at least 30 minutes. This step is key for setting the pops. A firm cake pop makes decorating easier. It also ensures the sticks hold well.
Adding Sticks And Coating
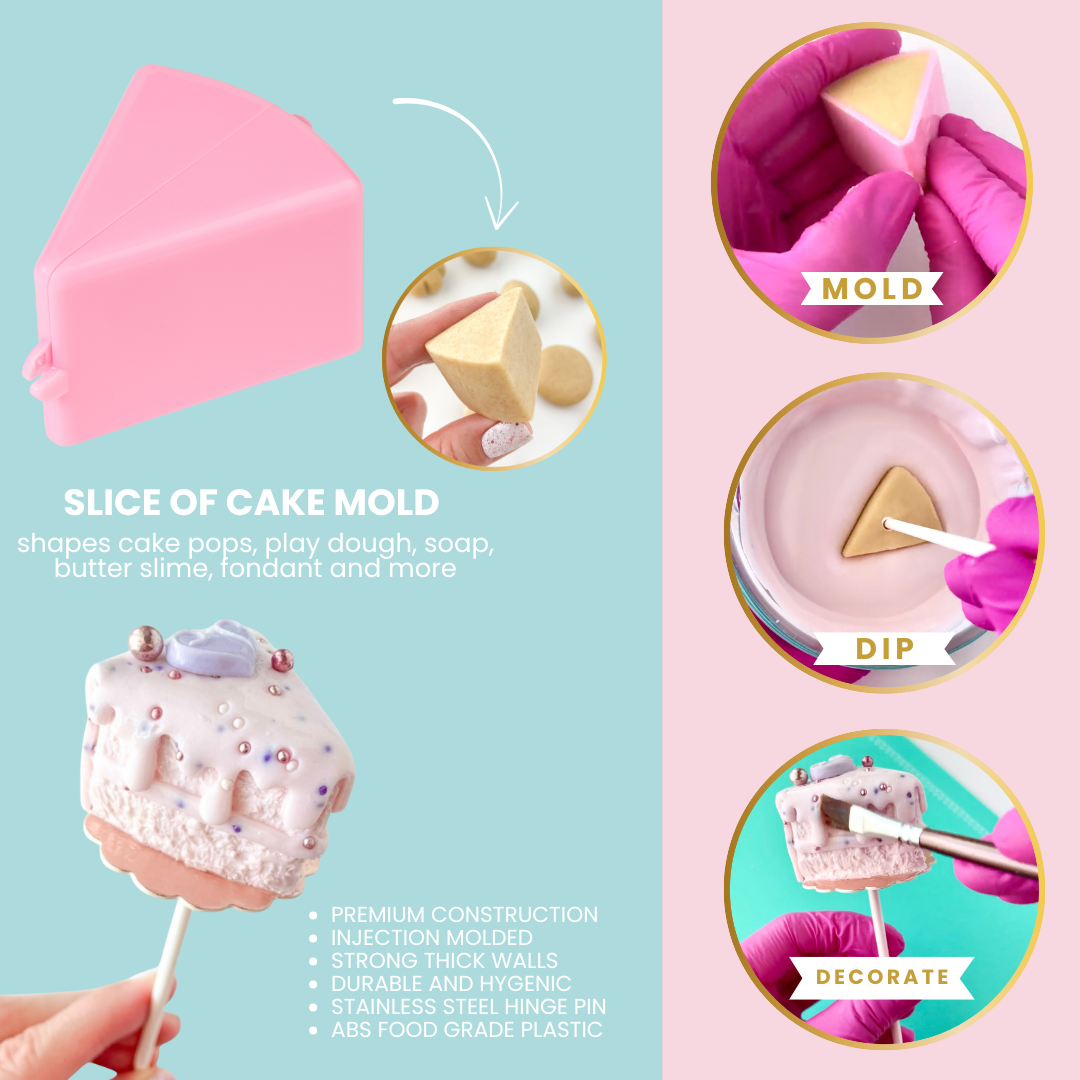
Adding sticks and coating is a key part of making perfect cake pops. This step ensures your cake pops look great and hold together well. It also gives them a smooth, delicious finish.
Properly inserting sticks helps keep cake pops stable. Coating them with chocolate or candy creates a tasty shell. Dipping each pop evenly prevents messy spots and keeps the coating neat.
Inserting Sticks Securely
Start by melting a small amount of chocolate or candy coating. Dip the tip of each stick into the melted coating. This acts as glue to hold the stick in place. Gently insert the stick halfway into each cake pop. Place the cake pops in the fridge to let the coating harden. This step stops the cake pop from falling off the stick.
Melting Chocolate Or Candy Coating
Use a microwave or double boiler to melt your coating. Heat in short bursts, stirring often. This prevents burning and keeps the coating smooth. Choose high-quality chocolate or candy melts for the best taste. Thin the coating with a little vegetable oil if it feels too thick. The right consistency helps the coating spread evenly.
Dipping Cake Pops Evenly
- Hold the stick firmly and dip the cake pop into the coating.
- Tap the stick gently on the bowl’s edge to remove extra coating.
- Rotate the pop slowly to cover all sides evenly.
- Place the dipped pop upright in a styrofoam block or cake pop stand.
- Allow the coating to set at room temperature or in the fridge.
Even coating gives cake pops a smooth and shiny finish. Avoid thick layers that may crack or drip. A steady hand helps make every pop look perfect.
Credit: www.mylittlecakepopmolds.com
Decorating Cake Pops
Decorating cake pops is where your creativity truly shines. After molding and baking, the fun begins with adding colors, textures, and personal touches that make each pop a mini masterpiece. How you decorate can turn simple cake pops into stunning treats perfect for any occasion.
Using Sprinkles And Edible Glitter
Sprinkles and edible glitter add instant charm and sparkle to your cake pops. You can dip the pop in melted chocolate or candy coating, then quickly roll or sprinkle it with your chosen toppings before it hardens.
Try mixing different shapes and colors of sprinkles to match the event or your mood. Edible glitter catches the light beautifully, making your cake pops look festive and inviting without much effort.
Creating Themed Designs
Think about the event or recipient when designing your cake pops. You can use colored coatings, edible markers, or piped icing to create characters, patterns, or symbols that suit birthdays, holidays, or celebrations.
For example, use green and red for Christmas, or pastel shades for baby showers. Themed designs make your cake pops more meaningful and memorable, showing you put thought into every detail.
Adding Final Touches
The last details can make a big difference. Consider adding small candies, nuts, or drizzles of contrasting chocolate to give your cake pops texture and flair.
Don’t forget to use decorative sticks or ribbons to enhance their presentation. These finishing touches show your care and elevate simple cake pops into delightful gifts or party treats.
Storing And Serving Tips
Knowing how to store and serve cake pops properly keeps them fresh and tasty. It also makes your presentation look neat and inviting. This section covers easy tips for storing cake pops and creative ways to serve them.
Best Ways To Store Cake Pops
Store cake pops in an airtight container to keep moisture out. Keep them in the fridge if you plan to eat them within a week. For longer storage, freeze them wrapped in plastic wrap and placed in a sealed bag.
Allow frozen cake pops to thaw in the fridge before serving. Avoid leaving cake pops at room temperature for too long. This helps maintain their shape and flavor.
Serving Ideas And Presentation
Present cake pops in a decorative stand or foam block for a clean look. Wrap each pop in clear cellophane tied with a ribbon for gifts or parties. Arrange them in colorful cups filled with candies or sprinkles.
- Group cake pops by color or flavor for visual appeal.
- Use themed decorations to match events or holidays.
- Place small labels on sticks to identify flavors.
Simple touches like ribbons and labels make cake pops more festive. Serving them this way adds charm and makes guests feel special.

Credit: lifemadesimplebakes.com
Frequently Asked Questions
What Ingredients Are Needed For Cake Pops With A Mold?
You need cake crumbs, frosting, and candy melts or chocolate. Optional decorations include sprinkles or edible glitter. Use fresh cake for best results.
How Do I Use A Cake Pop Mold Properly?
Fill each mold cavity with cake mixture, press firmly. Insert sticks, close the mold, and freeze for 10 minutes. Remove carefully to keep shape intact.
Can I Use Any Cake Flavor For Cake Pops?
Yes, any cake flavor works well with cake pop molds. Popular choices include vanilla, chocolate, and red velvet. Choose flavors that complement your frosting.
How Long Should Cake Pops Set Before Decorating?
Allow cake pops to chill for at least 30 minutes. This helps them firm up and hold their shape. Decorating is easier when pops are cold.
Conclusion
Making cake pops with a cake pop mold is simple and fun. You only need a few ingredients and the right tools. The mold helps shape the pops quickly and evenly. Decorating them lets you be creative and enjoy tasty treats.
Practice a little to get perfect results every time. Share your cake pops with friends or keep them for a sweet snack. This method saves time and makes baking less messy. Try it soon and enjoy delicious, homemade cake pops!