Are you ready to turn your favorite box brownies into bite-sized treats that everyone will love? Making brownies in a mini muffin pan is a simple trick that gives you perfectly portioned, fudgy bites every time.
Whether you’re hosting a party, packing snacks for the kids, or just craving a quick sweet fix, these mini brownies are your new go-to. Keep reading to discover how easy it is to transform your box mix into delicious, shareable goodies that will disappear fast!
Choosing The Right Brownie Mix
Choosing the right brownie mix is the first step to making perfect mini muffin brownies. The mix affects taste, texture, and how well the brownies bake in a small pan. Some mixes create fudgy brownies, while others give a cakey texture. Pick a mix that suits your preference and works well in mini muffin pans.
Popular Brands To Consider
- Betty Crocker – known for rich and moist brownies.
- Ghirardelli – offers intense chocolate flavor and fudgy texture.
- King Arthur Flour – provides natural ingredients and classic taste.
- Hershey’s – a budget-friendly option with a balanced flavor.
- Simple Mills – great for gluten-free and natural mixes.
These brands are widely available and have reliable results for mini brownies.
Checking Ingredients And Flavor Options
Read the ingredient list carefully. Avoid mixes with too many artificial additives. Choose mixes with real cocoa or chocolate for better flavor.
Flavor options vary. Some mixes include nuts, caramel, or mint. Plain chocolate is the most versatile for mini muffins. Pick a flavor that matches your taste and any dietary needs.
Preparing Your Mini Muffin Pan
Preparing your mini muffin pan is key for perfect box brownies. A well-prepared pan stops brownies from sticking. It also helps them bake evenly. Taking time here saves effort later when removing brownies.
Two popular ways prepare the pan: greasing and using liners. Each has its benefits. Choose what works best for your kitchen tools and preferences.
Greasing Techniques
Greasing the pan forms a barrier between the pan and brownies. Use a small amount of butter or oil. Spread it evenly inside each mini muffin cup.
Try these tips for greasing:
- Use a pastry brush or paper towel to spread the grease.
- Coat every corner and bottom thoroughly.
- Use non-stick spray for quick and even coverage.
- Avoid too much grease to prevent soggy edges.
Using Liners For Easy Removal
Liners make removing brownies simple and neat. They also reduce cleanup time. Choose mini muffin liners that fit snugly in your pan.
Benefits of liners include:
- Brownies lift out without sticking.
- Less chance of breaking or crumbling.
- Safer handling when warm.
- Can add a decorative touch.
Place a liner in each cup before pouring batter. Press gently to fit the shape. This small step improves the baking experience greatly.
Mixing The Batter Perfectly
Mixing the batter perfectly is key to making delicious box brownies in a mini muffin pan. The texture and taste depend on how well the ingredients combine. Too little mixing leaves clumps; too much makes the brownies tough. Getting the batter just right helps achieve moist, tender bites that fit perfectly in each mini muffin cup.
Measuring Ingredients Accurately
Accurate measurements ensure consistent results. Use dry measuring cups for flour and sugar. Spoon the ingredient into the cup and level it off with a straight edge. For liquids, use a clear liquid measuring cup placed on a flat surface. Check the measurement at eye level. Even small differences can change the texture and flavor of your brownies.
Tips For A Smooth Batter
- Combine dry ingredients in a separate bowl before mixing with wet ingredients.
- Use a whisk or electric mixer on low speed to blend ingredients evenly.
- Scrape down the sides of the bowl to mix all parts thoroughly.
- Mix just until ingredients are combined to avoid overworking the batter.
- Look for a smooth, thick batter without lumps for the best brownie texture.

Filling The Mini Muffin Cups
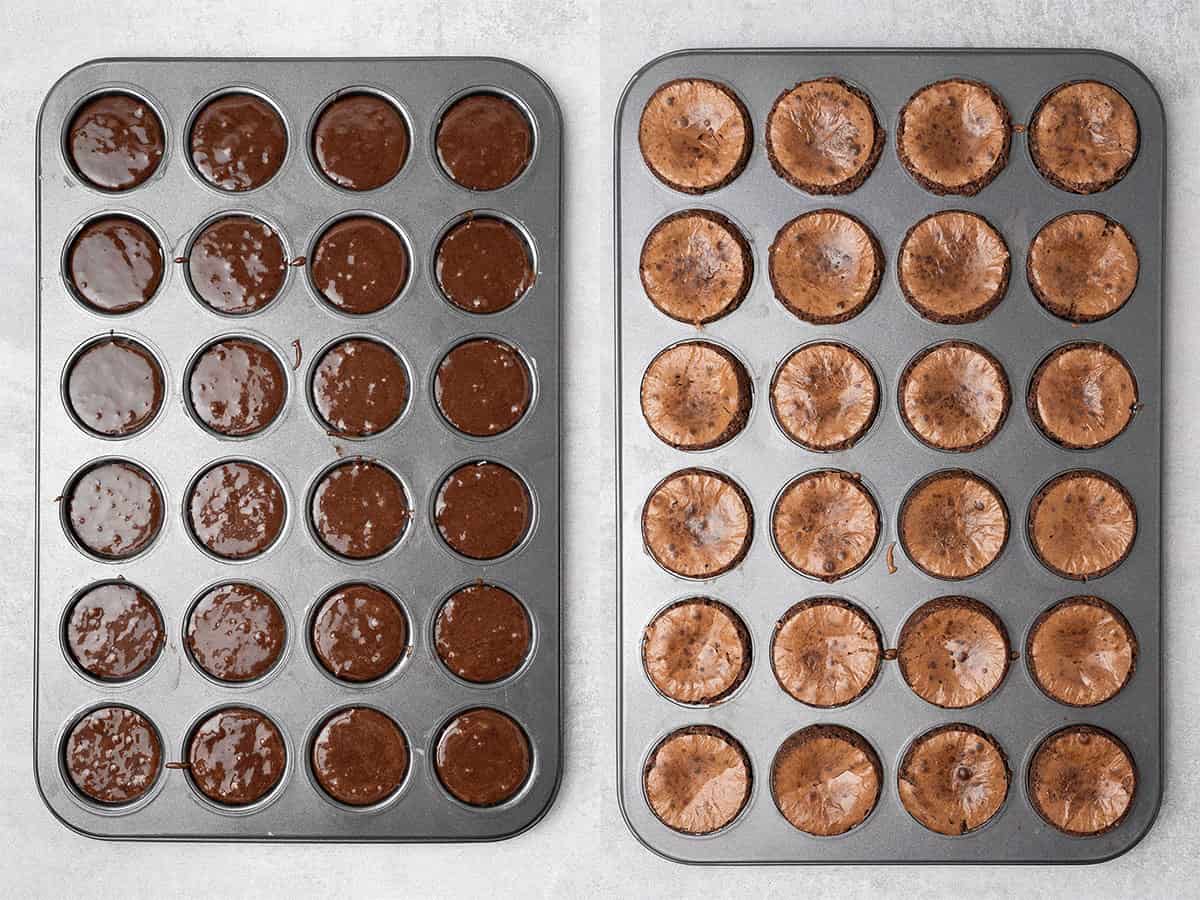
Carefully spoon brownie mix into mini muffin cups, filling them two-thirds full for even baking. This ensures a delightful, bite-sized treat that's perfect for any occasion. Use a small spoon or a cookie scoop for easy filling.
Filling the mini muffin cups with brownie batter can be an art in itself. It's not just about spooning in the mix; it's about achieving the perfect bite-sized delight. Let's explore how you can master this step and ensure each mini brownie is a delectable treat.
Ideal Portion Sizes
When filling your mini muffin cups, getting the right portion size is crucial. Use a small cookie scoop or a tablespoon to fill each cup about two-thirds full. This ensures that the brownies rise perfectly without spilling over the edges, giving you a neat and tasty result. Consider the size of your mini muffin pan. If they're particularly shallow, adjust accordingly. The goal is to have a uniform batch where each brownie bakes evenly.
Avoiding Overfilling
Overfilling the muffin cups can lead to a messy bake. Brownies that spill over can become uneven and difficult to remove from the pan. To avoid this, regularly check your portion sizes as you fill each cup. A little practice and attention make all the difference. Wouldn't you want each mini brownie to pop out of the pan with ease, looking as good as it tastes? Keeping the portions consistent not only helps in baking but also ensures each bite offers the same rich, chocolaty experience. Remember, restraint is key!
Baking Tips For Mini Brownies
Baking mini brownies in a muffin pan requires a few special tips. These help make sure the brownies cook evenly and stay moist. Small sizes mean they bake faster and need closer attention.
Knowing the right oven temperature and adjusting the baking time can make a big difference. These tips help avoid overbaking or undercooking your brownies.
Optimal Oven Temperature
Set your oven to 325°F (163°C). This is slightly lower than the usual brownie temperature. Lower heat helps the mini brownies bake evenly without burning edges. High heat can dry them out or cause uneven cooking.
Preheat your oven fully before placing the pan inside. A steady temperature ensures consistent results. Use an oven thermometer to check accuracy if needed.
Adjusting Baking Time
Mini brownies need less time than full-size ones. Start checking for doneness around 12 minutes. Use a toothpick inserted in the center to test. It should come out with a few moist crumbs, not wet batter.
If brownies look set but still feel soft, give them 1–2 more minutes. Watch closely to avoid overbaking. Every oven is different, so adjust based on your experience.
Cooling And Removing Brownies
Cooling and removing box brownies from a mini muffin pan is a crucial step that can make or break your dessert’s final look and texture. If you rush this process, you risk brownies sticking to the pan or even breaking apart. Taking time to cool properly and using the right techniques ensures each mini brownie comes out perfectly shaped and ready to enjoy.
Best Cooling Practices
Let your brownies cool completely in the pan before trying to remove them. This usually takes about 15-20 minutes, but you can test by gently touching the top—it should feel set and not warm.
Placing the pan on a wire rack helps air circulate underneath, speeding up even cooling. Avoid cooling on a flat surface like a countertop alone, as trapped heat and moisture can make brownies soggy.
Have you ever noticed how warm brownies tend to crumble? Waiting patiently helps them firm up, making removal much easier.
Preventing Breakage
Use a small butter knife or a thin spatula to gently loosen the edges of each brownie. Slide it carefully around each mini muffin cup to separate the brownie from the pan without tearing.
When removing brownies, turn the pan upside down and tap gently on the bottom. If any stick, try pushing them out gently with your fingers or the back of a spoon.
Consider lining your mini muffin pan with paper liners before baking. This simple step can save you from the frustration of broken brownies and makes cleanup a breeze.
Creative Toppings And Add-ins
Adding creative toppings and mix-ins to your box brownies baked in a mini muffin pan transforms simple treats into exciting bites. These small brownies become a playground for flavors and textures. You can easily customize each piece to suit different tastes or occasions.
Sprinkles, Nuts, And Chocolate Chips
Sprinkles add a fun pop of color and a slight crunch. Try rainbow or chocolate sprinkles for a festive look. They are perfect if you’re baking for kids or a party.
Nuts bring a satisfying crunch and a rich flavor contrast. Walnuts, pecans, and almonds work well. Toast them lightly before adding to intensify their flavor.
Chocolate chips melt slightly while baking, creating gooey pockets of chocolate. Use mini chips for even distribution or mix white and dark chocolate chips for a twist. You can add them to the batter or sprinkle on top before baking.
Frosting And Drizzle Ideas
Frosting turns your mini brownies into bite-sized cupcakes. Cream cheese frosting or classic chocolate buttercream works beautifully. Pipe a small swirl on each brownie once cooled for an elegant touch.
Drizzles can add flavor and a decorative finish. Melted caramel, peanut butter, or white chocolate drizzled in thin lines create eye-catching patterns. Have you tried mixing dark chocolate drizzle with a pinch of sea salt for a surprising flavor boost?
Combining toppings and drizzles opens endless possibilities. Why not sprinkle chopped nuts on frosting or add sprinkles over a caramel drizzle? These little details make your brownies more memorable.

Serving And Storing Mini Brownies
Serving and storing mini brownies properly can make all the difference in how enjoyable they are. Once you've baked these delightful treats in your mini muffin pan, you want to make sure they look appealing and stay fresh for as long as possible. Let’s look at some practical tips to help you serve and keep your mini brownies at their best.
Presentation Tips
Mini brownies are small, so how you present them can make a big impact. Try arranging them on a decorative platter or a tiered stand to catch your guests' eyes. Adding a light dusting of powdered sugar or a drizzle of chocolate sauce can instantly elevate their appearance.
Consider using colorful mini cupcake liners to add a splash of color and make serving easier. You can also top each brownie with a small piece of fruit like a raspberry or a sprinkle of chopped nuts for texture and flavor contrast. Have you ever noticed how simple garnishes can turn a plain brownie into a party favorite?
Storage To Maintain Freshness
Keeping mini brownies fresh is easier than you might think. Store them in an airtight container at room temperature to maintain their soft texture for up to 3 days. Avoid stacking them directly; using parchment paper between layers prevents sticking and damage.
If you want to keep them longer, place the container in the fridge, but be aware this might make them a bit firmer. To enjoy them like fresh-baked, warm them slightly in the microwave before serving. Have you tried freezing your brownies? Wrapped tightly, they can last in the freezer for up to 3 months—perfect for planning ahead or unexpected guests.
Frequently Asked Questions
How Long Do Mini Muffin Pan Brownies Take To Bake?
Mini muffin pan brownies usually bake in 12 to 15 minutes. Baking time depends on your oven and batter thickness. Check with a toothpick to ensure they come out clean. Avoid overbaking to keep them moist and fudgy.
Can I Use Any Boxed Brownie Mix For Mini Pans?
Yes, any boxed brownie mix works for mini muffin pans. Just reduce the baking time and fill each cup appropriately. Adjust baking time to prevent overcooking. This method is quick, easy, and produces bite-sized treats.
Should I Grease Mini Muffin Pans Before Adding Brownie Batter?
Yes, lightly grease mini muffin pans or use non-stick spray. This prevents brownies from sticking and makes them easier to remove. Alternatively, mini paper liners can be used for easy cleanup and serving.
How Do I Know When Mini Brownies Are Fully Baked?
Insert a toothpick into the center of a mini brownie. If it comes out with moist crumbs but no wet batter, they’re done. Baking time varies, so start checking at 12 minutes to avoid overbaking.
Conclusion
Making box brownies in a mini muffin pan is quick and fun. These bite-sized treats bake faster and are easy to share. You can enjoy warm, fudgy brownies in just minutes. Try adding nuts or chocolate chips for extra flavor.
Perfect for parties, snacks, or a simple dessert. Baking small brownies saves time and makes less mess. Give this method a try and enjoy delicious brownies anytime. Simple steps, tasty results. What’s not to love?