Do you want to create a charming small bow but don’t have any fancy tools? What if I told you that all you need is a simple fork sitting right in your kitchen?
Making a small bow with a fork is easier than you think, and it’s a fun way to add a personal touch to gifts, crafts, or decorations. In this guide, you’ll discover a quick and clever trick that anyone can master.
Ready to impress yourself and others with this nifty skill? Let’s dive in and make your own perfect little bow!
Credit: doodleandstitch.com
Materials Needed
Gathering the right materials makes crafting a small bow with a fork easy and fun. Each item plays a key role in shaping your bow perfectly. Simple supplies work best and keep the process smooth.
Ribbon Or Fabric Strip
Choose a ribbon or fabric strip about 6 to 8 inches long. A narrow width, around half an inch, fits well on the fork. Satin, grosgrain, or cotton ribbons all work fine.
Fork
Use a standard metal fork with four tines. The fork’s tines help form the bow loops evenly. Avoid plastic forks as they may bend or break.
Scissors
Sharp scissors cut the ribbon cleanly. Clean cuts prevent fraying and make the bow look neat. Keep scissors nearby for quick trimming.
Thread Or Thin Wire
Thread or thin wire ties the bow’s center tightly. Choose a color that matches your ribbon to blend in. This keeps the bow shape secure.
Optional: Glue Or Needle
Glue or a needle helps secure the bow if needed. Use fabric glue for a strong hold without sewing. A needle and thread can add extra stability.

Credit: www.youtube.com
Choosing The Right Ribbon
Choosing the right ribbon is crucial when making a small bow with a fork. The ribbon you pick affects not just the look but also how easy it is to shape the bow. Think about the texture, color, and flexibility of the ribbon before you start; these factors will make your bow stand out or struggle to hold its form.
Types Of Ribbon
You’ll find ribbons in many materials, each offering a different look and feel. Grosgrain ribbons have a ribbed texture that holds shape well and adds a classic touch. Satin ribbons are smooth and shiny, giving your bow a sleek, elegant appearance but can be a bit slippery to work with.
Organza ribbons bring a light, airy look with their translucent quality, perfect if you want a delicate bow. Velvet ribbons add a rich texture and depth but might be harder to fold neatly on a fork. Ask yourself: do you want your bow to be sturdy or soft and flowy?
Ribbon Width And Length
The width of your ribbon directly impacts the size and detail of your small bow. Narrow ribbons, around 1/4 to 1/2 inch wide, are easier to handle and create neat, petite bows that fit perfectly on small gifts or accessories.
Wider ribbons can make fuller bows but might be tricky to control on a fork. Length matters too—cutting too short limits how many loops you can make, while extra length lets you add more layers or longer tails. A good starting point is about 12 to 18 inches, but adjust based on your desired bow size.
Have you experimented with different widths or lengths before? Trying out a few combinations can reveal which ribbon suits your style and project best. Small changes here can lead to big differences in your final bow’s charm.
Preparing Your Workspace
Setting up your workspace is a key step before you start making a small bow with a fork. A clean and organized area helps you focus and makes the process smoother. Have you ever tried crafting in a cluttered space and felt frustrated? Avoid that by preparing well.
Choosing The Right Surface
Pick a flat, stable surface like a kitchen table or a sturdy desk. This ensures your fork stays steady while you work. Avoid soft or uneven surfaces that can cause slips or misalignment.
Good lighting is also important. Natural light works best, but a bright lamp can help you see the details clearly.
Gathering Your Materials
Before you start, collect all the items you will need. This usually includes:
- A standard fork (preferably with evenly spaced tines)
- A thin ribbon or string
- Scissors
- Optional: a small piece of tape or glue
Having everything within reach prevents interruptions and keeps your workflow steady.
Clearing Distractions
Turn off notifications on your phone or computer to avoid interruptions. Crafting a small bow requires patience and precision. Even a small distraction can break your concentration.
Try playing soft background music if it helps you stay focused, but keep it at a low volume.
Setting Up A Waste Bin
Preparing a small bin or container for scraps and cut ribbon pieces keeps your workspace tidy. It also helps you stay organized and speeds up cleanup.
Keeping your area clean while you work can improve your efficiency and reduce stress.
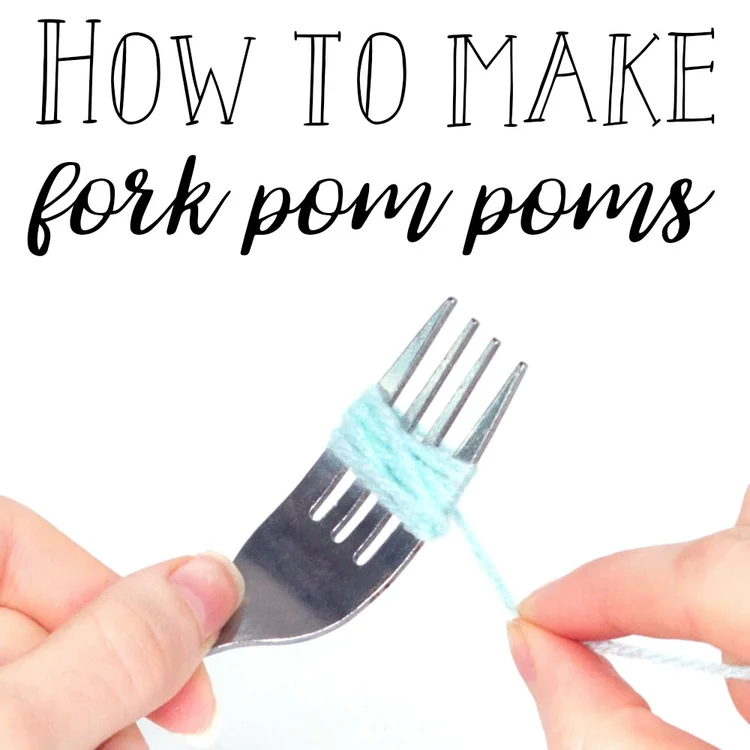
Step 1: Wrapping The Ribbon
Starting your small bow with a fork is easier than it sounds, and the key lies in how you wrap the ribbon around the tines. This first move sets the foundation for a neat and symmetrical bow. If you wrap the ribbon too loosely or too tightly, the bow won't hold its shape well, so getting this right matters.
Choosing The Right Ribbon Length
Pick a ribbon about 18 to 24 inches long. This length lets you wrap around the fork several times while leaving enough tail to tie off later.
Too short, and you’ll struggle to finish the bow. Too long, and it becomes bulky and hard to handle.
Positioning The Ribbon On The Fork
Hold the fork with the back facing you. Place the end of the ribbon behind the middle tine so it won’t slip out while you wrap.
Make sure the ribbon’s shiny side faces outward for a polished look once the bow is done.
Wrapping With Consistent Tension
Wrap the ribbon around the fork’s tines evenly and snugly. Pull gently but firmly to keep the loops tight, but avoid stretching the ribbon.
Each wrap should sit flat against the fork without overlapping or twisting. This keeps your bow smooth and tidy.
How Many Wraps Are Enough?
- Four to six wraps usually create a full-looking bow.
- Fewer wraps result in a smaller, simpler bow.
- More wraps can add volume but may be harder to secure.
Try different wrap counts to see what fits your project best.
Step 2: Securing The Center
Securing the center of your small bow is crucial for giving it shape and hold. Without a tight center, the bow will look loose and may fall apart quickly. This step ensures your bow stays neat and tight, ready to add charm to any project.
Choosing The Right Material To Tie The Center
You can use thread, thin wire, or even a strip of ribbon to secure the center. Thread works well if you want the tie to be almost invisible. Wire adds extra strength but can be a bit tricky to handle if you’re new to crafting.
Think about what you’ll use the bow for. If it’s for a gift wrap, a matching ribbon strip might look best. For decoration or hair accessories, thread or wire will hold better over time.
How To Wrap The Center Securely
Hold the loops of the bow tightly in place with one hand. With the other hand, wrap your chosen material around the middle several times. Make sure to pull it snug so the bow doesn’t loosen later.
Leave a small tail on both ends if you plan to tie a knot or make a bow with the securing material itself. This extra length helps you adjust the tightness easily and keeps everything in place.
Tying A Knot Or Making A Small Bow At The Center
Once wrapped, tie a secure knot to lock the center. A double knot works great for thread or ribbon. If you’re using wire, twist the ends tightly together, but be careful not to poke yourself.
You might also try making a tiny bow with the securing ribbon for an extra decorative touch. This small detail can make your bow look more polished and professional.
Tips To Avoid Common Mistakes
- Don’t wrap too loosely; your bow will lose shape quickly.
- Avoid using too thick a material that can overpower the bow’s size.
- Check that the loops stay even as you tie the center.
Have you ever struggled with a bow coming undone at the center? What’s your favorite way to keep it tight? Share your tips and tricks—you might help someone else create the perfect bow!
Step 3: Creating The Bow Loops
Create loops by folding the ribbon over the fork’s prongs. Hold each loop gently to keep its shape steady. Repeat until the bow looks even and full.
Creating the bow loops might seem like a delicate art, but with a simple fork, you can achieve perfect results. This step is where the magic happens, transforming a mundane piece of ribbon into a charming bow. Remember the first time you tried tying a bow and it resulted in a tangled mess? This method solves that with precision and ease.
Understanding The Ribbon Placement
Start by holding your fork with the tines facing upwards. Place the ribbon between the middle tines, allowing equal lengths on either side. This positioning is crucial for symmetrical loops.
Securing The Initial Loop
Wrap the left end of the ribbon around the back of the fork. Bring it over the front, ensuring it crosses the right ribbon end. This creates the first loop and forms the foundation of your bow.
Forming The Second Loop
Take the ribbon end that’s now on the right and slide it under the first loop. Pull it through the middle tines of the fork. This step tightens the bow and begins shaping the second loop.
Adjusting For Symmetry
Gently pull both ribbon ends to adjust the size of the loops. Make sure they are even, as this will enhance the overall look of the bow. You might find that a bit of practice is needed, but the satisfaction of creating a neat bow is worth it.
Tying The Knot
Finish by tying a small knot at the center of the bow. Slide the knot to the front, where it will secure the loops in place. Feel free to adjust and perfect the bow as needed. How did your bow turn out? Did you find the process easier than expected? Once you master this technique, you’ll never look at a fork the same way again.
Step 4: Tightening And Adjusting
Crafting a small bow using a fork is a delightful skill. In Step 4, the focus is on tightening and adjusting. This part is crucial for a neat, polished bow. Precise tightening ensures the bow holds its shape. Adjustments make the bow look symmetrical and appealing.
Tightening The Bow
Hold both ends of the ribbon firmly. Pull them gently but firmly. This action secures the knot in the center. Ensure the knot is snug and does not slip. A tight knot is essential for stability.
Adjusting Loop Sizes
Check the loops for evenness. Use your fingers to shape each loop. Pull gently to adjust their size. Aim for loops that are equal in size. This makes the bow look balanced and attractive.
Trimming The Ribbon Ends
Examine the ribbon ends. Trim them to the desired length. Use sharp scissors for a clean cut. You can cut them straight or angled. This adds a professional touch.
Final Inspection
Look over the bow carefully. Ensure all parts are even and tidy. Make small adjustments if needed. A well-adjusted bow enhances the overall presentation. Enjoy your beautifully crafted bow!
Step 5: Finishing The Bow
Finishing your small bow made with a fork is where your creation truly comes to life. This final stage lets you perfect the shape and add personality to your bow. Paying attention to details here can make a simple craft look professional and charming.
Trimming The Ends
Once your bow is securely tied, the ends of the ribbon might look uneven or too long. Trimming these ends neatly improves the overall appearance and prevents fraying over time.
Cut the ribbon ends at an angle for a clean, polished look. Use sharp scissors to avoid ragged edges. If you want a classic finish, try cutting the ends into a “V” shape by folding the ribbon in half lengthwise and cutting diagonally from the fold.
Have you noticed how a small change like trimming can instantly upgrade your bow? It’s a simple step, but it makes a big difference in the final presentation.
Adding Decorative Touches
After trimming, think about adding a small embellishment to make your bow unique. A tiny bead, a button, or a dab of glitter glue can add sparkle and charm.
You can also layer a thinner contrasting ribbon on top to create depth. This extra detail catches the eye and gives your bow a professional look without much effort.
Don’t hesitate to get creative here—what personal touch will make your bow stand out? Sometimes, the smallest details reflect your style and make your craft truly yours.
Tips For Perfect Bows
Creating the perfect small bow with a fork may seem tricky at first, but with the right approach, it becomes a simple and enjoyable craft. Paying attention to a few key details can make your bows look neat and professional every time. Let’s dive into some practical tips that will help you handle your ribbon better and fix common problems quickly.
Ribbon Handling
Choose a ribbon that is flexible but not too flimsy. Stiff ribbons hold their shape well, making your bow look crisp. Thin satin or grosgrain ribbons work great for small bows on a fork.
Keep your ribbon taut while looping it around the fork. Loose loops can make your bow look messy or uneven. Try holding the ribbon firmly with your thumb as you wrap it around.
Cut the ribbon ends cleanly at an angle to prevent fraying. If you notice frayed edges, a quick touch with a lighter can seal them—just be careful not to burn the ribbon.
Troubleshooting Common Issues
- Bow looks uneven:Check the tension on each loop. Are some loops tighter or bigger? Adjust by gently pulling or loosening the loops before tying off.
- Ribbon slips off the fork:Try wrapping the ribbon around the fork a couple of extra times for better grip. Using a fork with slightly wider tines can also help.
- Bow won’t hold shape:Consider using a ribbon with a wired edge. It gives more structure and stays in place better.
- Ribbon twists while working:Pause and straighten the ribbon before continuing. Twisted ribbon can make your bow look unprofessional.
Have you ever struggled with a bow that just won’t look right no matter how many times you redo it? Sometimes, stepping back and examining these small details can make all the difference. What’s one ribbon type you haven’t tried yet but are curious about? Experimenting might just lead to your best bow yet.

Credit: www.youtube.com
Creative Uses For Small Fork Bows
Small bows made with a fork are more than just cute little decorations. They can add a personal touch to many everyday items, making them unique and charming. Once you master this simple craft, you’ll find plenty of ways to use these bows to brighten your gifts, style your hair, and even enhance your home’s look.
Gift Wrapping
Adding a small fork bow to your gift wrap instantly makes your present stand out. You can use colorful ribbons to match the occasion—red and green for Christmas, pastels for birthdays, or gold for anniversaries.
Try attaching the bow directly on top of the package or tie it around the ribbon for a layered effect. It’s a quick way to make your gift look thoughtfully wrapped without spending extra money on fancy bows.
Hair Accessories
Have you ever struggled to find cute hair accessories that don’t feel bulky? Small fork bows can be glued onto plain hair clips or headbands to create charming, lightweight accessories.
They’re perfect for kids and adults alike, adding a subtle pop of style to any look. Plus, you can customize the size and color of the bow to match your outfit or mood.
Home Decor
These tiny bows can also bring a playful touch to your home decorations. Attach them to mason jars, candle holders, or picture frames for a fresh, handmade vibe.
Imagine a cluster of small fork bows on a wreath or tied around napkins for a dinner party—simple details that guests will notice and appreciate. What other items around your home could use a bit of unexpected charm?
Frequently Asked Questions
How Do You Make A Small Bow With A Fork?
To make a small bow with a fork, wrap ribbon around the fork’s prongs, tie a knot in the center, and slide it off carefully. Fluff the loops to shape the bow evenly. This method is quick and perfect for crafting decorative bows.
What Materials Are Needed For A Fork Bow?
You need a fork, ribbon, and scissors to make a small bow. The fork helps shape the loops evenly. Choose ribbon width based on bow size. This simple tool combination ensures neat and consistent bows without extra tools.
Can I Use Any Ribbon Type For Fork Bows?
Yes, most ribbon types work well, including satin, grosgrain, or organza. Choose a ribbon that holds shape for best results. Avoid very stiff or extremely thin ribbons, as they can be harder to manipulate around the fork.
How Do I Secure The Bow After Making It?
After shaping the bow on the fork, tie a knot tightly in the center using the ribbon’s tail. You can also use a thin wire or string for extra hold. This ensures the bow keeps its shape when removed from the fork.
Conclusion
Making a small bow with a fork is simple and fun. You only need a few steps to create a pretty bow. Practice a couple of times to get the shape right. Use different ribbons to make unique designs. This craft adds a nice touch to gifts or decorations.
Keep trying, and soon you will enjoy making bows quickly. It’s a great way to be creative without special tools. Try it today and see how easy it can be!