Have you ever wished you could turn your phone into a big-screen projector without spending a lot of money? What if we told you that a simple wine glass can help you do just that?
You’ll discover an easy and fun way to create your own projector right at home. Imagine watching your favorite videos or photos on the wall, impressing your friends, and enjoying a unique experience—all with items you probably already have. Ready to see how this magic happens?
Keep reading, and we’ll guide you step-by-step to make your very own wine glass projector.
Credit: diyjoy.com
Materials Needed
Gathering the right materials is the first and most crucial part of making a projector with a wine glass. Your success depends on choosing items that fit well and work effectively together. Before you start, make sure you have everything ready to avoid interruptions.
Choosing The Right Wine Glass
The shape and size of the wine glass affect how clear and bright your projected image will be. Look for a glass with a rounded bowl rather than a straight one. A bowl that curves outward and then narrows at the top helps focus the light better.
Clear glass is essential—avoid colored or frosted glasses as they can distort the image. A glass with a thicker base can also improve stability, preventing your setup from tipping over during use. Have you ever noticed how some wine glasses feel more solid? That’s the kind you want for this project.
Other Essential Items
Besides the wine glass, you’ll need a few simple items that you probably already have at home. A smartphone or tablet acts as your screen to project the image. Make sure your device’s brightness is set to maximum for the best results.
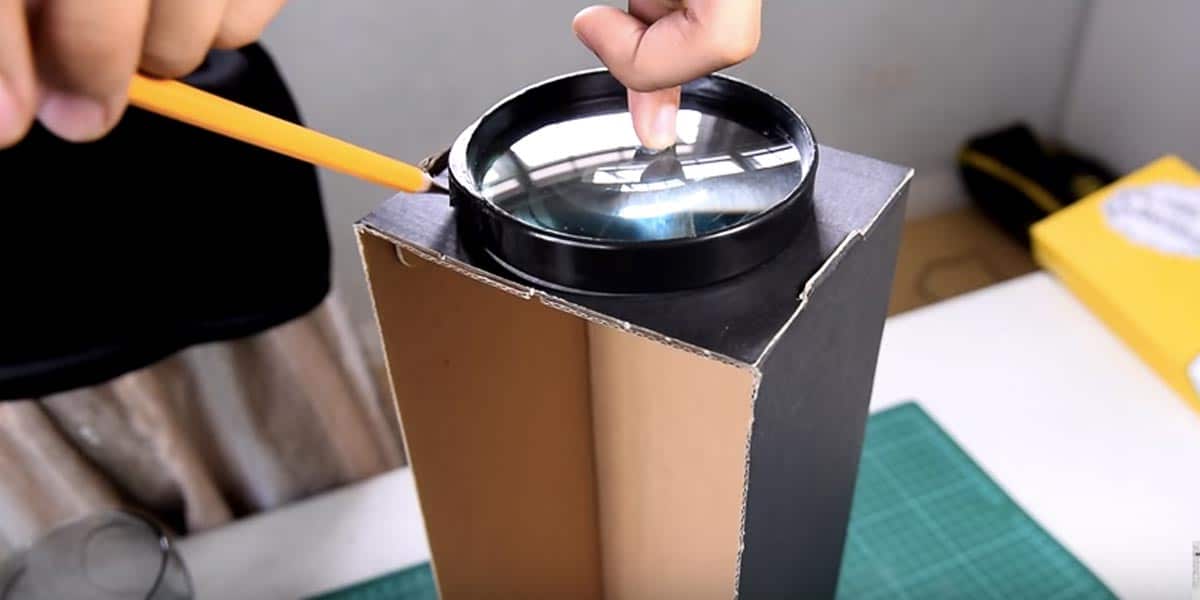
You’ll also need a small magnifying lens or a magnifying glass to focus the image through the wine glass. Some people use a drop of water instead, but a lens gives a sharper picture. Additionally, a cardboard box or a dark container will serve as your projector’s body to hold everything in place.
- Smartphone or tablet with bright screen
- Magnifying lens or magnifying glass
- Cardboard box or dark container
- Black tape or glue for securing parts
- Scissors or cutter for shaping the box
Have you thought about how you’ll arrange these parts? The right materials not only make the projector work but also make the build process smoother and more fun.
Preparing Your Workspace
Preparing your workspace is important for making a clear and bright projector. The right environment helps the image from the wine glass projector show well on the wall or screen. Small details can affect the final picture quality and your overall experience.
Keep your area tidy and ready. Gather all tools before starting. This saves time and keeps the process smooth.
Finding A Dark Room
Choose a room with little or no light. Dark rooms make the projected image more visible and sharp. Turn off all lights and close curtains or blinds. Avoid rooms with street lights or bright screens nearby. A completely dark space improves the contrast of the projection.
Setting Up The Phone
Use a phone with a bright screen and good resolution. Place the phone flat on a stable surface. Position it so the screen faces the wine glass. Adjust the phone’s brightness to maximum. Lock the screen orientation to prevent rotation. Keep the phone still during projection for a steady image.
Creating The Projector Lens
Creating the projector lens is a key part of turning a simple wine glass into a working projector. The lens focuses light to form a clear image on a surface. Using the curved shape of the wine glass, you can bend and magnify light. This allows you to project videos or pictures from your phone or other devices. The right water level and glass positioning make the image sharp and bright.
Filling The Wine Glass With Water
Fill the wine glass slowly with clean water. The water acts as the lens material. It changes how light bends through the glass.
- Start with a small amount of water.
- Adjust the level until the image looks clear.
- Too much water blurs the image.
- Too little water makes the image too small.
Use room temperature water to avoid glass cracking. The water shape inside the glass creates the lens effect.
Positioning The Glass Correctly
Place the wine glass on a flat surface. Position it above your phone screen or light source. The right distance is important.
- Keep the glass close but not touching the phone.
- Move the glass back and forth to find focus.
- Adjust height to improve image size and clarity.
- Use a dark room for better projection results.
Hold the glass steady to avoid image shaking. Small changes in position affect the projection sharply.
Credit: www.youtube.com
Aligning The Image
Aligning the image is a key step in making a projector with a wine glass. This step ensures the picture is clear and correctly positioned on the wall or screen. Without proper alignment, the image may appear blurry, upside down, or off-center. Small changes in distance and rotation can make a big difference in image quality.
Adjusting Distance For Focus
Move the wine glass closer or farther from your phone screen. Watch the image on the wall carefully. When the image becomes sharp, stop adjusting. The right distance helps the lens focus light correctly. Too close or too far will blur the image. Try small movements until the picture is clear.
Rotating The Image
The image might appear upside down after projecting. Rotate the wine glass slowly to correct this. Turn it until the image sits the right way up. Slight angle changes can also improve image clarity. Keep adjusting until you get the best view. The goal is a steady, well-aligned picture on your surface.
Tips For Better Projection
Using a clear wine glass filled with water helps focus light for a sharper image. Adjust the distance between your phone and glass to improve the picture quality. Darken the room to see the projection more clearly.
Creating a projector with a wine glass can be both fun and educational. However, to get the best experience, it’s crucial to focus on enhancing the quality of the projection. Whether it's improving brightness or sharpening the image, small tweaks can make a big difference. Here are some practical tips to ensure your homemade projector delivers impressive results.
Improving Image Brightness
Boosting the brightness of your projection can significantly enhance your viewing experience. Start by ensuring your room is as dark as possible. This might mean pulling down the blinds or waiting until nighttime. Using a brighter light source inside your projector setup can also help. A strong LED flashlight often does the trick. Experiment with different positions for the light source to find the best spot that enhances brightness without distorting the image. Reflective surfaces can amplify light. Consider lining the inside of your projector box with aluminum foil to reflect more light through the wine glass. This simple trick can make a noticeable difference.
Enhancing Image Clarity
Clarity is key for a good projection. To start, clean your wine glass thoroughly. Dust or smudges can blur the image. A microfiber cloth usually works best for this task. Adjusting the distance between the wine glass and the projection surface can also improve clarity. Too close might make the image blurry, while too far can reduce sharpness. Test various distances to find the sweet spot. Consider the quality of the image source as well. A high-resolution image or video will project better than a low-quality one. If you notice the image is still not clear, try refocusing by slightly adjusting the angle of the wine glass. Have you tried different methods to enhance your homemade projector? Share your tips and see what works best!

Credit: www.indiatoday.in
Troubleshooting Common Issues
Creating a projector with a wine glass can be a fun DIY project, but you might run into some common issues along the way. Don't let these problems discourage you. With a few simple tweaks, you can improve your projector's performance and enjoy clear, bright images.
Blurry Image Fixes
If your projected image looks fuzzy or out of focus, the first thing to check is the distance between your phone and the wine glass. Moving your phone closer or farther away can sharpen the image quickly.
Also, make sure the wine glass is clean and free from smudges or fingerprints, as these can blur the image. Sometimes, adjusting the angle of the glass slightly can make a big difference in clarity.
Have you tried using different types of wine glasses? I found that glasses with thinner, more uniform curves tend to produce sharper images. Experiment with what you have at home to see what works best.
Dealing With Reflections
Reflections can be frustrating and reduce the visibility of your projected image. Position your projector away from direct light sources like lamps or windows to minimize unwanted glare.
Using a dark background or screen for projection can also help absorb excess light and improve contrast. If you notice reflections on the surface of the wine glass, try gently tilting it or changing its orientation.
One trick I discovered is to dim the room lights or use blackout curtains during your projection session. This simple change can dramatically reduce reflections and make your image pop.
Frequently Asked Questions
How Does A Wine Glass Work As A Projector Lens?
A wine glass acts as a convex lens, magnifying and focusing light. It bends light rays to project a clear image on a flat surface. The curved shape helps enlarge the image from your phone or device onto a wall.
What Materials Are Needed To Make This Projector?
You need a wine glass, a smartphone or small screen device, a dark room, and a flat surface. Optionally, use a cardboard box to hold the setup steady. These items help create a simple, low-cost projector.
How Do I Position The Wine Glass For Best Projection?
Place the wine glass upside down on your phone screen. Adjust the glass distance to focus the image sharply on the wall. Fine-tuning the distance and angle improves clarity and brightness.
Can I Use Any Wine Glass For This Projector?
A glass with a smooth, curved shape works best. Larger glasses provide a bigger image but may reduce sharpness. Avoid glasses with intricate designs or thick rims for clearer projection.
Conclusion
Making a projector with a wine glass is simple and fun. You only need a few items and some patience. This DIY project helps you learn about light and lenses. It works well for small movies or presentations. Try it yourself and enjoy the experience.
It’s a great way to reuse everyday objects creatively. Keep experimenting to improve your projector’s image. You’ll feel proud of what you build with your hands. Simple projects like this spark curiosity and creativity in everyone. Give it a go and see how it works!