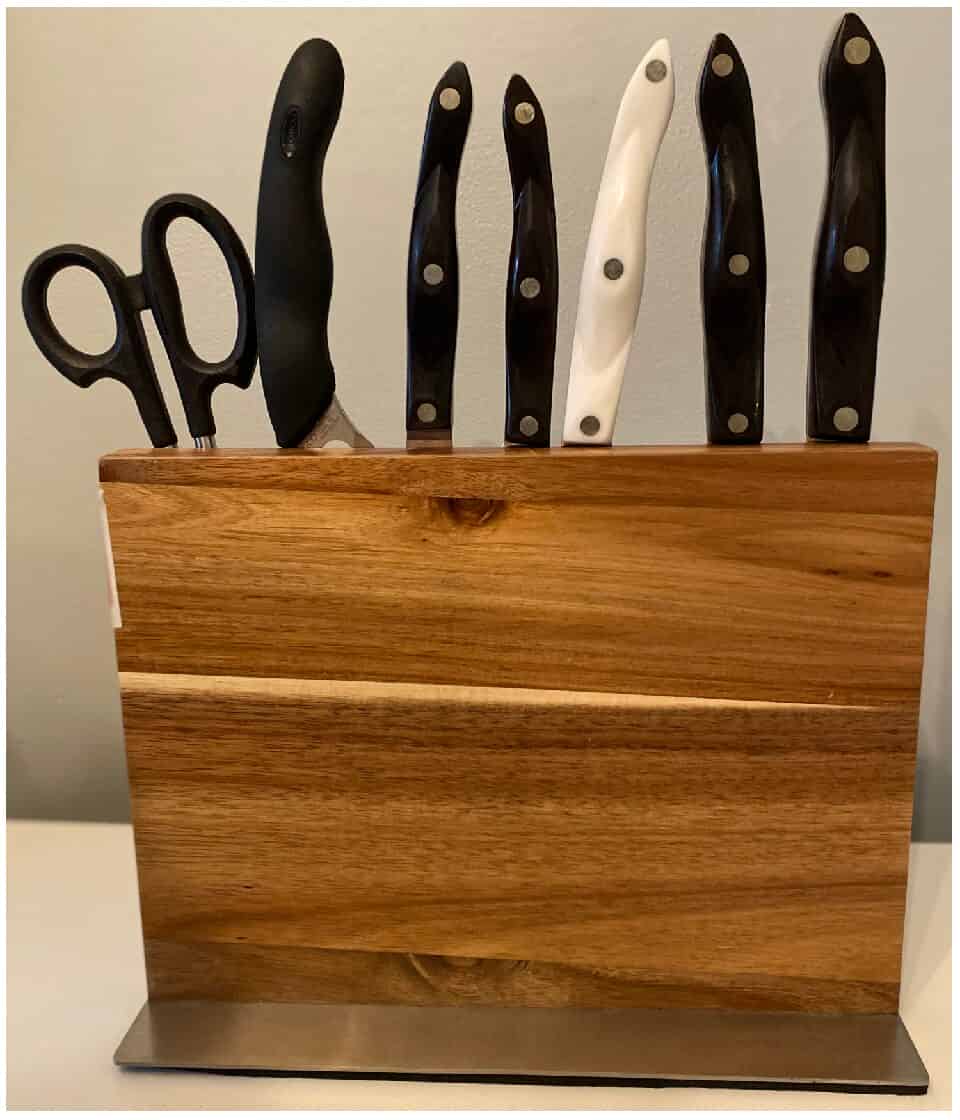
Are you tired of hunting for your knives every time you cook? A knife block can keep your kitchen organized and your blades safe.
Making your own knife block might seem tricky, but it’s easier than you think—and it gives you a custom piece made just for your knives. In this guide, you’ll learn simple steps to create a sturdy, stylish knife block that fits your kitchen perfectly.
Ready to turn clutter into order? Let’s get started!
Choosing The Right Wood
Choosing the right wood is a key step in making a knife block. The wood affects the block’s strength, appearance, and safety. Picking wood that holds knives well and lasts long improves your kitchen experience.
Best Wood Types For Knife Blocks
Some woods work better for knife blocks than others. Hardwoods are popular because they resist cuts and dents. Here are some top choices:
- Maple:Light in color and very durable. It has a smooth surface that won’t dull knives.
- Walnut:Dark and rich in color. Strong and resists moisture well.
- Bamboo:Eco-friendly and hard. It is lightweight and resists bacteria.
- Cherry:Warm tone and ages beautifully. It is strong but a bit softer than maple.
Wood Durability And Safety
Durability means the wood can handle daily use without damage. Hardwoods with tight grains protect knives better. Soft woods may show marks quickly and can dull blades.
Safety is also important. The wood should not release toxins or splinters. Smooth finishes help protect hands and knives. Avoid woods with strong odors or allergies.
Gathering Tools And Materials
Gathering the right tools and materials sets the foundation for a successful knife block project. Careful preparation helps avoid delays and mistakes. Knowing what to use makes the building process smooth and enjoyable.
Organize your workspace and check each item before starting. This saves time and keeps the project on track. Focus on quality tools and materials for a sturdy, lasting knife block.
Essential Tools For The Project
- Measuring tape or ruler for precise dimensions
- Pencil to mark cutting lines
- Hand saw or jigsaw for cutting wood pieces
- Drill with drill bits for making holes
- Sandpaper or sanding block to smooth edges
- Clamps to hold pieces while gluing
- Wood glue for strong bonding
- Safety goggles and gloves for protection
Materials Needed For Knife Block
- Hardwood board such as maple, oak, or walnut
- Wooden dowels or strips for slot dividers
- Wood finish or mineral oil to protect wood
- Non-slip pads for the base
- Sandpaper of various grits for finishing
Designing Your Knife Block
Choose a sturdy block of wood and plan slots to fit your knives safely. Drill holes or cut grooves carefully to hold each blade securely. Sand and finish the wood for a smooth, polished look that protects both knives and hands.
When crafting your knife block, design is key. A well-designed knife block not only serves a functional purpose but also enhances your kitchen's aesthetic. This section will guide you through the process of designing a custom knife block that fits your needs and style.
Determining Size And Shape
The first step in designing your knife block involves deciding its size and shape. Consider the number of knives you have. A larger collection will need a bigger block. Measure the space on your countertop. This will help in choosing the right dimensions. The shape can be rectangular, square, or custom. Ensure it complements your kitchen decor.
Planning Knife Slot Layout
Plan the layout of the knife slots carefully. Each slot should securely hold a knife. Start by grouping knives by size and type. This helps in organizing the slots efficiently. Use a wooden board to sketch the layout. Ensure there's enough space between slots for easy access. A well-planned layout enhances safety and usability.
Credit: cuttingedgegift.com
Cutting And Shaping The Wood
Cutting and shaping the wood is where your knife block truly starts to take form. This phase demands precision and patience, as the measurements and cuts you make will determine how well your knives fit and how sturdy your block feels. Getting these details right can save you from frustration later on and ensure a professional-looking result.
Measuring And Marking
Start by carefully measuring the dimensions of your wood piece. Use a ruler or measuring tape and mark the spots where you’ll make your cuts with a pencil. Double-check your measurements before marking to avoid mistakes—do you know the exact size your knives require?
Mark the slots for the knives clearly, considering both width and depth. Remember, different knives need different sized slots. Taking this extra time here means your knives will fit snugly and safely.
Safe Cutting Techniques
Safety should be your top priority when working with cutting tools. Always wear safety goggles and work gloves to protect yourself from splinters and accidental slips. Are you set up with a stable workspace that keeps the wood steady?
Use a saw that matches your skill level— a handsaw is fine for beginners, while a power saw can speed up the process if you’re experienced. Cut slowly and steadily along your marked lines, stopping frequently to check your progress. This approach helps prevent splintering and keeps your cuts clean and accurate.
Keep your fingers clear of the blade at all times. If you’re unsure about your cutting technique, practicing on scrap wood can build your confidence before you work on your actual knife block.
Creating Knife Slots
Creating knife slots is a crucial step in making a knife block that’s both functional and safe. These slots hold your knives securely, preventing damage to the blades and accidents in the kitchen. Precision matters here—you want each slot to fit the knife snugly without forcing it in or letting it wobble.
Slot Dimensions And Spacing
Start by measuring the width and thickness of your knives’ blades. Most kitchen knives range from 1/8 inch to 3/8 inch thick, but measuring your own set ensures a perfect fit. Add about 1/8 inch to the width for clearance, so the blade slides in easily without being too loose.
Spacing between slots is just as important. Leaving about 1/2 inch to 3/4 inch between each slot prevents handles from clashing and makes it easier to grab your knives quickly. Think about your knife collection—do you have wider chef’s knives or slim paring knives? Adjust slot sizes and spacing accordingly.
Using A Drill And Saw For Slots
To create slots, start by drilling a row of holes along the desired slot length. Use a drill bit slightly larger than your slot width to make the next step easier. This technique helps you avoid tearing out the wood when you cut the slots.
After drilling, use a fine-toothed saw or a jigsaw to connect the holes, carefully cutting along the marked slot lines. Take your time here—straight, clean cuts make the knife block look professional and function better. Sand the inside edges of each slot to smooth rough spots that could dull your knives.
Have you tried this approach before? You might find that drilling first saves you a lot of effort and keeps your cuts precise. It’s a little trick I learned after struggling with straight cuts on my first knife block project.
Sanding And Finishing
Sanding and finishing are key steps in making a knife block. These steps give the block a smooth feel and a lasting look. Proper sanding removes rough spots and shapes the wood. Finishing protects the wood from moisture and stains. Together, they make your knife block both beautiful and durable.
Sanding For Smooth Edges
Start with coarse sandpaper to even out rough surfaces. Use 80-grit sandpaper to remove big bumps and marks. Then, switch to medium grit like 120 for a finer smoothness. Finish sanding with 220-grit for a soft, polished feel. Always sand along the wood grain to avoid scratches. Pay attention to corners and slots to keep edges gentle. Use a sanding block for flat surfaces and folded sandpaper for curves.
Applying Finish For Protection
Choose a food-safe finish to keep knives safe. Options include mineral oil, beeswax, or a special wood conditioner. Apply the finish with a clean cloth in thin, even layers. Let the wood absorb the finish for about 15 minutes. Wipe off any extra to avoid sticky spots. Allow the block to dry completely before use. Repeat the process for stronger protection and a richer look.
Assembling The Knife Block
Assembling the knife block is where your project truly takes shape. This stage requires attention to detail and patience to ensure all parts fit securely and the block functions safely. Let’s look at how to join the pieces firmly and make the base slip-resistant for everyday kitchen use.
Joining Pieces Securely
Start by aligning all the wooden pieces carefully. Use wood glue along the edges before fitting them together to create a strong bond.
Clamp the pieces tightly and let the glue dry completely to avoid any gaps or weak spots. Adding small finishing nails or screws can reinforce the joints, especially where the slots for knives will face stress.
Check the block’s shape regularly as you assemble it. A slight misalignment can cause the knives not to fit properly or make the block unstable. Have you ever struggled with a crooked knife block? Avoid that by double-checking your angles with a square or ruler.
Adding Non-slip Base
A stable knife block is safer and easier to use. Attach a non-slip base to prevent the block from sliding on your countertop.
You can use rubber pads, adhesive felt, or silicone feet. These materials absorb shock and keep your block steady, even on smooth surfaces.
Place the pads evenly on the bottom corners and press firmly to secure. Think about your kitchen surface – would your knife block stay put, or does it need extra grip? This simple addition can save you from accidents and frustration.
Customizing Your Block
Customizing your knife block makes it unique and personal. It adds character and fits your kitchen style. Small changes can give a simple block a fresh, new look. Personal touches make your knife block more than just storage.
Adding Personal Touches
Start by carving initials or a short message on the block. Use a wood burner for clean, lasting marks. Attach small metal or wooden tags with names or dates. Glue decorative elements like small stones, beads, or buttons. Create a pattern with nails or screws on the surface for texture. You can also add a small chalkboard label to write knife types.
Painting And Staining Ideas
Choose paint colors that match your kitchen decor. Use chalk paint for a matte, vintage look. Apply a clear wood stain to highlight natural grain. Combine paint and stain for contrast. Use painter’s tape to create stripes or geometric shapes. Finish with a clear sealant to protect your design and keep it lasting longer.
Maintaining Your Knife Block
Crafting a knife block requires choosing sturdy wood and precise cutting for slots. Sand the edges smooth to protect blade tips and hands. Finish with a safe sealant to keep the wood clean and durable.
Maintaining your knife block ensures it stays in top condition. A well-kept knife block protects your knives and prolongs their sharpness. Regular care keeps it looking great and functioning well.
Cleaning Tips
Clean your knife block monthly for best hygiene. Remove knives and turn the block upside down. Shake gently to clear dust and crumbs. Use a pipe cleaner for slots. Dampen a cloth with mild soap and water. Wipe the block's exterior. Avoid soaking the block in water. Dry completely to prevent mold.
Long-term Care Advice
Avoid placing the knife block in direct sunlight. Sunlight can fade and weaken wood. Use mineral oil to condition the wood occasionally. Apply a small amount and rub gently. Avoid using harsh chemicals. They can damage the finish and wood. Inspect for any damage or cracks regularly. Replace the block if it becomes unstable or damaged.

Credit: www.youtube.com
Credit: www.woodworkingtalk.com
Frequently Asked Questions
What Materials Are Needed To Make A Knife Block?
To make a knife block, you need wood, wood glue, clamps, sandpaper, and a saw. Choose hardwood like maple for durability. Additional tools include a drill for slots and finishing oil to protect the wood.
How Do I Design Knife Slots Safely?
Measure your knives’ blade widths to create precise slots. Use a drill or jigsaw to cut slots slightly wider than the blades. Sand slot edges smooth to avoid blade damage and ensure safe knife insertion and removal.
Can I Customize The Knife Block Size?
Yes, customize the block size based on your knife collection and kitchen space. Plan the block height, width, and slot depth to fit your knives perfectly. A customized block keeps knives organized and accessible.
How Do I Finish A Homemade Knife Block?
Finish your knife block with food-safe mineral oil or beeswax. This protects the wood from moisture and enhances its appearance. Apply several coats, allowing drying time between each for best results.
Conclusion
Making a knife block is a simple and useful project. It helps keep knives safe and organized. You only need a few materials and basic tools. Take your time to measure and cut carefully. Personalize the block to fit your kitchen style.
This DIY knife block saves money and adds charm. Enjoy the satisfaction of using something you made. Keep your knives sharp and within reach. Try this project and see how easy it can be.