Have you ever wanted to create a beautiful double bow but didn’t know where to start? What if I told you that all you need is a simple fork to make one?
Yes, you read that right! Making a double bow with a fork is quick, easy, and perfect for adding a special touch to gifts, crafts, or decorations. In this guide, you’ll discover step-by-step instructions that anyone can follow, even if you’ve never tied a bow before.
Ready to impress yourself and others with this clever trick? Let’s get started!
Materials Needed
Gathering the right materials helps create a neat double bow using a fork. The process is simple with just a few items. These materials are easy to find at home or in craft stores.
Having everything ready saves time and makes the bow look perfect. Use good quality ribbon for the best results. The fork will act as a tool to shape the bow quickly.
Ribbon
- Choose a ribbon about 1/2 inch to 1 inch wide.
- Fabric ribbons like satin or grosgrain work well.
- Pick a color that matches your project or gift.
- Cut a piece about 12 to 18 inches long.
Fork
- Use a regular dinner fork with four tines.
- Plastic or metal forks both work fine.
- The fork size should be easy to hold and handle.
Scissors
- Sharp scissors help cut ribbon cleanly.
- Make sure they cut without fraying the ribbon edges.
Thread Or Thin Wire
- Use thread or thin wire to secure the bow.
- Choose a color close to the ribbon for a neat look.
- Keep a small piece ready to tie the bow tightly.

Credit: m.youtube.com
Preparing The Ribbon
Preparing the ribbon is a crucial part of making a double bow with a fork. How you handle the ribbon before you start can make the entire process smoother and your bow look neater. You want the ribbon to be flexible but not too loose, so it holds its shape well.
Choosing The Right Ribbon
Pick a ribbon that is about 1 to 2 inches wide. Too narrow, and your bow will look flimsy; too wide, and it might be hard to manage on the fork. Satin ribbons work great because they are smooth and easy to fold, but grosgrain also holds its shape nicely.
Think about the occasion and the color scheme. A shiny ribbon can add elegance, but a matte finish might suit a rustic gift better. Have you ever noticed how the texture of ribbon changes the whole vibe of a bow?
Cutting The Ribbon
Cut your ribbon to about 18 to 24 inches long. This length is perfect for making a double bow without excess waste. If your ribbon has wired edges, be gentle when cutting to avoid fraying.
Before cutting, measure twice and cut once. It’s easier to trim a bit off later than to add more ribbon. Would you rather have too much ribbon to manage or too little to finish your bow?
Prepping The Ribbon Ends
After cutting, seal the ends to prevent fraying. You can carefully run the edges over a flame for synthetic ribbons or use clear nail polish for natural fibers. This small step saves a lot of frustration later.
Try cutting the ends at an angle or into a V shape. This detail can make your finished bow look more professional. Have you tried this little trick before? It really makes a difference in presentation.
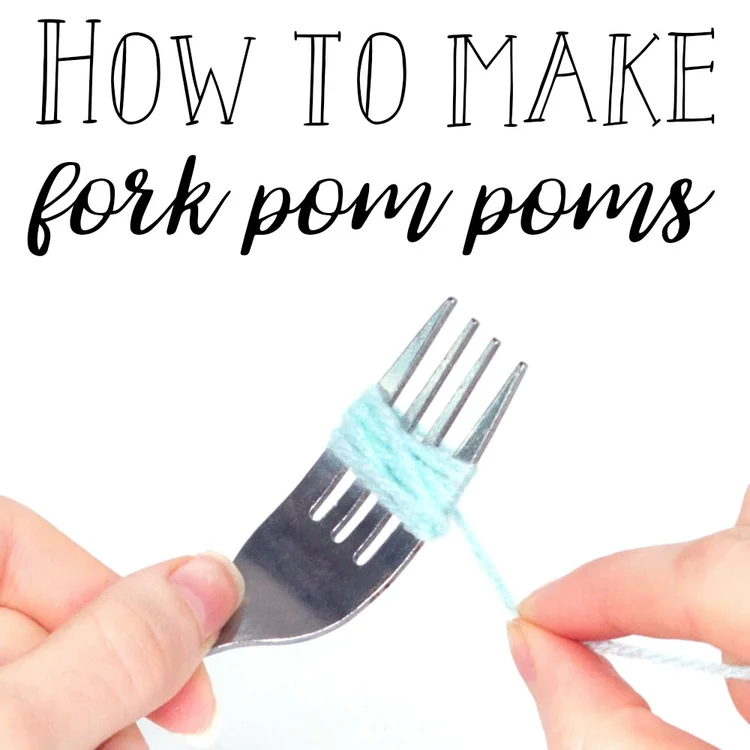
Setting Up The Fork
Setting up the fork correctly is the first key to making a perfect double bow. It prepares you to create neat, even loops with ease. A well-arranged fork will hold the ribbon firmly and help keep your fingers free to work.
Start by choosing a regular four-tined fork. The shape and size of the fork affect the bow size. A standard dinner fork works best for most ribbons.
Positioning The Fork
Hold the fork with the tines facing up and toward you. Rest the fork on a flat surface or hold it firmly in your hand. The flat back of the fork should be against your palm for stability.
- Cut a ribbon piece about 12 inches long.
- Choose a ribbon width that fits between the fork tines comfortably.
- Make sure the ribbon edges are clean and not frayed.
Securing The Ribbon On The Fork
Place one end of the ribbon behind the middle tine of the fork. Hold the end tightly with your thumb. This anchor point stops the ribbon from slipping while you wrap the loops around the fork.
Creating The Loops
Creating the loops is the key step in making a double bow with a fork. These loops form the bow’s shape and give it volume. You need to be gentle but firm while shaping the loops to keep them even and neat.
Start by choosing the right ribbon. A medium-width ribbon works best. It should be flexible enough to bend but stiff enough to hold the shape.
Positioning The Ribbon On The Fork
Hold the fork with the tines facing up. Place the end of the ribbon between the middle tines. Leave a small tail hanging down. This tail will become the bow’s center knot later.
Wrap the ribbon around the fork’s back. Keep it flat and smooth to avoid wrinkles. The ribbon should cover the tines evenly.
Forming The First Loop
Pull the ribbon to the left side of the fork. Make a loop by folding it back toward the center. The loop size depends on your desired bow size. Keep the loop tight against the fork to hold its shape.
Hold the loop gently with your fingers. Do not twist or pull too hard. The loop should stay flat and smooth.
Making The Second Loop
Now, pull the ribbon to the right side. Create a similar loop by folding it back to the center. Match the size with the first loop for balance.
Hold this loop firmly next to the first one. Both loops should touch at the center of the fork. This creates the classic double bow look.
Adjusting The Loops For Symmetry
- Check both loops for size and shape.
- Gently pull the loops to even them out.
- Flatten any creases or bumps carefully.
- Make sure the loops sit nicely on the fork tines.
Symmetrical loops give the bow a polished and professional look.
Securing The Bow Center
Securing the bow center is a crucial step in making a double bow with a fork. Without a tight and neat center, your bow can quickly fall apart or lose its shape. This part not only holds the loops together but also defines the bow’s overall look and durability.
Choosing The Right Material To Tie The Center
Pick a thin but strong thread or ribbon to tie the center tightly. Thicker materials may be harder to wrap around the bow’s middle and can create a bulky look.
I once used a thin floral wire, and it made the bow sturdy without showing through the loops. If you want your bow to look clean, avoid thick yarns or bulky strings.
Wrapping And Tightening The Center
Wrap your chosen material around the middle of the bow several times. Make sure you pull it tight enough to hold all the loops firmly but not so tight that it crushes the ribbon.
Ask yourself: How tight is too tight? A good test is to gently shake the bow—if the loops stay in place, the tension is just right.
Securing The Knot For Longevity
After wrapping, tie a secure knot or bow with the material. Double knots work best to keep everything locked in place.
If you prefer extra security, add a tiny dab of clear-drying glue on the knot. This keeps your bow perfect even after hours of use or display.
Credit: doodleandstitch.com
Shaping The Bow
Creating a double bow with a fork is simple and fun. Wrap the ribbon around the fork’s prongs, then pull and tie it to shape a neat bow. This craft adds charm to gifts and decorations with just a few easy moves.
Creating a double bow using a fork might sound like a quirky craft project, but it’s surprisingly practical and fun. The tiny, precise loops you can make with a fork are perfect for adding a polished touch to gifts, DIY projects, or even hair accessories. As you shape the bow, you'll find that the technique is not only straightforward but also a delightful exercise in creativity.
Positioning Your Fork
The first step in shaping your bow is to hold the fork so that its tines are facing upwards. This might feel a bit odd at first, but it's essential for creating those neat loops. Place the fork securely on a flat surface or hold it with your non-dominant hand for stability.
Threading The Ribbon
Take a piece of ribbon and slide it through the middle tines of the fork. Ensure the ribbon is long enough to wrap around the fork and create multiple loops. The ribbon should hang equally on both sides, allowing enough length to work with comfortably. Wrap the ribbon around the outer tines of the fork, forming an "X" shape at the back. This crisscross action is what forms the loops of your bow. Make sure each side is symmetrical, adjusting as necessary to keep the loops even.
Tightening The Center Knot
Once the loops are formed, bring the ends of the ribbon to the front of the fork. Tie them in a firm knot between the middle tines. This step is crucial as it secures the loops, giving the bow its distinctive double bow appearance.
Final Adjustments
Gently slide the completed bow off the fork, ensuring the loops remain intact. Fluff and adjust the loops to achieve the desired fullness and symmetry. Trim any excess ribbon, leaving a neat finish. Whether you’re crafting bows for a special occasion or just for fun, mastering the art of shaping them with a fork is a skill worth having. Have you ever tried using this method before, or do you have your own unique bow-making techniques? Share your thoughts and experiences in the comments below!
Finishing Touches
After shaping your double bow with a fork, the finishing touches make all the difference between a simple craft and a polished accessory. These final steps add flair and ensure your bow holds up beautifully. Paying attention now will save you frustration later.
Trimming The Ribbon Ends
Cutting the ribbon ends neatly gives your bow a professional look. You can choose angled cuts for a sharp finish or dovetail cuts for a decorative touch. Using sharp scissors helps prevent fraying and keeps the edges clean.
Have you noticed how a small tweak in the ribbon’s tail can completely change the bow’s vibe? Try experimenting with different shapes until you find the one that fits your style perfectly.
Securing The Bow Firmly
Use a tiny dab of hot glue or a few stitches to keep your bow from unraveling. This simple step keeps the loops tight and the bow intact, especially if you plan to wear or gift it. Avoid using too much glue; it can make the ribbon stiff and less flexible.
In my experience, pinching the bow gently while the glue dries helps maintain the perfect shape. What’s your go-to trick for keeping delicate crafts in place?
Adding Decorative Elements
Consider adding beads, buttons, or glitter to give your bow a unique personality. These extras can match the occasion or your outfit, making the bow truly stand out. Just be careful not to overload the bow; sometimes less is more.
- Small pearl beads can add elegance
- Bright buttons give a playful touch
- A light sprinkle of glitter adds sparkle without mess
What little details do you think make a craft piece feel special? Your personal touch can turn a simple double bow into a memorable accessory.

Credit: www.youtube.com
Tips For Perfect Bows
Crafting a double bow with a fork can seem tricky. With the right tips, your bows can look perfect every time. Focus on precision and patience. Here are some key pointers to elevate your bow-making skills.
Choose The Right Fork
Use a fork with evenly spaced prongs. This helps in creating uniform loops. A smaller fork is better for tiny bows. For larger bows, consider a larger fork.
Use Quality Ribbon
Select a ribbon that holds its shape. Satin or grosgrain ribbons work well. Avoid ribbons that fray easily. The quality of the ribbon affects the final look.
Master The Tying Technique
Practice the weaving motion. Start by placing the ribbon between the middle prongs. Wrap it around and tie securely. Consistent tension ensures neat loops.
Adjust The Loops
Once tied, gently pull on the loops. This helps in shaping the bow. Adjust until both sides are even. Take your time to get it right.
Trim The Ends
After forming the bow, cut the ribbon ends. Use sharp scissors for clean cuts. Trim at an angle for a polished look. Ensure both ends are the same length.
Practice Regularly
Regular practice enhances skill. Experiment with different ribbons. Try varying fork sizes. Each attempt improves your technique.
- Choose the right fork for uniform loops.
- Use quality ribbon for a lasting shape.
- Master the tying technique for consistent results.
- Adjust loops for symmetry and style.
- Trim ends neatly for a professional finish.
- Practice regularly to perfect your skills.
Creative Uses For Double Bows
Double bows made with a fork are more than just pretty decorations. Their unique shape and size make them perfect for a variety of creative projects around your home and in your daily life. If you’ve ever thought a simple bow couldn’t add much to your crafts or gifts, think again.
Gift Wrapping That Stands Out
Adding a double bow to your gift wrapping instantly lifts the whole presentation. You can use colorful ribbons to match the occasion, making your gifts look thoughtfully wrapped without much effort.
Imagine your friends’ surprise when they see such a neat and elegant bow on their present. It’s a small detail that shows you care, and you can make it quickly with just a fork and some ribbon.
Decorating Hair Accessories
Double bows are perfect for customizing hair clips, headbands, or hair ties. They bring a charming, handmade touch to everyday accessories you or your kids wear.
I once made several double bow hair clips for a family party. Everyone loved the cute and polished look, and it was a fun way to add personality to simple hairstyles.
Enhancing Home Decor
Use double bows to add flair to your home decor items like candle holders, picture frames, or even curtains. They’re an easy way to refresh your space without spending a lot.
Try attaching a bow to a plain lampshade or a vase. The ribbon’s texture and color can complement your room’s style and make ordinary items more interesting.
Creating Personalized Party Favors
Double bows can turn simple party favors into memorable keepsakes. Tie them onto small gift bags, jars, or boxes to give your guests a special touch.
When I hosted a birthday party, I used double bows on favor bags, and many guests commented on how charming the little details were. It made the favors feel more personal and fun.
Adding Charm To Clothing And Accessories
Have you thought about sewing or pinning double bows onto your clothing or bags? They can brighten up plain shirts, jackets, or backpacks with minimal effort.
Double bows offer a playful way to customize your look. Try placing one near a collar or pocket and see how it changes the vibe of your outfit.
Frequently Asked Questions
How Do You Start Making A Double Bow With A Fork?
Begin by cutting a ribbon about 12 inches long. Fold the ribbon around the fork's prongs to create loops. Hold the ribbon tightly in place before proceeding to tie the center with thread or wire.
What Type Of Ribbon Works Best For Double Bows?
Use a medium to stiff ribbon for best results. Satin and grosgrain ribbons hold their shape well. Avoid very thin or soft ribbons as they may not form neat loops.
How Many Loops Are Needed For A Double Bow On A Fork?
Typically, you need four loops, two on each side. This creates a balanced double bow. Adjust loop size depending on the desired bow fullness.
Can I Use A Double Bow Made With A Fork For Gift Wrapping?
Yes, it adds a charming, handcrafted look to gifts. The bow is secure and decorative. It works well on small to medium-sized packages.
Conclusion
Making a double bow with a fork is simple and fun. You can create beautiful bows for gifts or crafts. Practice a few times to get the perfect shape. Small mistakes can happen, but don’t worry. Each bow will look better than the last.
This skill saves money and adds a personal touch. Try different ribbon colors for variety. Enjoy creating and sharing your handmade bows with others. Keep practicing, and you will get faster and neater. Making bows can be a relaxing and creative hobby.