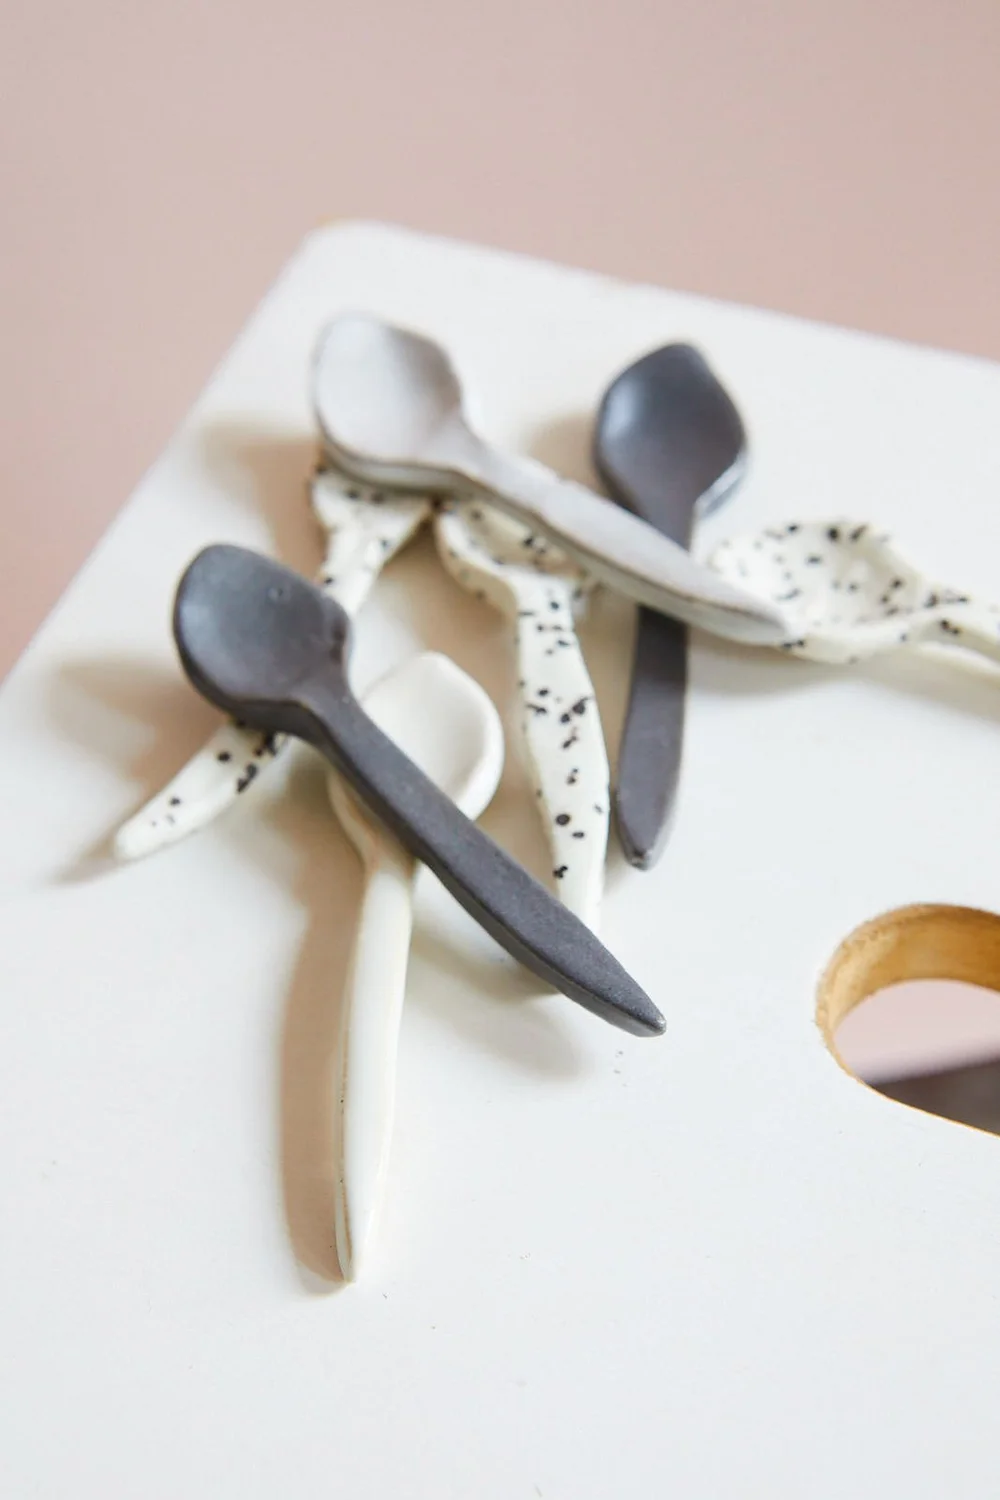
Have you ever wanted to create something both beautiful and useful with your own hands? Making a ceramic spoon is a simple and rewarding way to do just that.
Whether you’re a beginner or have some experience with pottery, this guide will show you easy steps to craft your very own spoon. Imagine holding a spoon you made yourself—smooth, unique, and perfect for your kitchen. Keep reading, and you’ll discover how fun and satisfying it can be to turn clay into a handmade ceramic spoon you’ll be proud to use every day.

Credit: www.youtube.com
Materials Needed
Creating a ceramic spoon needs specific materials to shape and finish it well. Using the right supplies helps make a smooth and durable spoon. Gather everything before starting to avoid interruptions. Below are the key materials for this project.
Types Of Clay
- Stoneware Clay:Durable and good for daily use spoons.
- Earthenware Clay:Easy to mold but less strong.
- Porcelain Clay:Smooth and fine, perfect for detailed work.
Essential Tools
- Clay knife for cutting and shaping.
- Rolling pin or slab roller to flatten clay.
- Modeling tools for smoothing edges and details.
- Sponge to keep clay moist and smooth surfaces.
- Pottery wheel (optional) for uniform shaping.
- Wire cutter to slice clay blocks.
- Brushes for applying glazes and cleaning.
Glazes And Finishes
- Food-safe glaze to coat and protect the spoon.
- Matte, glossy, or satin finishes for different looks.
- Underglaze for adding color or patterns before firing.
- Clear glaze to highlight the clay’s natural texture.
Preparing The Clay
Preparing the clay is a key step in making a ceramic spoon. Proper preparation ensures the clay is soft, even, and free of air bubbles. This helps prevent cracks and weak spots during shaping and firing. Taking time to prepare the clay well improves the final product’s strength and look.
Wedging Techniques
Wedging the clay mixes it thoroughly and removes trapped air. It also makes the clay smooth and consistent. Use a firm surface like a clean table or board for wedging. Press the clay down with the heel of your hand. Fold it over and press again. Repeat this process several times.
- Spiral wedging: Roll the clay into a cone, then push and twist it.
- Kneading: Push down and fold the clay repeatedly.
- Ram’s head wedging: Press and fold clay like shaping a ram’s head.
Choose a wedging style that feels comfortable. The goal is to get rid of lumps and air pockets.
Clay Conditioning Tips
Conditioning the clay makes it easier to shape. Keep the clay covered with plastic to prevent drying out. If the clay feels too hard, sprinkle a little water and knead it in. Avoid adding too much water; the clay will become sticky and hard to work with.
Store unused clay in an airtight container or plastic bag. Warm the clay slightly before working to make it soft. Cold clay can crack and resist shaping.
Regularly check the clay’s texture during work. Stop to wedge or add water if it feels dry or crumbly. Well-conditioned clay improves your control and the quality of the spoon.
Shaping The Spoon
Shaping the spoon is where your ceramic piece begins to take real form. This stage requires a blend of patience and precision, as each curve and line impacts the spoon’s usability and aesthetic. You'll need to focus on creating a comfortable, functional shape that feels good in your hand.
Forming The Bowl
Start by pressing your clay into a smooth, rounded bowl shape. Use your thumb or a small tool to gently hollow out the center, aiming for an even thickness throughout. Keep checking the depth and curve to ensure it can hold liquids or food without spilling.
Remember, the bowl’s shape affects how well the spoon scoops. Too shallow, and it won’t hold much; too deep, and it might be awkward to use. Try holding the bowl as if you were about to eat—does it feel natural?
Crafting The Handle
Roll out a coil of clay for the handle, making sure it’s neither too thick nor too thin. The handle should feel sturdy but comfortable to grip. You can slightly taper it towards the end or add a subtle curve to fit your hand better.
Think about balance: a heavy bowl with a flimsy handle won’t work well. Test the weight distribution by holding the handle and imagining the spoon’s use. Does it feel balanced? Adjust thickness and length as needed.
Joining Parts Smoothly
Score both the bowl’s edge and the handle where they will meet, then apply slip (liquid clay) to both surfaces. Press them together firmly and blend the joint with your fingers or a soft tool to create a seamless transition. This step is crucial to prevent cracks during drying and firing.
Take your time smoothing out the connection. Rough joins can weaken your spoon and spoil its look. Ask yourself if the handle and bowl flow together naturally—if not, keep refining until the join feels like one piece.
Drying And Trimming
After shaping your ceramic spoon, the drying and trimming process is crucial to achieve a smooth and durable final product. This phase allows the clay to harden just enough for you to refine its form without risking cracks or deformation. Paying close attention to drying time and careful trimming will elevate the quality of your spoon dramatically.
Proper Drying Time
Drying the clay too quickly can cause cracks or warping. Ideally, let your spoon dry slowly in a cool, shaded area to maintain even moisture loss. This might take anywhere from 24 to 48 hours depending on your environment.
Check the spoon's hardness by gently pressing with your finger—if it feels leather-hard, it’s ready for trimming. Have you noticed how patience in drying saves you from frustrating repairs later?
Refining The Shape
Once your spoon reaches the leather-hard stage, use a sharp trimming tool or needle to clean up edges and smooth out any uneven surfaces. Focus on the bowl and handle areas where imperfections show the most.
Trimming not only improves appearance but also reduces excess weight, making the spoon more comfortable to use. Don't rush; slow and steady movements help avoid accidental gouges.
Bisque Firing
Bisque firing is a crucial step in making a ceramic spoon. It transforms clay into a durable, porous state, perfect for glazing. This process ensures your spoon withstands daily use and holds its shape. Understanding bisque firing involves knowing the right temperatures and necessary safety precautions.
Firing Temperatures
Firing temperatures are key to successful bisque firing. Most potters fire between 1730°F and 1940°F. This range allows the clay to harden without becoming fully vitrified. Low-fire clays need lower temperatures, often around 1730°F. For stoneware or porcelain, aim closer to 1940°F. Always check your clay's specifications.
Safety Precautions
Safety is paramount during bisque firing. Ensure proper ventilation in your kiln area. Kilns release fumes that need to be vented. Wear protective gear, like gloves and goggles, to protect against heat and sharp edges. Check your kiln for any damages before firing. A faulty kiln can be dangerous. Always follow the manufacturer's guidelines for safe operation.
Glazing The Spoon
Glazing the ceramic spoon is a key part of the process. It gives the spoon a smooth finish and adds color. The glaze also protects the spoon from water and stains. This step requires care and patience to get the best results. Understanding glaze types and applying them correctly will make your spoon both beautiful and durable.
Choosing The Right Glaze
Select a glaze that fits your spoon's use. Food-safe glazes are important for items that touch food. Glossy glazes give a shiny look, while matte glazes offer a soft finish. Think about the color and texture you want. Low-fire glazes work well for beginners. High-fire glazes create stronger, more durable surfaces. Always check glaze labels for safety and firing temperature.
Applying Techniques
Clean the spoon before glazing to remove dust and oils. Use a brush for detailed areas and dipping for full coverage. Apply thin, even layers to avoid drips and runs. Let each layer dry before adding another. Sponging can create interesting textures on the surface. Avoid thick glaze application; it can cause cracking during firing. Wear gloves to keep your hands clean and prevent fingerprints on the glaze.
Final Firing
The final firing is the crucial stage that transforms your ceramic spoon from fragile clay into a durable, functional piece. This process hardens the spoon, giving it strength and a finished surface that can hold up to daily use. Paying close attention to the details during this phase ensures your spoon not only looks great but lasts long.
Kiln Settings
Setting the right temperature and firing schedule in your kiln is essential. Typically, ceramic spoons are fired at cone 06 to cone 04, which translates to about 1828°F to 1945°F (998°C to 1063°C). Adjusting the ramp rate, or how quickly the kiln heats up, helps prevent cracks.
Slow heating is better than rushing the process. If the temperature rises too fast, the spoon can crack or warp. I learned this the hard way when my first spoon broke because I skipped slower ramping. A good rule is to increase temperature at around 100°F per hour until halfway, then speed up if the spoon looks stable.
Cooling Process
Once firing is complete, the cooling process is just as important. Let your kiln cool down gradually to room temperature before opening it. Rapid cooling can cause thermal shock, which damages the spoon’s structure.
You might feel tempted to open the kiln early to see your work, but patience pays off here. A slow cooldown over 12 to 24 hours helps the spoon retain its strength and finish. Have you ever noticed how ceramics that cool too fast often end up with tiny cracks? Avoiding that is key to a perfect final product.

Credit: makezine.com
Troubleshooting Common Issues
Ceramic spoon making is an art that requires precision and patience. Beginners often face challenges that can affect the final product. Understanding common issues can help in creating a flawless ceramic spoon.
Cracking And Warping
Cracking is a frequent problem in ceramic projects. It often occurs due to uneven drying. Ensure that your spoon dries uniformly. Cover it with a plastic sheet during the drying phase. This helps control the moisture loss rate.
Warping happens when clay is not handled properly. Use consistent pressure when shaping your spoon. Avoid overworking the clay. Keeping the thickness uniform can also prevent warping.
Glaze Defects
Glaze defects can ruin the appearance of your ceramic spoon. Pinholes and blistering are common defects. Ensure your clay surface is clean before applying glaze. Dust and oils can cause defects.
Improper firing temperature can also lead to issues. Follow the recommended temperature for your specific glaze. Test the glaze on a small piece first. This ensures it reacts well with your clay.
Creative Tips
Adding your own creative touch to a ceramic spoon can transform it from a simple tool into a unique piece of art. Creativity allows you to express your personality and style while making the spoon truly yours. Let’s look at some practical ways to add those special details.
Adding Decorative Elements
Think beyond plain shapes and smooth surfaces. You can add texture by pressing leaves, lace, or stamps into the soft clay before it dries. This gives your spoon a beautiful, natural pattern that stands out.
Glazes offer another way to decorate. Try mixing different colors or layering them for a marbled effect. If you’ve never experimented with glazing before, start with small sections to see how the colors react during firing.
Have you ever tried painting tiny images or symbols on your ceramics? Using underglaze pencils or brushes, you can create intricate designs like flowers, geometric shapes, or even small animals. This kind of detail makes each spoon feel special and handcrafted.
Personalizing Your Spoon
Adding your name or a meaningful word onto the handle is a simple way to personalize your spoon. You can carve it directly into the clay or paint it on with underglaze before firing. Imagine giving a set of spoons with each family member’s name engraved—how memorable would that be?
Consider shapes that reflect your interests or hobbies. For example, if you love the ocean, sculpt a tiny shell or wave pattern onto the handle. This personal touch makes your spoon more than just a kitchen tool; it becomes a conversation starter.
Don’t hesitate to mix and match these ideas. Adding both texture and personalized carvings can give your spoon a layered, rich look. What story do you want your ceramic spoon to tell?
Credit: www.kerribrewer.net
Frequently Asked Questions
What Materials Are Needed To Make A Ceramic Spoon?
You need clay, carving tools, a sponge, water, a kiln, and glaze to make a ceramic spoon. Clay forms the base, while tools help shape it. The kiln hardens the spoon, and glaze adds a smooth, waterproof finish.
How Long Does It Take To Make A Ceramic Spoon?
Making a ceramic spoon usually takes 2 to 3 days. Shaping and drying the clay takes a day. Firing in the kiln and glazing adds extra time. Patience is key for quality results.
Can Beginners Easily Make Ceramic Spoons?
Yes, beginners can make ceramic spoons with basic clay skills. Start with simple shapes and follow step-by-step instructions. Practice improves shaping and finishing techniques. Ceramic spoon making is a rewarding craft for all skill levels.
How Do You Glaze A Ceramic Spoon Properly?
Apply glaze evenly after the first firing, called bisque firing. Use a brush or dip the spoon in glaze. Avoid thick layers to prevent dripping. Fire the spoon again to set the glaze for a smooth, durable finish.
Conclusion
Making a ceramic spoon is a fun and creative process. You start with clay, shape it carefully, and let it dry. Then, you fire the spoon in a kiln to make it strong. Finally, add glaze for color and shine.
Each step takes patience and care. Your handmade spoon can be useful or decorative. Trying this craft helps you learn about pottery and art. Enjoy the process and create something unique with your own hands. Keep practicing to improve your skills over time.