Are you tired of your bread going stale too quickly? What if you could keep your bread fresh longer, save money, and reduce waste—all with something you make yourself?
Learning how to make a bread bag is easier than you think, and once you have your own, you’ll wonder how you ever lived without it. In this guide, you’ll discover simple steps to create a bread bag that fits your needs perfectly.
Ready to keep your bread fresh and your kitchen stylish? Let’s get started!
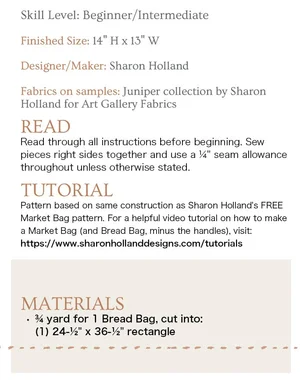
Credit: www.sharonhollanddesigns.com
Choosing The Right Fabric
Choosing the right fabric is key to making a bread bag that lasts and keeps bread fresh. The fabric affects breathability, durability, and how eco-friendly the bag is. Picking the best material ensures the bread stays fresh longer and the bag is easy to clean.
Natural Vs Synthetic Materials
Natural fabrics come from plants or animals. Cotton, linen, and hemp are common natural choices. They allow air to flow and help keep bread fresh. Synthetic fabrics like polyester or nylon are made from chemicals. They are often less breathable but can be more water-resistant.
Natural fabrics feel soft and are gentle on bread. Synthetic ones may last longer but trap moisture inside. This can cause bread to get soggy faster.
Fabric Durability And Breathability
Durability matters because bread bags get used often. Choose fabric that can handle washing and daily use. Breathability is important to avoid mold and soggy bread. Fabrics with a loose weave let air move freely.
Cotton and linen offer good breathability and last long with proper care. Tight weaves or coated fabrics block air and moisture. This can harm bread freshness.
Eco-friendly Options
Eco-friendly fabrics help reduce waste and pollution. Organic cotton is grown without harmful chemicals. Hemp grows fast and needs little water. These options are better for the planet.
Recycled fabrics also reduce waste. Some bags use recycled cotton or polyester. Choosing eco-friendly fabric supports a greener lifestyle and makes your bread bag more sustainable.
Essential Tools And Supplies
Having the right tools and supplies sets the foundation for a smooth bread bag-making process. Without them, you might find yourself stuck or frustrated, especially if you’re new to sewing projects. Let’s look at the essential items that will make your crafting experience enjoyable and effective.
Sewing Machine And Needles
A reliable sewing machine is your best friend when making a bread bag. It speeds up the work and ensures strong, even stitches that hold up over time. If you don’t have one, a sturdy hand-sewing needle can work, but it takes more patience.
Choose needles that match your fabric type—sharp needles for cotton and a ballpoint for knits. Using the wrong needle can cause skipped stitches or damage your fabric. Have extra needles on hand because they can wear out quickly during a project.
Measuring And Cutting Tools
Accurate measurements are key to making a bread bag that fits your bread perfectly and looks neat. Use a clear ruler or measuring tape to get precise dimensions. A fabric marker or chalk helps you mark where to cut or sew without leaving permanent marks.
Sharp fabric scissors make all the difference. Dull scissors can fray fabric edges and make cutting frustrating. Keep your scissors dedicated to fabric only; using them on paper dulls the blades quickly.
Thread And Fasteners
Pick a strong, all-purpose thread that matches or contrasts nicely with your fabric. Polyester thread is durable and works well for most bread bag materials. Don’t overlook thread quality—cheap thread can break easily and ruin your work.
Fasteners like buttons, snaps, or drawstrings add functionality and style to your bread bag. Think about how you want to open and close your bag. A drawstring is simple and effective, but buttons or snaps can add charm and extra security.
Measuring And Cutting Fabric
Measuring and cutting fabric is a crucial step in making a bread bag. Accurate measurements ensure the bag fits the bread perfectly. Careful cutting helps the fabric pieces align well during sewing. This section guides you through the essential steps to prepare your fabric before sewing.
Determining Bag Size
Decide the size based on the bread you want to store. Measure the length, width, and height of the loaf. Add extra space for easy insertion and removal of bread. Consider making the bag slightly bigger for air circulation. Write down these measurements clearly for reference.
Adding Seam Allowances
Always add seam allowances to your measurements. Typically, ½ inch (1.27 cm) is enough for sewing seams. This extra fabric prevents the bag from becoming too small. Mark the seam lines lightly with a fabric pencil or chalk. This step avoids mistakes while sewing the pieces together.
Cutting Techniques
Use sharp fabric scissors for clean cuts. Cut slowly and follow the marked lines carefully. Avoid lifting the fabric too much to prevent shifting. Pin the fabric layers together to keep them aligned. Check edges for smoothness and evenness after cutting.

Credit: www.sharonhollanddesigns.com
Sewing The Bread Bag
Choose fabric that is strong and washable for your bread bag. Cut pieces to size, then sew edges carefully to form the bag shape. Add a drawstring or closure to keep bread fresh and secure.
Sewing a bread bag is a simple and rewarding project. It keeps your bread fresh and reduces plastic waste. Follow these easy steps to create your own stylish bread bag.
Assembling Fabric Pieces
Choose a sturdy fabric that breathes well. Linen or cotton works best. Cut two rectangles of equal size for the bag's body. Ensure the fabric pieces are clean and pressed. Place the right sides of the fabric facing each other. Align the edges carefully before sewing.
Creating Seams And Hems
Sew along the sides and bottom of the fabric. Use a straight stitch for durability. Leave the top open for the bread. Turn the bag inside out to hide the seams. Iron the seams flat for a neat finish. Fold the top edge twice and sew to create a hem. This prevents fraying and adds strength.
Adding Drawstrings Or Closures
Create a channel for the drawstring at the top. Leave a small opening on each side. Thread a cord or ribbon through the channel. Use a safety pin to guide it through. Knot the ends of the drawstring to secure it. Test the drawstring by pulling both ends. The bag should close snugly around the bread.
Personalizing Your Bag
Personalizing your bread bag makes it unique and special. It turns a simple bag into a creative project. Personal touches show your style and add charm.
Personalizing can also help you identify your bag easily. Small details make a big difference. Use simple materials to decorate and customize your bread bag.
Decorative Stitching
Decorative stitching adds texture and color to your bag. Use bright thread to create patterns or shapes. Simple stitches like zigzags or waves look great.
Try contrasting colors to make the stitches stand out. You can stitch your initials or small designs. Decorative stitching strengthens the fabric too.
Adding Labels Or Tags
Labels or tags give your bag a personal identity. Write your name or a fun message on the tag. Use fabric, leather, or even paper tags.
Attach tags with a small safety pin or sew them on. Choose labels that match your bag’s style and color. Tags make your bag easy to recognize.
Using Fabric Paints Or Patches
Fabric paints let you add colorful designs and patterns. Draw shapes, words, or simple pictures on the bag. Use stencils for neat and clean images.
Patches add texture and style. Sew or iron on patches with fun shapes or logos. Mix different patches to create a custom look.
Fabric paints and patches make your bread bag stand out. They are easy to use and long-lasting.
Caring For Your Bread Bag
Caring for your bread bag ensures it lasts longer and keeps your bread fresh. Proper care not only maintains the bag’s appearance but also prevents unwanted odors or stains. Let’s look at some practical ways to keep your bread bag in top shape.
Washing Instructions
Wash your bread bag gently to protect the fabric and any linings. Use cold or lukewarm water with mild detergent to avoid shrinking or fading.
Hand washing is best, but if you prefer machine washing, place the bag in a laundry mesh bag and choose a delicate cycle. Avoid bleach or harsh chemicals that can weaken the fabric fibers.
After washing, air dry your bread bag flat or hang it up—never use a dryer. This prevents damage and keeps the bag’s shape intact.
Storage Tips
Store your bread bag in a cool, dry place away from direct sunlight. Excessive heat or humidity can cause mold or mildew to develop.
Keep the bag empty and clean between uses to avoid attracting pests. You might want to add a small sachet of dried lavender or cedar chips to naturally repel insects.
Have you noticed how storing bread bags with some airflow extends their freshness? Try leaving the bag slightly open instead of sealing it completely.
Maintaining Fabric Quality
Regularly check your bread bag for signs of wear such as thinning fabric or loose threads. Repair small holes quickly to prevent them from getting worse.
Iron your bread bag on a low setting if the fabric wrinkles, but avoid high heat that can damage synthetic materials. This keeps the bag looking neat and ready for use.
Think about rotating multiple bread bags if you bake often. This reduces wear and gives each bag a chance to rest and air out between uses.

Credit: www.princesstafadzwa.com
Frequently Asked Questions
What Materials Are Needed To Make A Bread Bag?
To make a bread bag, you need cotton fabric, thread, scissors, and a sewing machine. Choose breathable cotton for freshness. Optional items include a drawstring or Velcro for closure. These materials ensure durability and keep bread fresh longer.
How Do I Sew A Simple Bread Bag?
Cut fabric into a rectangle, fold it, and sew the sides. Leave the top open for bread insertion. Add a hem or casing to insert a drawstring. This method creates a reusable, eco-friendly bread bag quickly and easily.
Can A Homemade Bread Bag Keep Bread Fresh?
Yes, a homemade bread bag made from cotton helps retain moisture. Cotton fabric breathes well, preventing mold and staleness. It extends bread freshness better than plastic bags. Proper sewing and fabric choice are key to effectiveness.
How To Clean And Maintain A Bread Bag?
Wash your bread bag regularly in cold water with mild detergent. Air dry it to prevent shrinkage and maintain fabric quality. Avoid bleach or harsh chemicals. Proper cleaning keeps the bag hygienic and extends its lifespan.
Conclusion
Making a bread bag is simple and fun to try. It saves money and reduces plastic waste. You can choose fabric that suits your style. The steps are easy to follow and quick to do. A homemade bread bag keeps bread fresh longer.
It also adds a personal touch to your kitchen. Give it a go and enjoy fresh bread every day. Small efforts like this help the environment too. Keep practicing, and you will get better each time.