Is your Maytag freezer making strange noises or not cooling properly? The culprit might be a malfunctioning evaporator fan motor.
When this small but vital part stops working, your freezer can’t keep your food fresh like it should. But don’t worry—you don’t have to call a repair technician just yet. In this guide, you’ll learn simple, step-by-step ways to fix the evaporator fan motor yourself.
By the end, you’ll save money and get your freezer running smoothly again. Ready to take control and bring your freezer back to life? Let’s dive in.
Signs Of A Faulty Evaporator Fan Motor
Recognizing the signs of a faulty evaporator fan motor in your Maytag freezer can save you time and prevent food spoilage. The evaporator fan motor plays a crucial role in circulating cold air throughout the freezer compartment. When it malfunctions, your freezer’s efficiency drops, and you’ll notice clear symptoms that something is wrong.
No Cold Air In Freezer
If your freezer suddenly stops feeling cold, the evaporator fan motor might be the culprit. This fan is responsible for moving cold air from the evaporator coil to the freezer and fridge sections. Without proper airflow, the temperature inside rises quickly, causing your frozen goods to thaw.
Have you checked if your freezer feels unusually warm despite running continuously? This is a common sign the fan isn’t circulating air as it should. Ignoring this can lead to frost buildup or complete freezer failure.
Unusual Noises
Listen closely to your freezer for any strange sounds. A faulty evaporator fan motor often produces humming, buzzing, or grinding noises. These sounds usually indicate worn-out bearings or a motor struggling to spin the fan blades.
Think about the last time your freezer made an odd noise—did it stop after a while or persist? Persistent noise is a strong hint that the fan motor needs inspection or replacement before it damages other components.
Freezer Overheating
It might sound odd, but a failing evaporator fan motor can cause your freezer to overheat. When the fan stops working, the compressor has to work harder, generating more heat inside the unit. This extra heat can cause your freezer’s outer walls or compressor area to feel unusually warm.
Have you noticed your freezer’s back or bottom panel getting hot? This might be your freezer’s way of signaling the fan motor is malfunctioning and putting strain on the system. Addressing this early can prevent costly repairs or complete freezer breakdown.

Credit: www.searspartsdirect.com
Tools Needed For Repair
Fixing a malfunctioning freezer evaporator fan motor in your Maytag appliance requires the right tools to make the job smoother and safer. Having everything prepared before you start saves time and prevents unnecessary frustration. Let’s look at the essential tools you’ll need to tackle this repair effectively.
Screwdrivers And Multimeter
You’ll need a set of screwdrivers to open panels and remove screws holding the motor in place. A Phillips head and a flathead screwdriver usually cover most screws in Maytag freezers.
A multimeter is crucial for testing electrical connections and verifying if the fan motor is receiving power. Without it, you might replace parts unnecessarily. Have your multimeter ready to check voltage and continuity accurately.
Replacement Parts
Before you start, make sure you have the correct replacement evaporator fan motor designed for your Maytag model. Using the wrong part can cause more damage or poor performance.
It’s also wise to keep extra screws or mounting brackets handy, as these small parts can easily get lost or damaged during the repair process. Double-check the part number to ensure compatibility.
Safety Gear
Safety should never be overlooked. Use insulated gloves to protect yourself from electrical shocks while handling wiring.
Wear safety goggles to shield your eyes from dust or debris when opening the freezer panels. A dust mask can also help if you’re sensitive to particles inside the appliance.
Locating The Evaporator Fan Motor
Finding the evaporator fan motor is the first step to fix your Maytag freezer. This motor helps cool the freezer by circulating air over the evaporator coils. Without it, frost builds up and your freezer won't stay cold. Knowing its location saves time and effort during repair.
Accessing The Freezer Interior
Start by unplugging the freezer for safety. Open the freezer door fully. Remove all food items and shelves to clear your workspace. Shelves usually lift out or slide forward easily. Clearing space lets you see and reach the back wall clearly.
Removing The Back Panel
The evaporator fan motor sits behind the back panel inside the freezer. This panel protects the coils and fan. Use a screwdriver to remove screws holding the panel in place. Keep the screws safe for reassembly. Gently pull the panel away to expose the fan motor and evaporator coils.
Testing The Evaporator Fan Motor
Testing the evaporator fan motor is crucial to ensure your Maytag freezer runs smoothly. A faulty fan motor can cause uneven cooling or freezer malfunction. Follow these simple checks to find out if the motor works properly. These tests are safe and easy to perform with basic tools.
Checking For Power
First, make sure the evaporator fan motor gets power. Unplug the freezer before starting. Remove the freezer back panel to access the motor and wiring. Plug the freezer back in and carefully check the voltage at the motor terminals using a multimeter.
- Set the multimeter to measure AC voltage.
- Touch the probes to the motor's power wires.
- Look for a voltage reading matching your freezer's rated power.
No voltage means a wiring or control board issue. Voltage present means the motor may be defective.
Testing Motor Continuity
Unplug the freezer again before testing motor continuity. Disconnect the motor wires from the control board. Set your multimeter to the resistance or continuity mode. Touch the probes to the motor terminals.
- A low resistance reading shows the motor windings are intact.
- An infinite or very high reading means the motor winding is broken.
Testing continuity confirms if the motor is physically damaged or not. Replace the motor if it shows no continuity.
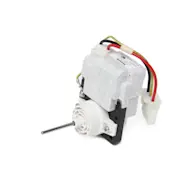
Removing The Faulty Fan Motor
Disconnect power before removing the faulty fan motor to avoid shocks. Carefully detach the motor from the freezer evaporator and unplug all connections. Handle parts gently to prevent damage during removal.
Removing a faulty evaporator fan motor in your Maytag freezer might seem daunting, but with a little patience and the right steps, you can tackle it yourself. A malfunctioning fan motor can lead to uneven cooling, which might affect your freezer's efficiency. By following the correct procedure, you ensure your freezer runs smoothly without the need for costly repairs.
Disconnecting The Wiring
First, ensure your freezer is unplugged to avoid any electrical hazards. Safety should always be your priority. Once you're ready, locate the fan motor and carefully disconnect the wiring harness. Use your fingers or a small flat-head screwdriver to gently release the connectors. Remember how each wire is connected, or take a quick photo for reference. This will be helpful when reconnecting the new motor.
Unscrewing The Motor Assembly
With the wiring out of the way, focus on the motor assembly. Typically, the motor is secured by a few screws, which can be removed using a screwdriver. Keep a small container handy to store the screws safely. Misplacing them could turn this simple task into a frustrating search. Once the screws are removed, gently pull out the motor assembly. If it's stuck, wiggle it slightly until it becomes free. This step requires patience, so take your time to avoid damaging any surrounding components.

Credit: minda.by
Installing The New Fan Motor
Installing the new evaporator fan motor in your Maytag freezer is a key step to restore proper cooling and avoid spoilage. This task demands careful handling to ensure the motor fits correctly and functions smoothly. Let’s focus on how to position, wire, and secure the motor for reliable operation.
Positioning The Motor
Start by aligning the new fan motor exactly where the old one was located. The mounting points should match, so take your time to fit the motor snugly without forcing it. If the motor feels loose or hard to place, double-check that you have the correct model for your freezer.
Have you noticed how a slightly misaligned motor can cause noise or reduce efficiency? Proper positioning avoids these problems and extends the motor’s lifespan.
Reconnecting Wiring
Once the motor is in place, reconnect the wiring harness carefully. Ensure each wire matches the original connection points—mixing wires can cause the motor to malfunction or even damage your freezer. Use the original connectors and avoid twisting wires together, which can lead to loose connections.
It’s helpful to take a photo of the wiring before removal. Did you do this? It saves a lot of guesswork during reassembly.
Securing The Assembly
After wiring, secure the fan motor assembly with the screws or clips that came with your freezer. Tighten them firmly but don’t overtighten, as this can strip the screws or crack plastic parts. Check that the fan blade spins freely without rubbing against the housing.
Ensuring everything is tightly secured reduces vibrations and noise, making your freezer run quieter and more efficiently. How often do you check your freezer’s internal components for loose parts?
Reassembling The Freezer
Reassembling the freezer after replacing the evaporator fan motor is a critical step to ensure everything runs smoothly. Taking your time here can prevent future issues and help the freezer maintain its efficiency. Let’s walk through putting it back together carefully and correctly.
Replacing The Back Panel
Start by carefully aligning the back panel inside the freezer compartment. Make sure the new evaporator fan motor and any wiring are properly positioned without pinching or stretching.
Secure the panel with the screws you removed earlier. Tighten them evenly to avoid warping the panel, which could cause air leaks or rattling noises.
Check that the fan blades spin freely and there’s no obstruction before closing everything up. Have you ever noticed a strange noise after reassembly? It’s usually caused by a misaligned panel or loose screws.
Restoring Power And Testing
Once the panel is back in place, reconnect the freezer to power. Give it a moment to start up and listen carefully for the fan motor’s sound.
Observe the temperature and airflow inside the freezer over the next hour. Is the air circulating evenly? Proper airflow means your fan motor is working as it should.
If the fan doesn’t start or you hear unusual noises, double-check your connections and panel alignment. Sometimes a quick adjustment here can save you a service call.
Credit: www.searspartsdirect.com
Maintenance Tips For Longevity
Regularly clean the freezer evaporator fan motor to prevent dust buildup and ensure smooth operation. Check wiring and connections for damage to avoid malfunctions. Replace worn parts promptly to keep your Maytag freezer running longer.
Maintaining your Maytag freezer's evaporator fan motor is crucial for its longevity and efficient performance. Proper care not only extends the life of your appliance but also ensures it runs smoothly, saving you from unexpected repairs. Here are some practical tips to keep your freezer's evaporator fan motor in top-notch condition.
Regular Cleaning
Cleaning your freezer regularly can prevent dust and debris from clogging the evaporator fan motor. Make it a habit to clean the interior and exterior surfaces with a mild detergent and a soft cloth. Pay special attention to the coils and vents to ensure optimal air circulation and efficiency.
Avoiding Overloading
Overloading your freezer can strain the evaporator fan motor, reducing its lifespan. Keep your freezer organized and avoid packing it too tightly. Ensure there is enough space for air to circulate freely, which helps maintain the motor's performance and energy efficiency.
Periodic Motor Checks
Schedule regular inspections to check the condition of the evaporator fan motor. Listen for unusual noises or vibrations, as these might indicate a problem. If you notice anything unusual, it might be time to consult a professional for a more thorough inspection. By focusing on these maintenance tips, you can enjoy a more reliable and longer-lasting freezer. What other maintenance practices have you found effective for your appliances?
Frequently Asked Questions
How Do I Know If My Freezer Evaporator Fan Motor Is Faulty?
Listen for unusual noises or no sound from the fan. Check if the freezer temperature is inconsistent or if frost builds up. These signs often indicate a malfunctioning evaporator fan motor needing inspection or replacement.
What Tools Are Needed To Fix Maytag Freezer Fan Motor?
You typically need a screwdriver, multimeter, and socket wrench. These tools help access the fan motor, test electrical connections, and remove faulty parts for replacement or repair.
Can I Replace The Freezer Evaporator Fan Motor Myself?
Yes, with basic mechanical skills and safety precautions. Ensure the freezer is unplugged before starting. Follow a step-by-step guide specific to Maytag models for safe and effective replacement.
How Much Does It Cost To Repair Maytag Freezer Fan Motor?
Repair costs range from $100 to $250, depending on parts and labor. DIY repairs can reduce expenses, but professional service ensures proper diagnosis and repair quality.
Conclusion
Fixing the freezer evaporator fan motor saves time and money. Check the motor and wiring carefully before replacing parts. Clean the fan blades to keep it running smoothly. A working fan keeps the freezer cold and food fresh. Small problems can cause big issues if ignored.
Follow these steps to avoid freezer breakdowns. Stay patient and work safely during repairs. Your freezer will work better and last longer. Simple fixes make a big difference in home appliance care.