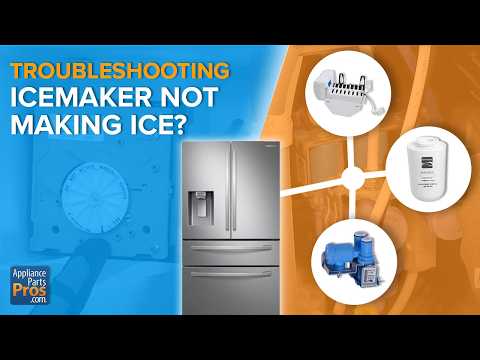
Is your Kenmore ice maker not working like it used to? You rely on it to keep your drinks cold and your gatherings fun, so a broken ice maker can be frustrating.
But don’t worry—fixing it might be easier than you think. In this guide, you’ll discover simple steps to get your ice maker back up and running quickly. Keep reading, and you’ll save time, avoid costly repairs, and enjoy ice-cold water again in no time.
Common Ice Maker Issues
Ice makers can be incredibly convenient, but they sometimes stop working as expected. Knowing the common issues can save you time and frustration before calling a repair technician. Understanding these problems helps you troubleshoot effectively and get your Kenmore ice maker back in action quickly.
No Ice Production
If your Kenmore ice maker isn’t producing any ice, the problem might be simple. Check if the water supply line is connected and turned on. A clogged or frozen water line can block water from reaching the ice maker.
Another cause could be a faulty water inlet valve. This valve controls water flow into the ice maker, and if it fails, no water reaches the ice tray. Sometimes, the ice maker’s motor or control module might be malfunctioning, preventing the machine from cycling properly.
Have you checked if the ice maker is turned on? It sounds basic, but it’s an easy step to miss. Also, ensure the freezer temperature is cold enough, ideally between 0°F and 5°F (-18°C to -15°C).
Slow Ice Making
When your ice maker produces ice but takes much longer than usual, it’s often a temperature issue. If the freezer is too warm, ice formation slows down significantly. Adjust your freezer settings and monitor the temperature to see if it improves.
Mineral deposits or dirt in the water filter can reduce water flow, leading to slower ice production. Replacing the water filter regularly helps maintain proper water flow and ice quality. Also, check for obstructions in the ice maker’s ejector arm, which can delay the ice removal process.
Have you noticed if the ice maker cycles fully? Sometimes, it stops mid-cycle due to electrical problems or sensor failures. Testing the ice maker’s cycle can reveal if this is the case.
Ice Cubes Are Small
Small ice cubes often mean your ice maker isn’t filling the tray with enough water. A partial clog in the water line or a weak water inlet valve can cause this issue. Inspecting and cleaning these parts can restore proper water flow.
Another reason could be the freezer temperature. If it’s too cold, the ice might freeze too quickly, resulting in smaller cubes. Try adjusting the temperature slightly to see if the size improves.
Have you checked if the ice tray is damaged or cracked? A worn-out tray can affect cube size and shape. Replacing it might be the simplest fix for better-sized ice cubes.
Tools And Materials Needed
Fixing a Kenmore ice maker requires the right tools and materials. Having these ready saves time and frustration. It ensures the repair goes smoothly and safely.
The tools and materials are common and easy to find. Most households or local stores will have them. Knowing what you need helps you prepare better for the task.
Essential Tools For Repairing Kenmore Ice Maker
- Phillips and flathead screwdrivers
- Nut driver set
- Multimeter for electrical testing
- Pliers and adjustable wrench
- Flashlight for better visibility
- Hairdryer or heat gun for defrosting
Materials To Replace Or Repair Ice Maker Parts
- New ice maker assembly or kit
- Replacement water inlet valve
- Ice mold thermostat
- Water filter cartridge
- Electrical tape and wire connectors
- Food-safe silicone lubricant
Safety Gear And Additional Supplies
- Gloves to protect your hands
- Safety glasses for eye protection
- Towels or rags to catch water
- Bucket for draining excess water
- Manual or user guide for reference
Checking The Water Supply
Before you dive into complex repairs on your Kenmore ice maker, checking the water supply is essential. Without a steady and clean flow of water, your ice maker can’t function properly. Ensuring the water line and pressure are in good shape often solves common ice-making problems quickly.
Inspecting The Water Line
Start by examining the water line connected to your ice maker. Look for any visible kinks, cracks, or leaks along the hose. Even a small obstruction or damage can reduce water flow and prevent ice from forming efficiently.
Make sure the water line is securely attached to both the fridge and the water source. If you find any damage, replacing the line is usually inexpensive and straightforward. Have you checked behind your fridge recently? Sometimes the line gets pinched when the fridge is moved.
Testing Water Pressure
Low water pressure can stop your ice maker from filling correctly. To test the pressure, turn off the ice maker and disconnect the water line. Attach a pressure gauge to the water valve to measure the flow.
Kenmore models generally require water pressure between 20 and 120 psi. If your pressure is below this range, it might explain the ice maker issues. You can increase water pressure by adjusting your home’s main valve or calling a plumber if the problem is serious.
Have you considered how water quality affects pressure? Sediment buildup can clog valves and reduce flow, so flushing the water line occasionally helps maintain steady pressure and clear water supply.
Examining The Ice Maker Assembly
Examining the ice maker assembly is a crucial step in troubleshooting your Kenmore ice maker. Understanding how each part functions can save you time and money. By carefully inspecting the components, you can identify the source of the problem and decide whether a simple fix or a replacement is needed.
Inspecting The Ice Mold
The ice mold is where water freezes into cubes, so any damage or blockage here affects ice production. Start by checking for cracks or chips that could cause leaks or incomplete cubes. Also, look for any buildup of mineral deposits or frost that might block water flow or freezing.
Cleaning the mold with a mixture of warm water and vinegar can often clear mineral deposits. If the mold is cracked, replacing it is usually the best option. Have you noticed uneven ice shapes or half-formed cubes? That’s often a sign the mold isn’t functioning properly.
Checking The Ejector Arm
The ejector arm pushes ice cubes out of the mold and into the storage bin. If this arm is stuck or broken, ice won’t be dispensed correctly. Gently move the arm by hand to see if it spins freely without resistance.
Look for any ice jams or obstructions that might block movement. Sometimes, a simple thawing of ice buildup around the arm fixes the issue. If the arm feels loose or broken, replacing it will restore proper ice ejection.
Have you experienced ice cubes piling up but not falling into the bin? This might be the ejector arm’s way of telling you it needs attention.
Replacing The Water Filter
Replacing the water filter in your Kenmore ice maker is a simple but essential task. It helps maintain the quality of your ice and ensures your machine runs smoothly. Ignoring this can lead to slow ice production or odd-tasting ice cubes.
Locating The Filter
Start by finding the water filter. In most Kenmore models, it’s either inside the refrigerator compartment or at the base of the fridge.
Check the user manual if you’re unsure. The filter usually looks like a small cartridge or a round, twist-in part.
Have you noticed your ice cubes looking cloudy or tasting off? That’s a good hint it’s time to locate and change the filter.
Installing The New Filter
Before installing, turn off the water supply to avoid leaks. Then, remove the old filter by twisting or pulling it out, depending on your model.
Take your new filter and align it properly with the slot. Push or twist it in until it clicks into place.
After installation, run a few cycles to flush the system. This clears out any air or loose particles, giving you fresh, clean ice.
Resetting The Ice Maker
Resetting your Kenmore ice maker can often solve common issues like it not producing ice or making unusual noises. This simple process refreshes the system and clears minor errors that might be causing problems. Before calling a technician, try resetting your ice maker yourself—you might be surprised how often this quick fix works.
Finding The Reset Button
Start by locating the reset button on your Kenmore ice maker. It’s usually inside the freezer compartment, near the ice maker assembly. Look for a small, square button—it might be red or black, depending on your model.
If you can’t spot a button, check your user manual for the exact location. Some models don’t have a physical button; instead, they reset by turning the ice maker arm or unplugging the unit. Have you checked behind the ice bucket? Sometimes the button is hidden there.
Executing The Reset Process
Once you find the reset button, press and hold it for about 10 seconds. You might hear a chime or see the ice maker motor start to run, indicating the reset is in progress. After releasing the button, wait for a few minutes to let the system reboot.
If your model lacks a reset button, try this alternative: lift the ice maker’s metal arm up to the “off” position, wait 10 seconds, then lower it back down. This signals the ice maker to restart its cycle. Have you noticed your ice maker working again after this simple move?
Finally, if neither option works, unplug your refrigerator for about five minutes and then plug it back in. This forces a full reset of the ice maker and the fridge’s control board. Often, this step clears any lingering glitches.
Addressing Temperature Issues
Temperature plays a crucial role in the proper functioning of your Kenmore ice maker. If the freezer is too warm or too cold, the ice maker may not produce ice correctly or at all. Fixing temperature issues can be straightforward once you know what to check and adjust.
Adjusting Freezer Temperature
Your freezer temperature should ideally be set between 0°F and 5°F (-18°C to -15°C) for the ice maker to work efficiently. Temperatures above this range can prevent ice from forming, while temperatures set too low may cause the ice to clump together.
Check your freezer’s temperature control dial or digital display. If you notice the temperature is off, adjust it gradually and monitor the ice production over the next 24 hours. Are you aware that even a slight temperature change can affect ice output significantly?
Ensuring Proper Airflow
Air circulation inside the freezer is essential to maintain consistent temperature levels. Blocked vents can cause uneven cooling, leading to ice production problems.
- Keep items away from freezer vents to allow cold air to flow freely.
- Avoid overpacking the freezer, which can restrict airflow.
- Regularly check and clean any frost buildup that might block vents.
Have you checked if something is obstructing the airflow in your freezer? Proper air circulation ensures your Kenmore ice maker gets the cold air it needs to function smoothly.

Credit: www.searshomeservices.com
Dealing With Mechanical Failures
Mechanical failures in your Kenmore ice maker can be frustrating, especially when you rely on it daily. These issues often stem from worn-out parts that affect the ice-making process. Understanding how to identify and fix these components can save you time and money.
Replacing The Ice Maker Motor
The motor powers the ice maker’s mechanical functions, such as ejecting ice cubes and turning the arm. If your ice maker stops working or makes unusual noises, the motor might be the culprit.
Before replacing the motor, unplug your refrigerator to avoid electric shock. Remove the ice maker assembly carefully, taking note of how parts connect.
Once the motor is accessible, check for signs of wear like burnt smells or visible damage. Swapping out the motor involves disconnecting wires and screws, then installing the new motor in reverse order.
Testing the ice maker after replacement helps confirm the repair. Have you checked your motor’s condition recently?
Fixing The Ice Level Control Board
The ice level control board manages the ice maker’s operation based on the ice bin’s fill level. If your ice maker continues to produce ice even when the bin is full, this board may be faulty.
Diagnose the problem by inspecting the control board for burnt components or loose connections. Sometimes, cleaning the contacts can resolve minor issues.
If cleaning doesn’t help, replacing the control board is necessary. Take a picture of the wiring before removal to ensure proper reconnection.
After installation, monitor your ice maker to ensure it stops ice production at the right level. Could a simple control board fix restore your ice maker’s efficiency?
When To Call A Professional
Knowing when to call a professional for your Kenmore ice maker saves time and money. Small issues can be fixed at home. But major problems need expert help. Calling a technician avoids damage and unsafe repairs. Here are key signs and cost points to guide your decision.
Signs Of Major Issues
- Ice maker does not produce ice at all
- Continuous water leakage inside or outside the unit
- Unusual noises like grinding or clicking sounds
- Ice cubes are misshapen or full of air bubbles
- Freezer temperature fluctuates unexpectedly
- Electrical parts or wiring show visible damage
- Repeated ice maker errors despite resetting
Cost Vs. Benefit Analysis
Repairing minor faults yourself costs less. Simple fixes include cleaning or replacing the water filter. But complex repairs require special tools and skills. A professional’s fee might seem high upfront. Yet, it prevents costly future damage.
Compare repair cost with buying a new ice maker. Professionals can extend your unit’s life. Avoid risky attempts that may void your warranty. Choose expert help when repair costs exceed half of a new unit’s price.

Credit: www.searshomeservices.com
Credit: www.appliancerepairfortlauderdalefl.net
Frequently Asked Questions
How Do I Reset My Kenmore Ice Maker?
To reset, locate the reset button on the ice maker. Press and hold it for 10 seconds. Release and wait for the ice maker to restart its cycle. This can resolve minor issues and restore normal operation.
Why Is My Kenmore Ice Maker Not Making Ice?
Common causes include a clogged water filter, frozen water line, or faulty water inlet valve. Check these parts and replace or clean them as needed. Also, ensure the ice maker is turned on and the freezer temperature is set correctly.
How Can I Fix A Jammed Ice Maker Ejector Arm?
Turn off the ice maker and gently remove any stuck ice cubes. Avoid forcing the ejector arm. Clear any blockages and restart the ice maker. This prevents damage and allows the arm to move freely again.
When Should I Replace My Kenmore Ice Maker?
Replace the ice maker if it consistently fails to produce ice after troubleshooting. Signs include mechanical noise, leaks, or electrical issues. Consult the user manual or a professional technician for proper replacement guidance.
Conclusion
Fixing your Kenmore ice maker can save time and money. Start with simple checks like the water supply and ice maker arm. Clean parts carefully to avoid blockages. Replace worn components to keep the ice maker working well. Regular maintenance helps prevent future problems.
Small steps can bring big improvements. Stay patient and follow each step clearly. Your ice maker will work smoothly again soon.