Cooking a turkey breast in a Dutch oven is easier than you might think. If you want juicy, flavorful meat without the hassle, this method is perfect for you.
Imagine pulling a tender, golden-brown turkey breast from your Dutch oven that melts in your mouth. You’ll learn simple steps that guarantee great results every time. Keep reading, and you’ll discover how to turn your turkey breast into the star of any meal with little effort and maximum taste.

Credit: campgrilleat.com
Choosing The Right Turkey Breast
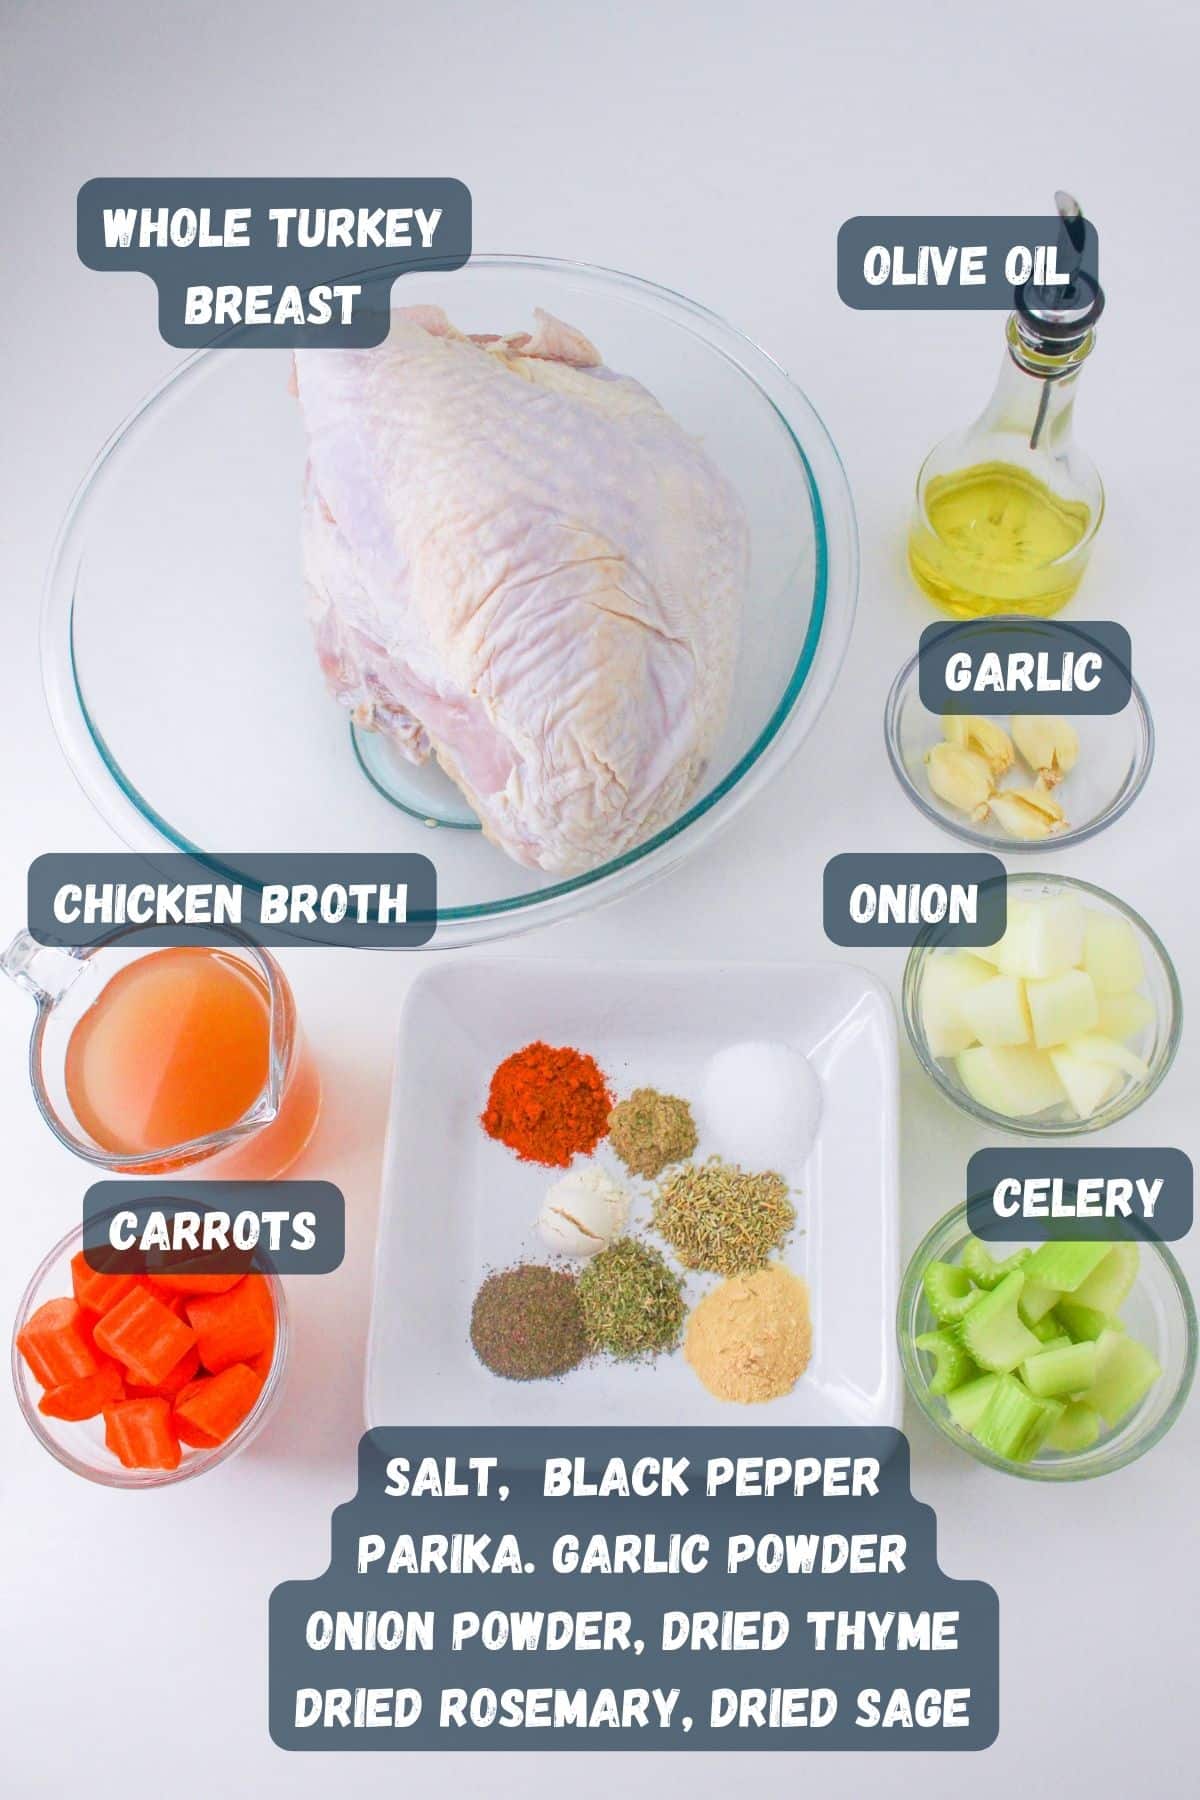
Choosing the right turkey breast is the first step to a tasty meal in a Dutch oven. The quality and size of the turkey breast affect cooking time and flavor. Picking the best option ensures juicy and tender meat. Consider freshness, weight, and size before buying.
Fresh Vs Frozen Options
Fresh turkey breast usually has better flavor and texture. It cooks evenly and stays moist. Fresh options need quick use and proper storage. Frozen turkey breast lasts longer and is easy to store. Thaw it fully before cooking to avoid uneven cooking. Both can work well in a Dutch oven if handled correctly.
Size And Weight Considerations
Choose a turkey breast size that fits your Dutch oven. Smaller breasts cook faster and are easier to manage. Large turkey breasts need more time and space to cook evenly. A 3 to 5-pound breast is ideal for most Dutch ovens. Check the weight on the package and plan cooking time accordingly.
Credit: cookthisagainmom.com
Preparing The Turkey Breast
Preparing your turkey breast properly can make all the difference in taste and texture when cooking in a Dutch oven. Taking a little extra time to clean and season it well sets the stage for juicy, flavorful results. Let’s look at how you can get your turkey breast ready for the best cooking experience.
Trimming And Cleaning
Start by removing any excess fat and leftover feathers from the turkey breast. Use a sharp knife to trim away the skin if you prefer a leaner dish, but keeping the skin can add extra moisture and flavor.
Rinse the turkey breast under cold water and pat it dry with paper towels. Drying is crucial because moisture on the surface can prevent the seasoning from sticking properly. Have you noticed how a dry surface helps spices cling better?
Seasoning And Marinades
Seasoning your turkey breast is where you can get creative. A simple mix of salt, pepper, garlic powder, and paprika works well, but you can also add herbs like rosemary or thyme for an earthy touch.
If you want deeper flavor, marinate the turkey breast for a few hours or overnight. Use ingredients such as olive oil, lemon juice, minced garlic, and a bit of honey for sweetness. This not only tenderizes the meat but also infuses it with layers of taste that come through beautifully when cooked.
Have you tried marinating your turkey breast before? It might change how you feel about turkey forever.
Selecting The Perfect Dutch Oven
Choosing the right Dutch oven can make a huge difference in how your turkey breast turns out. It’s not just about having a pot; it’s about having one that works with your cooking style and the size of your bird. Let’s look at what really matters when picking your Dutch oven.
Material And Size
The material of your Dutch oven affects heat distribution and cooking results. Cast iron is a favorite because it holds heat evenly and keeps it steady, which is perfect for roasting turkey breast.
However, consider your kitchen tools and cleaning preferences. Enameled cast iron is easier to clean and doesn't require seasoning, while traditional cast iron needs a bit more care but lasts forever.
Size is critical too. Your Dutch oven should be big enough to fit the turkey breast without crowding it. A 5 to 7-quart size usually works well for most turkey breasts, giving enough room for air to circulate and for adding aromatics around the meat.
Lid And Heat Retention
A tight-fitting lid is essential for keeping moisture locked in. This helps your turkey breast stay juicy and tender throughout the cooking process.
Look for lids that create a good seal but are also heavy enough to hold in heat. Some lids come with self-basting spikes that help redistribute moisture, which can be a game-changer for dry turkey breast.
Ask yourself: Does your Dutch oven hold heat well on your stove or in your oven? Some materials or lid designs lose heat quickly, which can lead to uneven cooking. You want steady, even heat to get that perfect roast every time.
Cooking Techniques For Juicy Meat
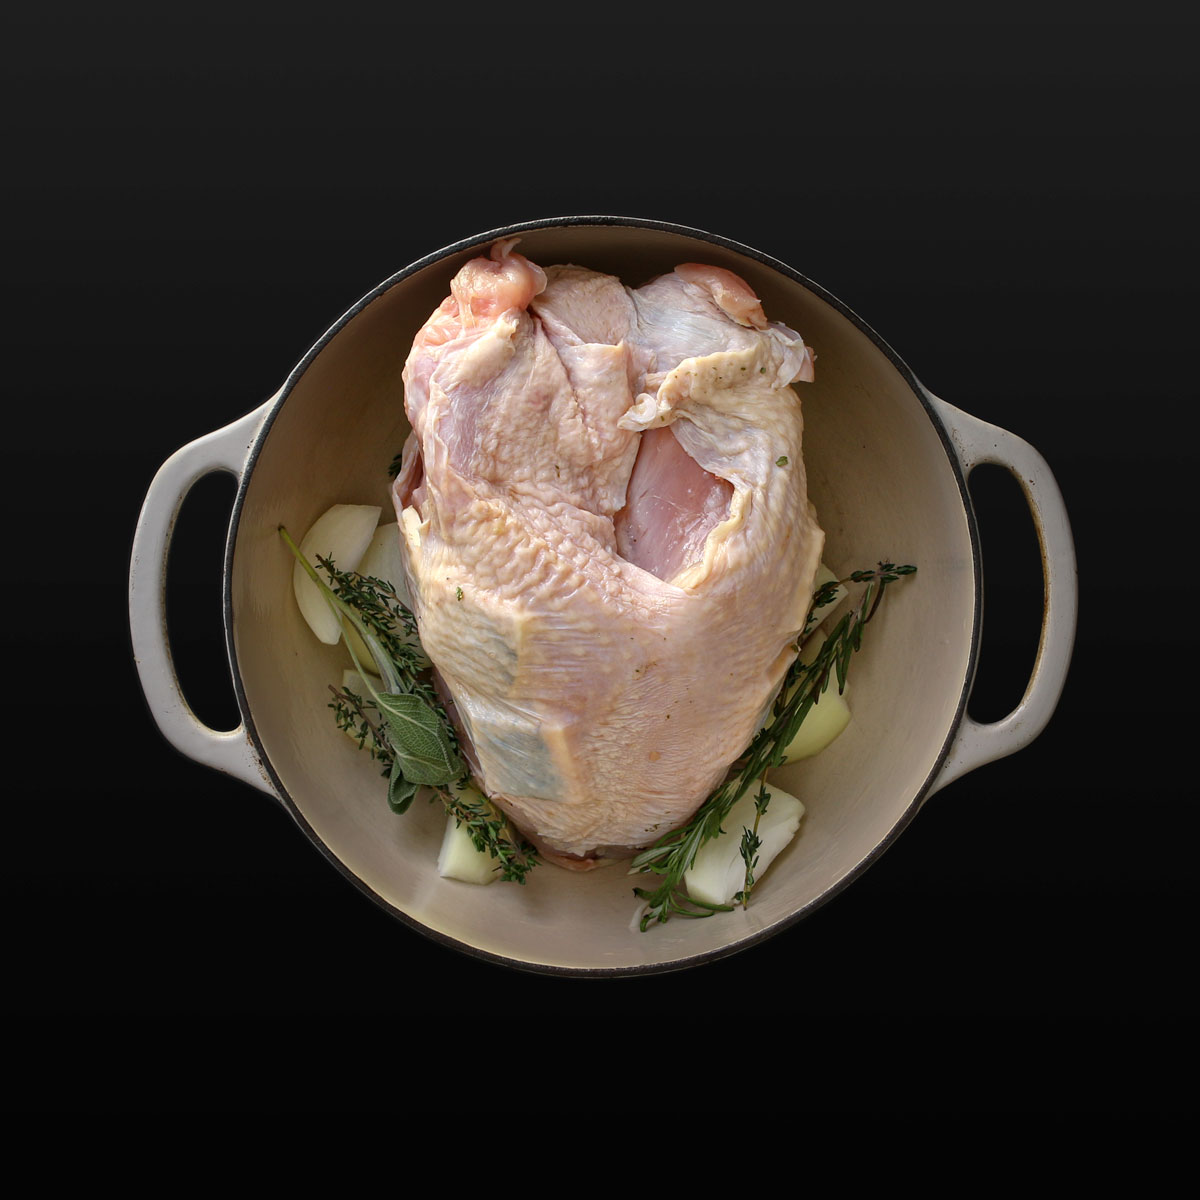
Cooking turkey breast in a Dutch oven keeps the meat moist and tender. Slow cooking with a tight lid traps steam, locking in flavor and juiciness. This method ensures evenly cooked, juicy turkey every time.
Cooking a turkey breast in a Dutch oven can transform your meal into a succulent masterpiece. The secret to achieving juicy meat lies in mastering a few simple cooking techniques. By paying attention to each step, from preparation to serving, you’ll ensure a mouth-watering result that will impress your guests.
Searing The Turkey Breast
Searing the turkey breast is the first crucial step. This process locks in moisture and adds a rich, golden-brown color. Heat a tablespoon of oil in your Dutch oven over medium-high heat until it shimmers. Place the turkey breast skin-side down and let it sizzle without moving for about 5 minutes. Flip it over to sear the other side. Have you ever noticed how the smell of a perfectly seared turkey fills the kitchen with a sense of anticipation?
Adding Aromatics And Liquids
Once searing is complete, it’s time to add depth of flavor. Aromatics like onions, garlic, and herbs enhance the taste. Dice an onion, crush a few garlic cloves, and toss them into the Dutch oven. Add a splash of chicken broth or white wine to deglaze the pot, scraping up the flavorful bits stuck to the bottom. This step not only infuses the turkey with flavor but also ensures it stays moist. What’s your favorite aromatic to use when cooking turkey?
Oven Temperature And Timing
Achieving the perfect oven temperature and timing is essential for juicy meat. Preheat your oven to 350°F (175°C). Once your Dutch oven is ready, place it in the oven and cook the turkey breast for about 20 minutes per pound. Use a meat thermometer to check that the internal temperature reaches 165°F (74°C). This ensures the meat is cooked through yet retains its juiciness. Have you ever tried using a thermometer to perfect your cooking? It’s a game-changer! By focusing on these techniques, you'll serve a turkey breast that's tender and flavorful, making each bite a memorable experience.
Checking For Doneness
Checking for doneness is a key step when cooking turkey breast in a Dutch oven. Proper doneness ensures the meat is safe to eat and juicy. Overcooking can make the turkey dry and tough. Under-cooking is risky for health. Use simple tools and techniques to check the meat’s readiness. These methods help achieve perfect turkey every time.
Using A Meat Thermometer
A meat thermometer is the most reliable tool to check doneness. Insert it into the thickest part of the turkey breast without touching bone. The safe internal temperature for turkey breast is 165°F (74°C). Remove the turkey once it reaches this temperature. Avoid guessing by color or texture. The thermometer gives a clear and accurate reading.
Resting The Meat
Resting allows juices to spread evenly through the meat. After removing the turkey from the Dutch oven, cover it loosely with foil. Let it rest for 10 to 15 minutes before slicing. This step makes the meat tender and moist. Skipping resting may cause the juices to run out when cutting.
Credit: goodcheapeats.com
Serving Suggestions
Serving your turkey breast cooked in a Dutch oven is a special moment. Presentation and pairing elevate the meal. Thoughtful carving and side dishes make the dish inviting and complete. Here are some simple tips to impress your guests and enjoy every bite.
Carving Tips
Let the turkey rest for 10-15 minutes after cooking. This keeps the juices inside. Use a sharp knife for clean slices. Cut across the grain for tender pieces. Remove the skin gently if preferred. Slice the breast meat into even, thin pieces. Arrange slices neatly on a warm platter. Pour a little pan sauce or gravy over the meat. This adds moisture and flavor.
Side Dishes To Pair
- Roasted vegetables like carrots, potatoes, and Brussels sprouts
- Classic mashed potatoes with butter and cream
- Green beans almondine or steamed broccoli
- Cranberry sauce for a sweet contrast
- Stuffing with herbs and a touch of garlic
- Fresh garden salad with a light vinaigrette
- Warm dinner rolls or crusty bread
- Simple gravy made from the Dutch oven drippings
Choose sides that balance flavors and textures. This makes the meal satisfying and well-rounded.
Troubleshooting Common Issues
Cooking turkey breast in a Dutch oven can sometimes present challenges, especially if you're aiming for juicy, evenly cooked meat. Troubleshooting common issues helps you avoid disappointment and ensures your meal turns out just right. Let’s tackle the most frequent problems you might face during the cooking process.
Dry Meat Solutions
Dry turkey breast is one of the biggest frustrations when cooking poultry. To keep your meat moist, try brining the turkey breast in a saltwater solution for a few hours before cooking. This simple step helps the meat retain moisture during roasting.
Another trick is to baste the turkey breast periodically with its own juices or a bit of melted butter. This adds moisture and flavor throughout the cooking. Covering the Dutch oven with a tight-fitting lid also traps steam, which keeps the meat juicy.
Have you ever noticed how letting your turkey rest after cooking changes its texture? Rest the turkey breast for at least 15 minutes before slicing. This step allows the juices to redistribute, making each bite tender rather than dry.
Uneven Cooking Fixes
Uneven cooking often happens because the heat isn’t distributed properly inside the Dutch oven. To solve this, place a rack or trivet inside the Dutch oven to elevate the turkey breast above the bottom. This prevents the bottom from cooking too fast and burning.
Rotating the turkey breast halfway through cooking also promotes even heat exposure. If your Dutch oven has hot spots, this simple move can save your meal from being overdone on one side and underdone on the other.
Consider the size and thickness of your turkey breast. Thicker parts will take longer to cook. You can gently pound the breast to even out its thickness or cut it into smaller sections to help it cook uniformly.
Frequently Asked Questions
How Long To Cook Turkey Breast In Dutch Oven?
Cook turkey breast in a Dutch oven for 1. 5 to 2 hours. Maintain an oven temperature of 325°F (163°C). Use a meat thermometer to check for an internal temperature of 165°F (74°C). This ensures the turkey is fully cooked and safe to eat.
Can I Cook Frozen Turkey Breast In Dutch Oven?
It’s best to thaw the turkey breast before cooking. Cooking from frozen increases cooking time and may result in uneven cooking. Always thaw in the refrigerator for 24-48 hours depending on size. This method ensures safe and even cooking in the Dutch oven.
What Seasoning Works Best For Dutch Oven Turkey Breast?
Use a simple blend of salt, pepper, garlic, and rosemary. These enhance the natural flavor without overpowering the turkey. You can also add lemon zest or thyme for extra aroma. Season the turkey breast evenly before cooking for the best taste.
Should I Cover The Dutch Oven While Cooking Turkey?
Yes, always cover the Dutch oven to retain moisture. This creates a steamy environment that keeps the turkey juicy. Removing the lid can dry out the meat. Keep it covered until the last 15 minutes for crispier skin.
Conclusion
Cooking turkey breast in a Dutch oven is simple and tasty. This method keeps the meat juicy and full of flavor. You only need a few ingredients and some patience. The slow cooking helps the turkey stay tender and moist.
Try adding herbs or spices to suit your taste. Serve it with your favorite sides for a complete meal. This way of cooking works well for family dinners or special occasions. Enjoy your delicious turkey without much fuss or effort.
Give it a try and see the difference yourself.