
Cooking a roast in a Dutch oven is one of the best ways to create a meal that’s tender, flavorful, and satisfying. If you want to impress your family or guests with a delicious, home-cooked roast but worry it might be too complicated, this guide is made just for you.
You’ll learn simple steps that anyone can follow, even if you’re new to cooking. By the end, you’ll have the confidence to make a roast that tastes like it’s from a restaurant—right in your own kitchen. Ready to discover the secret to juicy, mouthwatering roast every time?
Keep reading.

Credit: urbanblisslife.com
Choosing The Right Cut
Choosing the right cut of meat is key to a delicious roast in a Dutch oven. The cut affects cooking time, flavor, and tenderness. Picking the best cut helps you cook a meal that is juicy and full of taste.
Best Cuts For Roasting
Some cuts work better for roasting in a Dutch oven. These cuts have good marbling and enough fat to stay moist. Popular choices include:
- Chuck roast – rich flavor and tender when slow-cooked
- Brisket – requires slow cooking, becomes very tender
- Rump roast – leaner but still flavorful
- Shoulder roast – great for slow cooking and shredding
These cuts handle long cooking times well. They absorb flavors and break down to tender meat.
Considerations For Tenderness
Tenderness depends on the cut and cooking method. Tougher cuts need slow, low heat to become soft. The Dutch oven traps moisture, making these cuts perfect.
Look for cuts with some fat and connective tissue. This melts during cooking and keeps meat juicy. Avoid very lean cuts, which can dry out quickly.
Cooking time matters too. Plan for several hours of slow cooking. This allows fibers to break down and meat to become tender.
Preparing The Roast
Choose a good cut of meat and pat it dry with paper towels. Season well with salt, pepper, and your favorite herbs before heating the Dutch oven. Searing the roast on all sides locks in juices and adds rich flavor.
Preparing the roast is a crucial step that sets the foundation for a delicious meal in a Dutch oven. The way you prepare the meat can significantly affect the flavor and tenderness of the final dish. It’s not just about throwing the roast in the pot; it’s about crafting a meal that excites the senses and brings everyone together at the table.
Trimming And Seasoning
Before you start cooking, examine your roast for excess fat. Trimming some of it can help prevent your dish from becoming overly greasy. However, leave a thin layer as it adds flavor and keeps the meat moist during cooking. Seasoning is where you infuse the roast with flavor. Generously coat your meat with salt, pepper, and your choice of herbs. Consider using rosemary and thyme for a classic touch, or add a bit of smoked paprika for a hint of spice.
Marinating Tips
Marinating can elevate your roast to new heights of flavor. A simple marinade can be made with olive oil, vinegar, garlic, and herbs. Let your roast soak up these flavors for at least a couple of hours, or overnight if possible. Not all marinades are created equal. Balance is key—too much acid can toughen the meat. Think about what flavors complement your roast and experiment with different combinations. Have you ever tried using soy sauce or wine in your marinade? It might just surprise you!
Selecting Your Dutch Oven
Selecting the right Dutch oven is key to cooking a perfect roast. This cookware holds heat well and cooks food evenly. Choosing one that fits your needs makes the cooking process easier and more enjoyable. Consider the material, size, and shape to find the best option for your kitchen.
Material Matters
Cast iron is the most popular choice for Dutch ovens. It keeps heat steady and lasts for years. Enameled cast iron has a smooth coating that stops rust and is easy to clean. Bare cast iron needs seasoning but can get very hot and develop a natural non-stick surface over time. Aluminum Dutch ovens heat up quickly but may not keep heat as evenly. Pick a material that fits your cooking style and care routine.
Size And Shape
Choose a size that fits the amount of food you cook. A 5 to 7-quart Dutch oven works well for most roasts. Smaller sizes are good for single servings or side dishes. Larger sizes handle big cuts of meat or meals for many people. Round Dutch ovens are traditional and great for stovetop and oven use. Oval shapes fit long roasts better and give more cooking space. Think about what you cook most to pick the best size and shape.

Credit: gratefulgrits.com
Preheating And Searing
Preheating and searing are crucial steps in cooking a roast in a Dutch oven. These steps ensure the meat cooks evenly and develops a rich flavor. Proper heat control and timing can make a big difference in the final taste and texture.
Getting The Oven Ready
Start by preheating your oven to the right temperature, usually around 325°F to 350°F. This prepares the Dutch oven for slow, even cooking. Place the empty Dutch oven inside to heat up along with the oven. A hot Dutch oven helps sear the meat better and prevents sticking.
Searing For Flavor
Before searing, pat the roast dry with paper towels. This removes moisture and helps create a good crust. Heat some oil in the Dutch oven over medium-high heat on the stovetop. Sear the roast on all sides until browned. This locks in juices and adds deep flavor. Avoid moving the meat too much during searing to get a perfect crust.
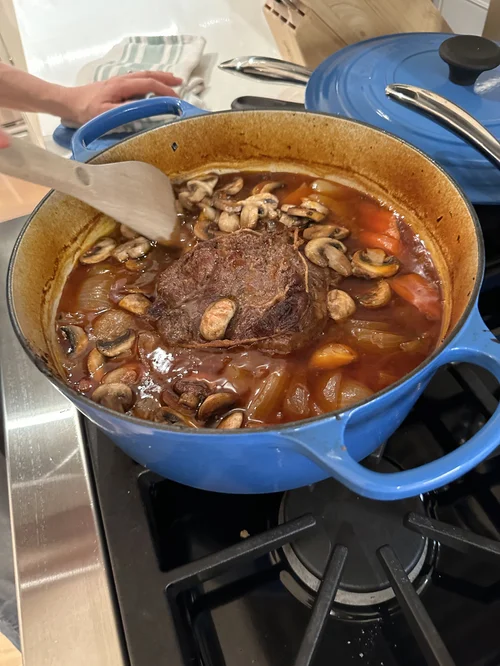
Adding Vegetables And Liquids
Adding vegetables and liquids to your Dutch oven roast is key to building rich flavors and a tender texture. The vegetables not only add taste but also help create a natural sauce as they cook down. Choosing the right liquids ensures your roast stays juicy and develops a deep, savory profile.
Best Vegetables To Include
Root vegetables are a fantastic choice because they hold up well during long cooking times. Carrots, potatoes, and parsnips add sweetness and earthiness that complement the meat perfectly.
Onions and garlic bring aromatic depth and enhance the savory notes. Celery adds a subtle bitterness that balances richer flavors.
- Carrots – for sweetness and texture
- Potatoes – absorb and soak up the juices
- Parsnips – add a unique, slightly nutty flavor
- Onions and garlic – build aroma and complexity
- Celery – introduces a light bitterness to balance richness
Have you noticed how the vegetables almost melt into the sauce after hours in the oven? That’s what makes a Dutch oven roast so comforting.
Choosing Broth Or Wine
Deciding between broth and wine changes the character of your roast dramatically. Broth, whether beef, chicken, or vegetable, adds a subtle, savory base that enhances the meat’s natural flavors.
Wine, on the other hand, introduces acidity and complexity. Red wine pairs well with beef roasts, cutting through the richness and adding layers of taste.
| Liquid | Flavor Impact | Best For |
|---|---|---|
| Beef Broth | Rich, savory depth | Beef roasts with hearty vegetables |
| Chicken Broth | Mild and light | Lean roasts or mixed vegetable blends |
| Red Wine | Acidic, complex, and robust | Bold flavored beef roasts |
| White Wine | Light, slightly fruity | Pork or poultry roasts |
What flavor do you want to highlight? The choice between broth or wine can elevate your roast from ordinary to unforgettable.
Credit: www.katieleebiegel.com
Cooking Techniques
Mastering the cooking techniques for a roast in a Dutch oven will transform your meal from ordinary to exceptional. The way you control heat and time directly impacts the tenderness and flavor of the meat. Understanding these techniques helps you cook with confidence and delivers consistent results every time.
Oven Temperature And Time
Setting the right oven temperature is crucial for a perfect roast. A common approach is roasting at 325°F (163°C), which balances cooking speed and moisture retention.
At this temperature, a 3 to 4-pound roast usually takes about 2 to 3 hours. However, the exact time depends on the cut and your desired doneness.
Using a meat thermometer is the best way to check. Aim for 135°F (57°C) for medium-rare and 145°F (63°C) for medium.
Using Low And Slow Method
Have you ever noticed how slow-cooked roasts melt in your mouth? Cooking your roast low and slow—around 275°F (135°C)—allows the connective tissues to break down completely.
This method takes longer, often 3 to 5 hours, but rewards you with incredibly tender and juicy meat. The Dutch oven traps moisture, so your roast stays flavorful without drying out.
Try adding vegetables and broth before sealing the lid. This creates steam, enhancing the low and slow cooking process and boosting flavor depth.
Checking For Doneness
Insert a meat thermometer into the thickest part of the roast to check its temperature. The roast is done when it reaches the right internal heat. Rest the meat before slicing to keep it juicy and tender.
Cooking a roast in a Dutch oven can be a delightful experience. Yet, ensuring it's perfectly cooked is essential. Knowing how to check for doneness is a crucial skill. This involves using tools and keen observation.
Using A Meat Thermometer
Insert the thermometer into the thickest part of the meat. Avoid bones, as they can give false readings. Aim for an internal temperature of 145°F for medium-rare. If you prefer medium, reach 160°F. Always allow meat to rest before serving. This lets the juices redistribute.
Visual And Texture Cues
Observe the roast's color. A browned exterior signals proper cooking. Press the roast gently with a fork. It should feel firm but not hard. Juices should run clear, not pink. This indicates a well-cooked roast.
Resting And Serving
Resting and serving a roast cooked in a Dutch oven is a crucial step. It allows the juices to settle and makes the meat tender and flavorful. Taking time to rest improves the overall taste and texture before carving and serving.
Importance Of Resting
Resting the roast for at least 15 to 20 minutes is important. This pause helps the juices redistribute inside the meat. Cutting too early causes the juices to run out. The roast will become dry and less tasty.
Cover the roast loosely with foil while resting. This keeps it warm without steaming the crust. Resting also makes carving easier and safer.
Carving Tips
Use a sharp knife for clean, smooth slices. Cut against the grain of the meat. This makes the pieces more tender and easier to chew.
Carve in even, thin slices for the best presentation and taste. Keep a steady hand and slice slowly. Arrange the slices on a warm platter before serving.
Troubleshooting Common Issues
Cooking a roast in a Dutch oven is rewarding but can bring some challenges. Common problems like dryness or toughness can happen. Overcooking is another issue many face. Understanding how to fix these problems helps keep your roast juicy and tender. This section offers simple tips to troubleshoot common cooking issues.
Dry Or Tough Roast Fixes
Dry or tough roast often means it cooked too long or at too high heat. To avoid dryness, add moisture during cooking. Use broth, water, or wine in the Dutch oven. Cover the pot tightly to trap steam and keep meat moist. Slow cooking at low heat breaks down tough fibers.
Rest the roast after cooking. Wrap it in foil and let it sit for 10-15 minutes. This helps juices redistribute inside the meat. Slice against the grain to make it easier to chew.
Avoiding Overcooking
Overcooking dries out the roast and makes it tough. Use a meat thermometer to check temperature. Aim for 135°F (57°C) for medium-rare and 145°F (63°C) for medium. Remove the roast from heat a few degrees before the target. It will keep cooking slightly while resting.
Cook the roast at a steady low temperature. Avoid high heat that cooks the outside too fast. Keep an eye on the time and temperature. Use a timer to prevent accidentally leaving the roast too long.
Frequently Asked Questions
How Long Should I Cook A Roast In A Dutch Oven?
Cook the roast for about 3 to 4 hours at 325°F (165°C). Check tenderness with a fork after 3 hours. Adjust cooking time based on roast size and type for best results.
What Is The Best Roast Cut For Dutch Oven Cooking?
Chuck roast is ideal for Dutch oven cooking. It becomes tender and flavorful when slow-cooked. Other good options include brisket and rump roast.
Should I Sear The Roast Before Dutch Oven Cooking?
Yes, sear the roast on all sides before cooking. Searing locks in juices and adds rich flavor. Use medium-high heat and brown for 3-4 minutes per side.
Can I Cook Vegetables With The Roast In A Dutch Oven?
Absolutely, add root vegetables like carrots, potatoes, and onions around the roast. They cook evenly and absorb delicious flavors. Add vegetables halfway through cooking for best texture.
Conclusion
Cooking a roast in a Dutch oven brings out rich flavors and tender meat. The slow cooking keeps the roast juicy and soft. You only need a few simple steps to create a delicious meal. This method works well for beginners and experts alike.
Try adding your favorite vegetables for a complete dish. Serve your roast with sides you enjoy. Enjoy the warmth and comfort of a home-cooked meal. Cooking this way saves time and effort. Give it a try and taste the difference yourself.


