If you love pizza, you know that the secret to a perfect crust is a crispy, evenly cooked base. Using a pizza stone can transform your homemade pizza from good to amazing.
But how do you use this tool to get that ideal crunch and flavor every time? In this guide, you’ll discover simple steps to cook a pizza with a pizza stone like a pro. By the end, you’ll be ready to impress your friends and family with delicious, restaurant-quality pizza made right in your own kitchen.
Keep reading to unlock the tips and tricks that will make your pizza nights unforgettable!
Choosing The Right Pizza Stone
Choosing the right pizza stone can make all the difference in how your homemade pizza turns out. The stone you pick affects heat retention, cooking time, and even the crust's texture. Let’s break down what you need to consider before making your choice.
Material Options
You’ll find pizza stones made from ceramic, cordierite, and even cast iron. Ceramic stones heat evenly but can crack if exposed to sudden temperature changes. Cordierite is more durable and handles high heat well, making it a favorite among home cooks.
Cast iron stones offer excellent heat retention but need careful maintenance to avoid rust. If you want a stone that lasts and performs consistently, cordierite often strikes the best balance. Have you tried different materials to see which suits your baking style?
Size And Thickness
Size matters because your stone needs to fit your oven and hold your pizza comfortably. Measure your oven’s width and depth before buying to avoid surprises. A stone too small will limit your pizza size; too large might be hard to handle and heat unevenly.
Thickness affects how the stone heats and retains heat. Thicker stones hold heat longer but take more time to preheat. Thinner stones heat quickly but may cool down faster once you place the pizza on them. What’s your priority—fast heat or steady heat?
Prepping Your Stone
Before you start cooking, your stone needs some preparation. Avoid washing it with soap; instead, rinse with water and let it dry completely. Some stones benefit from a light dusting of cornmeal or flour to prevent sticking.
Preheat your stone in the oven for at least 30 minutes at your cooking temperature to ensure it’s hot enough. This step is key to achieving that crispy crust you’re aiming for. How long do you usually preheat your stone, and what results do you notice?

Credit: www.cuisinart.com
Preparing The Dough
Getting your dough ready is the foundation of a great pizza, especially when using a pizza stone. The right preparation makes the difference between a chewy, doughy base and a crispy, flavorful crust that holds toppings perfectly. Let’s dig into the essentials of preparing dough that will impress every time.
Ingredients For Crispy Crust
Choosing the right ingredients sets the stage for your pizza crust’s texture. Use high-protein bread flour instead of all-purpose flour to develop more gluten, which helps create that desirable chew and structure.
Don’t forget salt—it controls yeast activity and strengthens gluten, improving flavor and texture. Adding a touch of olive oil can boost crispiness and add a subtle richness to the crust.
- High-protein bread flour (about 3 cups)
- Warm water (around 1 cup, about 110°F)
- Active dry yeast (1 packet or 2 1/4 teaspoons)
- Salt (1 ½ teaspoons)
- Olive oil (1 tablespoon)
Kneading Techniques
Kneading develops gluten, which gives dough strength and elasticity. You want to knead until the dough feels smooth and springs back when pressed.
Try the “windowpane test”: stretch a small piece of dough gently; if it stretches thin without tearing, your gluten is well developed. If it tears, keep kneading for a few more minutes.
Using your palms and heels of your hands, push and fold the dough repeatedly on a lightly floured surface. This simple technique transforms basic ingredients into dough ready for baking on a pizza stone.
Resting And Proofing
After kneading, resting the dough is crucial. It allows the gluten to relax, making the dough easier to shape without springing back.
Proofing is when yeast ferments, creating bubbles that give your crust a light, airy texture. Cover your dough with a damp cloth and let it rest in a warm spot for 1 to 2 hours.
Ever noticed how dough doubles in size during proofing? That’s the yeast working, and it’s a good sign your crust will be beautifully risen and full of flavor once baked on your pizza stone.
Preheating The Pizza Stone
Preheating the pizza stone is a vital step for a crispy, evenly cooked pizza crust. The stone absorbs heat and transfers it directly to the dough. This process helps create the perfect texture and flavor. Without proper preheating, the pizza can cook unevenly or become soggy.
Oven Temperature Settings
Set the oven to a high temperature. A range of 475°F to 500°F works best. This temperature mimics the intense heat of a traditional pizza oven. Avoid lower temperatures as they won’t heat the stone enough. Use the middle rack to allow even heat circulation around the stone.
Optimal Heating Time
Allow the stone to heat for at least 30 minutes. This time ensures the stone is hot throughout. A well-heated stone cooks the pizza base quickly and crisply. Avoid placing the pizza on a cold or warm stone to prevent a doughy crust. Patience pays off in the final pizza quality.
Assembling Your Pizza
Assembling your pizza is where creativity meets technique. The way you choose and layer your toppings can make a huge difference in flavor and texture. Paying attention to small details here ensures your pizza bakes evenly on the pizza stone and comes out crispy and delicious every time.
Choosing Toppings
Pick toppings that cook at roughly the same rate to avoid burnt edges or soggy centers. Fresh vegetables like bell peppers and mushrooms add moisture, so balance them with lean proteins such as grilled chicken or pepperoni. Think about the texture you want—do you prefer gooey cheese or a bit of crunch from caramelized onions?
Remember, less is often more. Overloading your pizza can weigh down the dough and prevent it from cooking properly on the stone. What toppings do you find create the best balance between taste and cooking performance?
Layering For Crispiness
Start with a thin layer of sauce spread evenly over the dough to prevent sogginess. Then add cheese next; it forms a protective layer that helps lock in moisture without making the crust wet. Place your toppings on top of the cheese rather than underneath to keep the base crispy.
Be mindful of layering heavy ingredients—spread them out instead of piling in one spot. This helps heat circulate evenly around the pizza on the stone. Have you ever noticed how some pizzas have a soggy middle? Layering might be the culprit.
Using Flour Or Cornmeal
Sprinkle a bit of flour or cornmeal on your pizza peel before placing the dough. This simple step prevents sticking and makes sliding the pizza onto the stone smoother. Cornmeal also adds a slight crunch and a subtle, nutty flavor to the crust’s bottom.
A light dusting is enough; too much can burn and create an unpleasant texture. Which one do you prefer under your crust—flour’s neutral taste or cornmeal’s added crunch?
Transferring Pizza To The Stone
Transferring your pizza onto a hot pizza stone can be a tricky moment. It requires confidence and the right technique to avoid a messy, misshapen pie. Getting this step right sets the stage for a perfectly cooked, crispy crust every time.
Using A Pizza Peel
A pizza peel is your best friend when moving pizza to the stone. It’s a flat, paddle-like tool that helps slide the dough smoothly onto the hot surface.
Make sure your peel is well-floured or dusted with cornmeal before placing the pizza. This prevents sticking and helps the pizza slide off easily.
Hold the peel steady and give it a quick back-and-forth shake before the transfer. This motion lets you feel if the dough is ready to move without tearing.
Avoiding Dough Sticking
Nothing ruins the pizza transfer faster than dough sticking to the peel. To avoid this, use plenty of flour, semolina, or cornmeal on the peel’s surface.
Test the peel by gently shaking it before adding toppings. If the dough grips, lift it and add more flour underneath.
Also, keep your dough cold before stretching. Warm dough tends to be sticky and harder to handle.

Credit: www.kingarthurbaking.com
Baking Tips For Perfect Crisp
Achieving that perfect crisp on your pizza crust is a satisfying challenge that a pizza stone can help you master. The stone absorbs and radiates heat evenly, creating an ideal environment for a crunchy base without burning the toppings. However, attention to detail during baking is key to unlocking this crisp texture every time.
Monitoring Bake Time
Keep a close eye on the clock as your pizza bakes. Too short a bake leaves the crust doughy, while too long can turn it brittle or burnt. Start checking the pizza a few minutes before the recipe’s suggested time to catch that golden moment.
Remember, ovens vary widely. Your pizza stone might retain heat differently depending on its thickness and material. Adjust your timing based on your first few tries rather than relying solely on preset bake times.
Rotating The Pizza
Your oven’s heat distribution might not be perfectly even. Rotating the pizza halfway through baking ensures all sides get equal exposure to the stone’s heat. This simple step prevents one side from overcooking while the other remains underdone.
I once skipped this step and ended up with a crust that was perfectly crisp on one side and soggy on the other. Now, I always set a timer to remind myself to rotate the pizza for balanced cooking.
Signs Of Doneness
Look for visual and tactile clues to know when your pizza is ready. The crust should be golden brown with slightly darker spots where it has charred just enough. It should feel firm and crisp when you gently tap the edges.
Don’t rely only on color—lift the pizza carefully and check if the bottom has a consistent golden tone. If it’s pale or soft, it needs more time on the stone. Have you noticed how sometimes the perfect pizza can’t be rushed?
Post-baking Care
After baking a delicious pizza with a pizza stone, proper post-baking care is crucial. This ensures both the pizza and the stone remain in top condition. Let's dive into the steps needed to care for both.
Cooling The Pizza
Allow the pizza to cool for a few minutes. This helps the cheese set and the flavors meld. Use a pizza peel or large spatula to transfer it. Place it on a cutting board. Avoid cutting on the stone. This can damage both the pizza and the stone.
Cleaning The Stone
Let the stone cool completely before cleaning. A hot stone can crack if exposed to cool water. Use a brush or scraper to remove any stuck bits. Avoid using soap as it can seep into the stone. Rinse with warm water if necessary. Dry the stone thoroughly before storing it.
Credit: www.pitboss-grills.com
Troubleshooting Common Issues
Using a pizza stone can elevate your homemade pizza to restaurant-quality levels, but it can also bring some common challenges. Knowing how to spot and fix these issues will save you from frustration and help you get the perfect pizza every time. Let's dive into some troubleshooting tips that address problems you might face while cooking with a pizza stone.
Soggy Crust
A soggy crust usually means your stone isn’t hot enough. Preheat the stone in the oven for at least 30 minutes at a high temperature (450°F or more) before placing your pizza on it. This ensures the stone absorbs enough heat to crisp up the dough quickly.
Also, watch the amount of sauce and toppings you add. Too much moisture can make the crust soggy. Try using thicker sauces or pat dry wet toppings like fresh tomatoes or mushrooms before adding them.
Burnt Bottom
If the bottom of your pizza burns but the top isn’t cooked properly, your stone might be too hot or too close to the heating element. Try lowering the oven rack or reducing the oven temperature slightly.
Another trick is to use a pizza peel dusted with cornmeal or flour. This prevents sticking and helps slide the pizza off the stone easily, avoiding excessive contact that can cause burning.
Uneven Cooking
Uneven cooking happens when heat isn’t distributed evenly across your pizza stone or inside the oven. Rotate your pizza halfway through baking to help even out the heat exposure. This simple step can make a huge difference.
Check if your oven has hot spots by baking a tray of bread slices and observing which areas brown faster. Adjusting your pizza’s position based on this can improve results significantly.
Have you noticed any other quirks when using your pizza stone? Sometimes small tweaks like these can change your whole pizza game.
Frequently Asked Questions
How Do I Preheat A Pizza Stone Properly?
Preheat your pizza stone in the oven at 475°F (245°C) for 30-45 minutes. This ensures even heat distribution. It helps create a crispy crust by absorbing moisture from the dough.
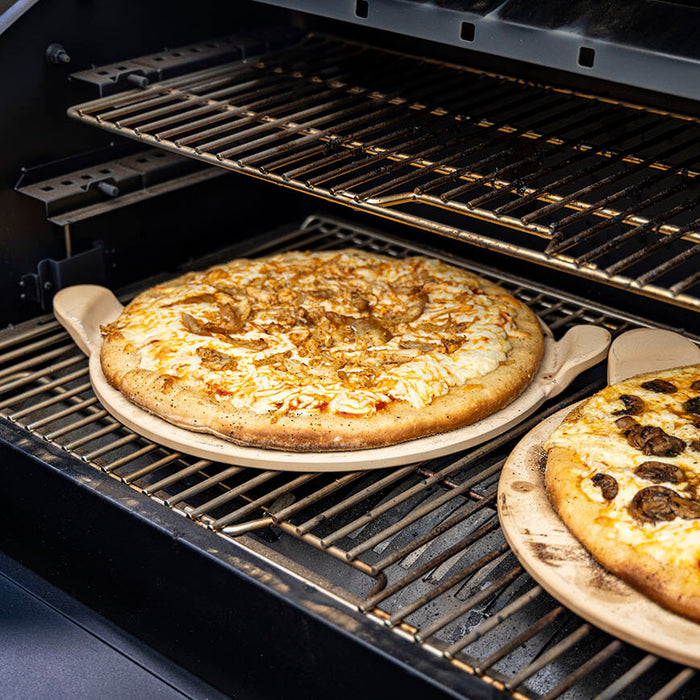
Can I Use A Pizza Stone On A Grill?
Yes, you can use a pizza stone on a grill. Preheat the stone on medium-high heat for 30 minutes. This method replicates a wood-fired oven and adds a smoky flavor to your pizza.
What’s The Best Dough For Pizza Stone Baking?
Use a high-hydration dough with 60-70% water content. This dough crisps well and cooks evenly on a pizza stone. Avoid overly thick dough to prevent undercooked centers.
How Do I Clean My Pizza Stone Safely?
Let the stone cool completely before cleaning. Use a brush or scraper to remove stuck food. Avoid soap and soaking; instead, wipe with a damp cloth to preserve the stone’s porous surface.
Conclusion
Cooking pizza with a pizza stone brings a crisp, tasty crust every time. The stone keeps heat steady and spreads it evenly under the dough. Preheat the stone well before placing the pizza on it. Use a pizza peel or baking sheet to slide pizza on and off safely.
This method helps avoid soggy bottoms and uneven cooking. With practice, you will enjoy restaurant-style pizza at home. Give it a try and taste the difference yourself. Simple steps, great results, and happy pizza nights await.