If you ride your dirt bike often, you know how important smooth, reliable suspension is. Worn-out fork seals can cause leaks and make your ride bumpy and unsafe.
But don’t worry—you can fix this yourself. Changing fork seals might sound tricky, but with the right steps, you can save money and get your bike riding like new again. In this guide, you’ll learn exactly how to change fork seals on your dirt bike, step by step, so you can get back on the trail with confidence.
Keep reading to find out how easy it really is.

Credit: www.youtube.com
Tools And Materials Needed
Changing fork seals on a dirt bike requires specific tools and materials. Having the right items ready makes the job easier and safer. It also helps prevent damage to your bike's forks.
Gather all tools and parts before starting. This preparation saves time and avoids interruptions. Below are the essential tools and materials needed for this task.
Essential Tools
- Socket wrench set
- Allen wrench set
- Flathead screwdriver
- Rubber mallet
- Seal puller or small pick
- Torque wrench
- Plastic or nylon fork seal driver
- Drain pan for old fork oil
- Clean rags or shop towels
- Measuring cup for fork oil
Required Materials
- New fork seals compatible with your bike
- Fresh fork oil with correct viscosity
- Fork seal grease or assembly lube
- Replacement fork dust seals (if needed)
- Thread locker (medium strength)
Safety And Cleaning Supplies
- Protective gloves
- Safety glasses
- Brake cleaner or parts cleaner
- Disposable containers for waste oil
Preparing The Dirt Bike
Before diving into changing the fork seals on your dirt bike, preparing the bike properly is crucial. It sets the stage for a smooth, safe process and helps you avoid unnecessary damage or injury. Taking time here pays off when the actual work begins.
Securing The Bike
Start by placing your dirt bike on a sturdy stand or lift designed for motorcycles. This keeps it stable and prevents any accidental tipping while you work.
Make sure the bike is level and won’t wobble. You don’t want the bike to shift unexpectedly when you remove parts, especially the front wheel.
Have you noticed how much easier tasks get when your workspace is stable? The same applies here—secure your bike well and you’ll save time and frustration later.
Removing The Front Wheel
First, loosen the axle nuts but don’t remove them completely until the bike is supported. This helps avoid the wheel dropping suddenly.
Next, carefully slide the front wheel out, keeping an eye on the brake caliper and disc. These components can be delicate and require gentle handling.
If you’ve ever struggled with a stuck axle, try applying some penetrating oil beforehand. It can make the removal process much smoother.
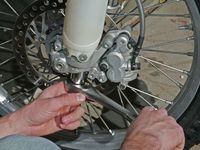
Removing The Forks
Removing the forks is the first important task when changing fork seals on a dirt bike. This process requires care and attention to avoid damage. Start by preparing your workspace and gathering the right tools. This section explains how to loosen the triple clamps and slide out the fork tubes safely.
Loosening The Triple Clamps
Begin by securing your dirt bike on a stand to keep it steady. Use the correct size wrench or socket to loosen the bolts on the triple clamps. These bolts hold the fork tubes tightly in place. Loosen them gradually and evenly to prevent stress on the components. Do not remove the bolts completely yet; just loosen them enough so the forks can move freely.
Sliding Out The Fork Tubes
Once the triple clamps are loose, gently slide the fork tubes downward and out of the clamps. Support the fork tubes carefully to avoid dropping or scratching them. Check for any resistance; if the tubes don’t slide out easily, double-check that the bolts are fully loosened. Place the removed forks on a clean surface to prevent dirt from getting inside. These steps ensure safe removal and prepare you for the next phase of changing the fork seals.
Disassembling The Fork
Disassembling the fork is the first crucial step to change the fork seals on a dirt bike. It requires careful handling to avoid damage to the fork components. Start by preparing a clean workspace and gathering the necessary tools.
Work slowly and keep track of all parts as you take them apart. This process includes draining the old fork oil, removing the fork cap and spring, and finally extracting the worn seals. Each step must be done with precision to ensure the new seals fit and work properly.
Draining The Fork Oil
Place a container under the fork to catch the old oil. Loosen the drain bolt or remove the fork tube carefully. Let the oil drain completely to avoid mess and contamination. Wipe the fork tube clean once the oil stops flowing.
Removing The Fork Cap And Spring
Use the correct tool to unscrew the fork cap at the top of the tube. Be cautious as the spring inside is under pressure and may pop out. Slowly remove the spring and set it aside safely. Keep the fork cap and spring in order for reassembly.
Extracting The Old Seals
Slide the fork tube out of the lower fork leg gently. Use a seal puller or a flat tool to pry out the old seals without scratching the tube. Remove any dirt and residue around the seal area. Clean the fork leg thoroughly before installing new seals.
Installing New Fork Seals
Installing new fork seals is a key part of maintaining your dirt bike’s suspension. It keeps dirt and oil from leaking out, ensuring smooth riding. The process needs care and the right tools to avoid damage. Follow these steps to install new fork seals correctly.
Cleaning Fork Components
Start by cleaning the fork tubes and all parts thoroughly. Dirt or old oil can stop the new seals from fitting well. Use a clean cloth and some fork oil or a mild solvent. Wipe the fork tubes until they are spotless. Check the fork tubes for scratches or dents. Smooth surfaces help seals last longer and work better.
Applying Fork Seal Grease
Apply fork seal grease around the new seals before installation. This grease helps the seals slide on without tearing. It also protects the seals from wear and friction. Spread a thin, even layer on the inside of the seal. Also, put some grease on the fork tube where the seal will sit. This step makes the seal fit tighter and last longer.
Seating The New Seals
Place the new seal carefully onto the fork tube. Make sure it sits straight and does not tilt. Use a seal driver or a similar tool to press the seal down evenly. Avoid using too much force; press just enough to seat the seal firmly. Check that the seal is flush with the fork tube edge. A well-seated seal stops oil leaks and keeps dirt out.

Credit: www.youtube.com
Reassembling The Fork
Carefully slide the fork parts back together, ensuring seals fit tightly to avoid leaks. Tighten bolts securely without overdoing it. Check alignment before final tightening for smooth fork function.
Reassembling the fork on your dirt bike is a crucial part of ensuring your ride is smooth and safe. After you've successfully removed the old seals and cleaned the components, it's time to put everything back together. This part of the process demands patience and precision, but with a little focus, you'll have your dirt bike ready for the trails in no time. Let's break it down step-by-step to make it as straightforward as possible.
Reinstalling The Spring And Cap
Begin by carefully sliding the spring back into the fork tube. Make sure it is aligned properly and seated securely. This is a step where many riders rush, but take your time to ensure it's done right. Next, position the fork cap on top of the spring. Tighten it by hand initially to avoid cross-threading, which can damage the threads. Once it's in place, use a torque wrench to secure it properly. The correct torque setting is vital for safety—check your bike's manual for the precise specifications.
Refilling Fork Oil
Refilling your fork oil is like giving your dirt bike a refreshing drink. Measure the exact amount of fork oil required for your bike model. This will ensure that the suspension performs optimally. Pour the oil slowly into the fork tube, allowing it to settle without creating air bubbles. Use a graduated cylinder for accurate measurement and avoid overfilling. Once filled, gently pump the fork to circulate the oil, ensuring even distribution. Have you ever noticed how a well-oiled fork transforms the handling of your bike? This simple step can drastically improve your riding experience. Wouldn't you agree it's worth the extra effort to get it just right? By following these steps, you'll not only have a bike ready for action, but you'll also gain confidence in your mechanical skills. So, are you ready to hit the trails with a renewed sense of accomplishment?
Reinstalling The Forks And Wheel
Carefully slide the forks back into the triple clamps, ensuring proper alignment. Tighten all bolts securely before reattaching the wheel. Check the wheel spins freely and the forks move smoothly.
Reinstalling the forks and wheel on your dirt bike is crucial. Proper alignment ensures safe and smooth riding. Follow these steps to get it right.
Sliding Forks Back Into Place
Gently slide the fork tubes into the triple clamps. Ensure they align perfectly with the previous markings. This helps maintain the original settings. Use a gentle touch to avoid scratching the tubes.
Tightening The Triple Clamps
Once the forks are in place, tighten the triple clamps. Start with the upper clamp bolts. Use a torque wrench for precise tightening. Check the manufacturer's manual for the correct torque settings. Ensure bolts are evenly tightened for balanced pressure.
Reattaching The Front Wheel
Lift the front wheel and align it with the fork legs. Slide the axle through the wheel hub and fork legs. Ensure the wheel spins freely without obstruction. Tighten the axle nuts securely. Use a wrench to ensure they are snug. Double-check the alignment and ensure the brake caliper is in place. Adjust and tighten as needed.
Credit: www.dirtrider.com
Final Checks And Testing
After replacing the fork seals on your dirt bike, final checks and testing are essential to ensure everything works smoothly. Skipping these steps can lead to leaks or poor suspension performance, which can affect your ride and safety. Taking the time to carefully inspect and test the forks will save you from costly repairs later.
Checking For Leaks
Start by wiping down the fork tubes with a clean cloth to remove any dirt or oil residue. Look closely at the new seals for any signs of oil weeping or fresh leaks. Even a small drop of oil can indicate the seal isn’t seated correctly or there’s dirt preventing a proper fit.
Press down on the forks several times to help the oil settle around the seals. This movement can reveal leaks that aren’t obvious when the bike is stationary. If you spot any leaks, tighten the fork caps slightly or check if the seals need repositioning.
Test Riding The Bike
Once you're confident there are no leaks, take your bike for a short test ride on familiar terrain. Pay attention to how the forks compress and rebound—smooth, consistent movement means the seals and oil are doing their job.
Listen for any unusual noises like clunks or squeaks, which could indicate internal issues. Also, feel for any stiffness or excessive softness in the suspension. How the bike handles bumps and corners can tell you a lot about the success of your fork seal replacement.
Does the front end feel stable and responsive? If not, it might be time to revisit your work or adjust the oil level. Testing under different conditions helps you catch problems early before they escalate on a rough trail.
Frequently Asked Questions
How Often Should I Change Dirt Bike Fork Seals?
Change fork seals every 20-30 hours of riding or when leaking occurs. Regular inspection prevents dirt damage and maintains suspension performance.
What Tools Are Needed To Replace Fork Seals?
You need fork seal drivers, wrenches, screwdrivers, and a fork oil seal remover. These tools ensure a smooth and damage-free seal replacement.
Can I Change Fork Seals Without Removing The Fork?
No, you must remove the fork from the bike. Proper removal allows safe disassembly and seal replacement without damaging components.
How Do I Prevent Dirt From Damaging New Fork Seals?
Clean the fork tubes thoroughly before installation. Use protective fork boots or guards during rides to minimize dirt exposure.
Conclusion
Changing fork seals on a dirt bike keeps your ride smooth and safe. Clean tools and a steady approach make the task easier. Take your time to avoid damage or leaks. Regular maintenance helps your bike perform well longer. Now, you can handle this repair with confidence.
Dirt biking stays fun when your bike works right. Give your forks the care they need today.