Is your Whirlpool refrigerator’s water not tasting as fresh as it used to? It might be time to change the water filter.
You don’t need to call a technician or spend hours figuring it out. With just a few simple steps, you can replace your water filter quickly and easily. In this guide, you’ll learn exactly how to change the water filter on your Whirlpool refrigerator, saving you money and ensuring clean, great-tasting water every day.
Keep reading, and you’ll be done before you know it!
Signs You Need To Change The Filter
Knowing when to change the water filter in your Whirlpool refrigerator keeps your water clean and fresh. Filters trap dirt, chlorine, and other impurities. Over time, they get clogged and lose their effectiveness. Watch for clear signs that your filter needs replacing to avoid poor water quality and damage.
Reduced Water Flow
Water coming from the dispenser slows down noticeably. The ice maker may produce smaller or fewer ice cubes. This happens because the filter gets clogged with debris. Reduced flow means the filter cannot clean the water properly anymore. Changing the filter restores normal water speed and ice production.
Unusual Taste Or Odor
Water tastes strange or smells bad. It may have a metallic or chemical flavor. These changes mean the filter no longer removes contaminants well. Drinking water should always taste clean and fresh. Replacing the filter improves the taste and smell of your water instantly.
Filter Indicator Light
The filter indicator light on the refrigerator turns on or blinks. This light signals that the filter has reached its lifespan. It usually comes on after six months of use. Ignoring this light can lead to poor water quality. Change the filter promptly to reset the indicator and keep water pure.

Credit: www.youtube.com
Gathering Necessary Tools
Changing a water filter in your Whirlpool refrigerator starts with gathering the right tools. Having everything ready makes the process smooth and quick. It saves time and avoids frustration. Knowing what to prepare ensures the filter fits well and works properly.
Type Of Replacement Filter
Identify the exact model of your Whirlpool refrigerator. This helps you find the correct replacement filter. Use the model number on the fridge or in the user manual. Check the filter’s part number to match it exactly. Using the wrong filter can cause leaks or poor water quality.
- Standard Whirlpool water filter
- Certified replacement filters compatible with your model
- Filters with NSF certification for safety and quality
Additional Supplies
Besides the new filter, gather a few extra items. These make the change easier and cleaner. You might need a towel to catch drips. Have a pair of gloves to keep your hands clean. A small container can hold any water that spills during removal.
- Soft towel or cloth
- Disposable gloves
- Small bowl or container
- Flashlight for better visibility inside the fridge
Locating The Water Filter
Finding the water filter in your Whirlpool refrigerator is the first step to ensuring fresh, clean water and ice. Knowing exactly where the filter sits saves you time and spares frustration during replacement. Let’s look at where these filters commonly hide and how you can easily access them.
Common Filter Positions
Whirlpool refrigerators usually have the water filter in one of a few typical spots. Most often, you’ll find it:
- Inside the fresh food compartment, near the top right corner or bottom grille
- At the base of the fridge, behind a grille or kickplate
- On the side wall inside the fridge, often behind a small cover
Look for a cylindrical shape or a plastic cover labeled “filter.” Some models have a push-button release or a twist-lock system holding the filter in place. If you’ve never checked inside your fridge’s compartments, you might be surprised how neatly the filter is tucked away.
Accessing The Filter Compartment
Once you spot the filter’s location, accessing it is usually straightforward. Often, you just need to open a cover or twist the filter counterclockwise to release it. Some filters slide out smoothly, while others require a gentle pull after unlocking.
Don’t force anything; Whirlpool designs these filters to be user-friendly. If the filter is behind a grille, you might need to remove it by pressing tabs or unscrewing it gently. Have a towel handy to catch any drips during removal—it’s a small detail that makes the process cleaner.
Have you checked your refrigerator’s manual or model number online? Sometimes a quick search can save you from unnecessary guessing. Knowing your specific model can help you find exact filter placement and access instructions without trial and error.

Credit: www.searshomeservices.com
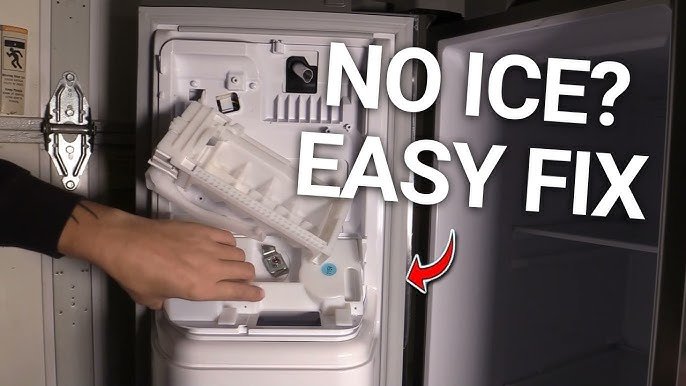
Removing The Old Filter
Changing the water filter in your Whirlpool refrigerator might seem daunting, but it’s a simple task that can improve the quality of your drinking water. The first step is removing the old filter, which can often be the trickiest part of the process. Whether you’ve done this before or it’s your first time, this guide will provide clarity and confidence.
Releasing The Filter
Before you start, make sure to locate the filter. It's usually found in the upper right-hand corner of the refrigerator or behind the base grille. If your model has a push-button release, press it to release the filter. You might need to twist it counterclockwise if it’s a twist-in type. Don't force it; if it doesn't move easily, double-check your model’s instructions.
Handling And Disposal
Once the filter is released, carefully pull it out. It's normal for a little water to drip, so have a towel handy. Wondering what to do with the old filter? Whirlpool recommends recycling, but check local guidelines as options vary. Did you know some water filter brands offer recycling programs? Consider participating in these for an eco-friendly choice.
By handling the old filter with care and disposing of it responsibly, you're not just maintaining your fridge but also contributing positively to the environment. What's your next step in making your home more sustainable?
Installing The New Filter
Installing the new water filter in your Whirlpool refrigerator is simple. Take your time to ensure the filter fits correctly. Proper installation keeps your water clean and fresh. Follow these steps carefully to avoid leaks or damage.
Aligning The Filter
Start by checking the new filter’s shape. Match it with the filter slot inside the fridge. Look for the arrows or marks on the filter and the slot. These guide the correct position. Hold the filter firmly and line it up straight. Avoid forcing it in. Proper alignment ensures smooth installation and good water flow.
Securing The Filter In Place
Push the filter gently into the slot until it stops. Turn it clockwise to lock it in place. You should feel it click or tighten. Do not over-tighten, as this may cause damage. Check that the filter is stable and does not move. Close the filter cover, if your model has one. Run water through the dispenser to clear any air and test the installation.
Resetting The Filter Indicator
Resetting the filter indicator is an important step after changing the water filter on your Whirlpool refrigerator. This indicator lets you know when the filter needs replacement. Resetting it ensures accurate tracking of filter life and helps maintain clean water and ice. The process is simple and usually done through the control panel on the fridge.
Using The Control Panel
Locate the control panel on the front of the refrigerator. Look for the filter reset button or icon. Press and hold this button for about 3 to 5 seconds. You might see the filter indicator light start to blink or turn off. This means the reset process has started. Release the button once the light changes.
Confirming The Reset
Check the filter indicator after resetting. The light should be off or show a green color. This confirms the filter status has been reset. If the light stays on, repeat the reset steps. Make sure the filter is correctly installed before resetting. The indicator now tracks the new filter’s lifespan accurately.
Flushing The New Filter
Flushing the new filter is a crucial step after installation. It clears out any loose carbon particles and air trapped inside. This ensures your water tastes fresh and stays free from impurities.
Running Water Through
Start by running water through the dispenser for about 3 to 5 minutes. You’ll notice some sputtering or air bubbles—this is normal as the filter clears out. Keep a container handy to catch the water and avoid spills.
Don’t rush this process. Flushing thoroughly helps prevent clogged filters and extends their life. Think of it like rinsing a new coffee filter before brewing; it’s a simple step that makes a big difference.
Ensuring Clean Water Output
After flushing, check the water’s clarity and taste. It should look clear and taste fresh, without any strange odors or aftertastes. If you notice anything off, run more water through the filter until it improves.
Remember, a clean water output means your filter is working properly. How often have you overlooked this and ended up with murky water? Taking a moment now saves you from unpleasant surprises later.

Credit: www.youtube.com
Tips For Filter Maintenance
Proper maintenance of your Whirlpool refrigerator’s water filter keeps water fresh and tasting good. Regular care prevents clogs and ensures the filter works efficiently. Small habits make a big difference in filter performance and longevity.
Recommended Replacement Frequency
Change the water filter every six months for the best results. Some models or water quality might require more frequent changes. Check the manufacturer’s guide to know the exact timing. A worn-out filter may reduce water flow and taste.
Signs to replace early:
- Water tastes strange or smells unusual.
- Ice cubes look cloudy or have an odd taste.
- Water flow slows down noticeably.
Keeping Spare Filters
Keep at least one spare filter at home. This helps avoid running out when it’s time to replace. Store filters in a cool, dry place away from direct sunlight. Avoid opening the filter package until ready to install to keep it clean.
Having a spare filter ensures uninterrupted clean water supply. It saves time and keeps your fridge running smoothly.
Frequently Asked Questions
How Often Should I Change A Whirlpool Refrigerator Filter?
Whirlpool recommends changing the water filter every six months. This ensures clean, fresh-tasting water and optimal appliance performance. Regular replacement prevents clogging and maintains water flow quality.
How Do I Locate The Water Filter In My Whirlpool Fridge?
The water filter is usually inside the refrigerator compartment. Look near the top right corner or behind the grille at the base. Refer to your model’s manual for exact location.
Can I Use Any Water Filter For Whirlpool Refrigerators?
No, use only Whirlpool-approved filters. They fit properly and meet quality standards. Using non-approved filters can damage your fridge and void warranty.
What Steps Are Involved In Changing The Whirlpool Water Filter?
First, locate and twist the old filter to remove it. Insert the new filter firmly until it clicks. Flush water for five minutes to clear air and impurities.
Conclusion
Changing a water filter on your Whirlpool refrigerator is simple. Regular filter changes keep water clean and fresh. Follow the steps carefully to avoid mistakes. Remember to reset the filter indicator after replacing. Clean water means better taste and safer drinking.
Keep your fridge working well with timely filter swaps. This small task helps your family stay healthy. You can do it yourself without extra help. Enjoy fresh water every day with a clean filter.