If your Whirlpool refrigerator’s water or ice doesn’t taste quite right, it might be time to change the filter. You might think this is a complicated task, but it’s actually simple and quick once you know how.
You’ll discover easy steps to replace your filter without any hassle. By following these tips, you’ll keep your water fresh and your fridge working perfectly. Keep reading to learn exactly what to do and avoid common mistakes that many people make.
Credit: www.searspartsdirect.com
Locate The Filter
Locating the filter in your Whirlpool refrigerator is the first key step to ensuring clean, fresh water and ice. Knowing exactly where to find it saves you time and avoids frustration. It also helps you understand your appliance better, making maintenance easier in the future.
Find The Filter Type
Whirlpool refrigerators come with different filter types, so identifying yours is important. Most models use either a push-in, twist-in, or slide-out filter. Check your user manual or look for a label inside the fridge that describes the filter model.
Recognizing the filter type helps you buy the correct replacement. Have you ever bought the wrong part and had to return it? Avoid that hassle by confirming this detail first.
Identify Filter Location
The filter location varies depending on your refrigerator’s model. Common places include:
- Inside the fresh food compartment, usually near the top right corner
- At the base grille or kick plate near the floor
- Behind the grille or inside a compartment at the back
Look carefully for a small cover or a round cap that you can twist or pull out. If you’re unsure, inspect the fridge’s interior walls or check near the water dispenser area.
Have you noticed how some filters hide in plain sight? Taking a moment to look closely can save you a lot of guesswork.
Prepare For Replacement
Before diving into changing the filter on your Whirlpool refrigerator, preparing properly can save you time and avoid unexpected hassles. Taking a moment to organize your tools and manage the water supply ensures a smooth replacement process. These simple preparatory steps can make the difference between a quick fix and a frustrating experience.
Gather Necessary Tools
Start by collecting all the items you’ll need to replace the filter. Usually, this includes the replacement filter itself and a clean cloth to wipe any drips. Some models might require a screwdriver, so check your user manual beforehand.
Having everything ready prevents unnecessary trips to the store. It also helps you stay focused and efficient during the replacement. Think about where you’ll place the old filter once removed to avoid any mess.
Turn Off Water Supply
Before you touch the filter, turn off the water supply connected to your refrigerator. This step is crucial to prevent leaks or water damage. You’ll usually find the shutoff valve behind the fridge or under the sink.
If you’ve never done this before, try turning the valve slowly to avoid breaking it. After shutting off, press the water dispenser briefly to release any remaining pressure. This simple action can save you from unexpected water spills.
Remove Old Filter
Removing the old filter from your Whirlpool refrigerator is an essential step to ensure clean, fresh water and optimal appliance performance. It might seem tricky at first, but with the right approach, you can do it quickly without any hassle. Let’s focus on the key actions to take before pulling out that old filter safely.
Unlock The Filter
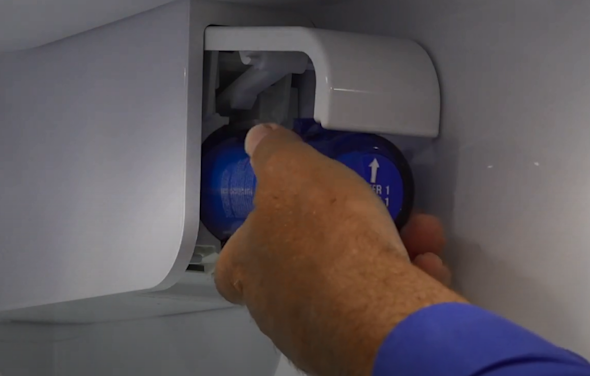
Start by locating the filter compartment, usually found inside the fridge or at the base. You’ll notice the filter is secured in place to prevent accidental spills or leaks. To unlock it, gently turn the filter counterclockwise—usually about a quarter turn—until you feel it release.
This simple twist is often overlooked, but it’s what frees the filter from its holder. If it feels stuck, don’t force it; check your user manual or try slightly adjusting the angle. Have you ever tried to remove a filter without unlocking it first? It usually ends in frustration or damage.
Pull Out The Filter
Once unlocked, the filter should slide out smoothly. Hold the filter firmly and pull it straight towards you without twisting. If you notice resistance, double-check that it’s fully unlocked and try again.
Be ready with a towel or cloth, as some water might drip out during removal. This step is straightforward but requires a steady hand to avoid spills or dropping the filter. How much easier does this task feel when you prepare your space before starting?

Credit: www.youtube.com
Install New Filter
Replacing a Whirlpool refrigerator filter is quick and simple. Twist the old filter out, insert the new one, and turn to lock it in place. This keeps your water fresh and clean.
Installing a new filter in your Whirlpool refrigerator is a simple task. It's important for keeping your water fresh and clean. This guide will help you with the process. Follow these steps to ensure a smooth installation.
Align The Filter Correctly
Begin by removing the new filter from its packaging. Check the filter for any damage. Hold the filter with the arrow facing upward. Insert the filter into the housing. Make sure it aligns with the grooves. This alignment ensures proper functioning.
Secure The Filter In Place
Push the filter firmly into the slot. You should feel it click into place. This clicking sound confirms it's secure. Avoid forcing the filter. If it doesn't fit, check the alignment. Once secured, turn the filter clockwise. This step locks the filter in position. Ensure it's tightly secured to prevent leaks. Following these steps ensures clean, fresh water. Enjoy the benefits of a well-maintained Whirlpool refrigerator.
Reset Filter Indicator
The filter indicator on a Whirlpool refrigerator helps track when to change the water filter. After installing a new filter, the indicator light must be reset. This reset keeps the fridge working well and ensures clean water and ice. Resetting the filter indicator is a simple process that anyone can do.
Find The Reset Button
The reset button is usually near the filter indicator light on the control panel. It might be labeled as "Filter Reset" or just "Reset." Some models have a small button you can press with a pen or paperclip. Check the fridge’s user manual if you cannot find it.
Perform The Reset
- Press and hold the reset button for about 3 seconds.
- Release the button when the filter light changes or turns off.
- If the light blinks or stays on, try pressing the button again.
- Wait a few minutes after resetting to let the system update.
After the reset, the indicator will track the new filter usage correctly. This simple step helps keep your water fresh and safe.
Test The New Filter
After installing the new filter in your Whirlpool refrigerator, it's important to test it properly. This ensures the filter works correctly and your water stays clean and fresh. Taking the time to check your work now can save you from potential leaks or poor water quality later.
Flush The Water Line
Once the new filter is in place, flush the water line by running water through the dispenser for about 3 to 5 minutes. This clears out any air bubbles and loose carbon particles from the new filter. You might notice some sputtering or dark particles at first—don’t worry, that’s normal.
Flushing helps the filter settle in and ensures your water tastes fresh. If you skip this step, your first drinks may have an unpleasant taste or cloudiness. Have you noticed how a quick flush made your water clearer and better tasting right away?
Check For Leaks
After flushing, inspect the filter area carefully for any leaks. Look around the filter housing and the water line connection points. Even a small drip can cause water damage over time, so catch it early.
If you spot a leak, try removing and reseating the filter to ensure it’s locked in place properly. Sometimes, the filter might not be twisted on tight enough or the O-ring gasket could be slightly out of position. Have you ever experienced a slow drip that was fixed just by adjusting the filter a bit?
Maintenance Tips
Keeping your Whirlpool refrigerator’s filter fresh is key to enjoying clean water and crisp ice. Proper maintenance doesn’t just improve taste; it safeguards your appliance’s performance and your health. Here are practical tips to help you manage and extend the life of your filters effectively.
When To Replace Filters
Most Whirlpool refrigerator filters need changing every six months. However, your usage and water quality affect this timeline. If you notice a strange taste, slower water flow, or reduced ice production, it’s time to swap the filter.
Think about how often you use the water dispenser or ice maker daily. Heavy use might mean replacing filters more frequently, sometimes every three to four months. Don’t wait for a warning light; check your filter regularly to avoid surprises.
Extending Filter Life
You can stretch your filter’s lifespan with simple habits. Using a water softener system if you have hard water reduces mineral buildup that clogs filters quickly.
Also, flush the new filter by running water through it for a few minutes before use. This clears out any loose carbon particles and helps the filter work efficiently from the start.
- Keep your refrigerator clean, especially around the filter area, to prevent dust and debris from affecting its performance.
- Avoid using unfiltered water sources to fill your fridge; always rely on the built-in filtration system.
- Monitor your water pressure—low pressure can strain the filter and reduce its effectiveness.
Have you ever noticed a sudden drop in water taste or flow and wondered if it’s the filter? Paying attention to these signs can save you from drinking contaminated water and costly repairs.

Credit: www.youtube.com
Frequently Asked Questions
How Often Should I Change A Whirlpool Fridge Filter?
You should replace the filter every 6 months for optimal water quality. Frequent use or poor water quality may require earlier changes. Regular replacement ensures clean, fresh-tasting water and ice.
Where Is The Filter Located On Whirlpool Refrigerators?
The filter is usually inside the fridge, near the top right corner or in the base grille. Consult your manual for the exact location to ensure proper replacement.
How Do I Reset The Filter Indicator On Whirlpool Fridges?
Press and hold the filter reset button for 3 seconds after changing the filter. This action clears the indicator and tracks the new filter’s lifespan correctly.
What Type Of Replacement Filter Fits Whirlpool Refrigerators?
Use genuine Whirlpool filters or compatible models specified in your fridge manual. Using the correct filter guarantees efficient filtration and maintains appliance warranty.
Conclusion
Changing a filter on a Whirlpool refrigerator keeps water clean and fresh. It only takes a few minutes to do. Regular changes help the fridge work well and last longer. Follow the steps carefully to avoid mistakes. Clean water and ice make daily life better.
Now, you can handle this small task with confidence. Simple maintenance helps your appliance stay healthy. Keep your home safe by changing the filter on time. A small effort brings big benefits.