Is your Whirlpool refrigerator’s water not tasting as fresh as it used to? Or maybe the ice cubes look a little cloudy?
These are signs that your filter needs changing. You might think it’s a complicated task, but it’s actually simple and quick. By learning how to change the filter yourself, you can save money, keep your water clean, and enjoy fresh ice every day.
In this guide, you’ll discover easy, step-by-step instructions that anyone can follow. Ready to refresh your fridge and your water? Let’s get started!

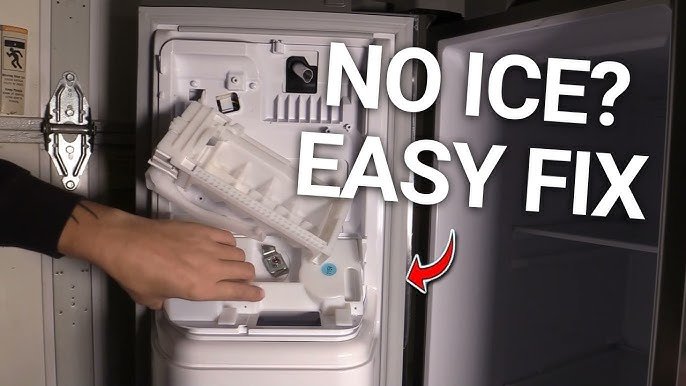
Credit: www.youtube.com
Identify Your Filter Type
Knowing your Whirlpool refrigerator’s filter type is key before making a replacement. Filters come in various shapes and sizes, and using the wrong one can impact water quality and appliance performance.
Identifying the correct filter ensures you get clean water and crisp ice without hassle. Let’s break down how you can quickly find out which filter fits your fridge.
Locate The Filter
Start by finding where the filter sits inside your fridge. Most Whirlpool models place the filter in one of these spots:
- Upper right corner of the fridge compartment
- Base grille at the bottom front of the refrigerator
- Behind a cover or inside the back wall of the fridge
Check your user manual or look for a small cover or slot that can be popped open. If you’ve ever changed the filter before, you might recognize the location. Not sure? Shine a flashlight inside and look for a cylindrical or rectangular cartridge.
Check The Model Number
Next, find your refrigerator’s model number. This is often on a label inside the fridge, usually on the wall near the crisper drawer or on the door frame.
Once you have the model number, you can search online or on Whirlpool’s official site to find the compatible filter types. Many Whirlpool fridges use filters like the EveryDrop or Whirlpool branded cartridges, but the exact model varies.
Have you ever grabbed a filter that didn’t fit? Checking the model number first saves you time and money. It ensures you order the exact replacement and avoid the frustration of returns or poor filtration.
Gather Necessary Tools
Gathering the right tools before changing the filter in your Whirlpool refrigerator makes the process smoother and faster. It saves you from last-minute scrambles and helps you avoid mistakes. Having everything ready ensures you won’t damage any parts or make a mess.
Prepare Replacement Filter
First, make sure you have the exact replacement filter for your Whirlpool model. Check the user manual or the current filter’s model number to avoid buying the wrong one. An incorrect filter can cause water flow issues or fail to filter properly, which defeats the purpose of the change.
Keep the replacement filter nearby and out of direct sunlight. This preserves the filter’s integrity until you’re ready to install it. Have you ever started a repair only to realize the new part doesn’t fit? Avoid that frustration by confirming the filter before you begin.
Have A Towel Ready
Water can drip or spill when you remove the old filter, so having a towel handy is a smart move. Place a towel or small tray under the filter area to catch any leaks. This keeps your floor clean and prevents water damage.
A towel also helps you grip the filter better, especially if your hands are wet or the filter is tight. This small step can save you from accidental slips or dropping the filter inside the fridge compartment. Do you keep a towel nearby during fridge maintenance? It’s a simple habit that pays off.
Remove The Old Filter
Removing the old filter from your Whirlpool refrigerator is a straightforward task that sets the stage for fresh, clean water and ice. It’s essential to approach this step carefully to avoid any spills or damage to your appliance. Let’s walk through the key actions you need to take before you can easily replace the filter.
Turn Off Water Supply
Before you touch the filter, make sure to turn off the water supply to your refrigerator. This prevents leaks and water damage while you remove the filter. You can usually find the shutoff valve behind the fridge or under the sink.
Turning off the water supply might seem like an extra step, but it saves you from unexpected messes. Have you ever experienced a drip or spill while changing a filter? Taking this precaution keeps your kitchen dry and stress-free.
Release The Filter
Next, locate the filter inside your Whirlpool refrigerator, often found in the upper right corner or behind the grille. To release it, either twist the filter counterclockwise or press the release button depending on your model. This action disengages the filter from its housing.
Don't force the filter if it feels stuck. Gently wiggle it while applying steady pressure. This helps avoid breaking any internal parts or damaging the filter socket.
Pull Out The Filter
Once released, carefully pull the filter straight out of its compartment. Keep a towel handy to catch any residual water that may drip during removal. Holding the filter upright helps minimize spills.
Removing the old filter smoothly prepares you for the next step—installing a new one. Have you noticed any resistance or difficulty pulling out your filter? If so, double-check that the water is off and the release mechanism is fully engaged before trying again.
Install The New Filter
Push the new filter firmly into the slot until it clicks. Turn the filter clockwise to lock it in place securely. Check for any leaks before closing the fridge door.
Installing a new filter in your Whirlpool refrigerator might seem like a daunting task, but with the right approach, it can be a quick and satisfying process. Imagine the sense of accomplishment when your refrigerator runs smoothly, providing fresh, clean water for you and your family. All you need is a little guidance, and you’ll have that filter replaced in no time. Let's dive into the steps to ensure your new filter is installed correctly.
Align The Filter Correctly
Before you start, make sure your new filter is the right one for your Whirlpool model. Check the old filter or your manual for the correct part number. Once you have the correct filter, align it with the filter compartment. Notice the grooves or arrows on the filter? They are there to guide you. Align these indicators with those in the compartment to ensure a proper fit. A proper alignment prevents damage and ensures the filter works efficiently.
Push The Filter Into Place
With your filter aligned, it's time to push it into place. Apply firm, even pressure on the filter. You might feel slight resistance, which is normal. Think of it like plugging in a charger; it should slide in with a bit of a push. If it doesn’t seem to fit, double-check the alignment. A gentle click usually signals the filter is seated correctly.
Secure The Filter
Once the filter is pushed in, securing it is the next step. Turn the filter clockwise to lock it into place. This ensures it doesn’t shift or dislodge during operation. Imagine securing a lid on a jar; it should feel snug and steady. If you're unsure, give it a slight wiggle—there should be no play. Your filter is now securely installed, ready to provide you with fresh, filtered water. Have you ever faced an issue while installing a filter? Share your tips or challenges in the comments below!
Flush The New Filter
Flushing the new filter is a crucial step after installation to ensure your Whirlpool refrigerator dispenses clean, fresh water. This process helps remove any loose carbon particles or air bubbles trapped inside the filter. Skipping this step might result in cloudy water or strange tastes, so take a moment to flush it properly.
Run Water Through The Dispenser
Start by running cold water through the dispenser for about 3 to 5 minutes. This clears out any impurities or trapped air inside the new filter. You might notice the water coming out in bursts or looking slightly cloudy at first—this is normal and will clear up soon.
Make sure to use a container to catch the water if your glass or bottle doesn’t fit easily under the dispenser. This prevents spills and keeps your kitchen counter dry. Have you ever wondered why your water tastes odd right after changing the filter? Flushing is the reason.
Check For Leaks
After flushing, carefully inspect the filter area for any leaks. Look around the filter housing and the connection points. If you spot any water drops or puddles, tighten the filter by turning it a little more clockwise.
Leaks could mean the filter isn’t seated properly or the O-ring is damaged. Don’t ignore small leaks—they can cause bigger problems down the line, like water damage or decreased filter performance. Have you checked your filter’s fit after installation?
Reset Filter Indicator
Resetting the filter indicator is essential after changing your Whirlpool refrigerator’s water filter. This action clears the alert and lets the refrigerator track the new filter’s usage. Without resetting, the indicator may keep showing a warning, causing confusion.
Resetting is quick and helps maintain the fridge’s water quality tracking. Follow the simple steps below to reset the filter indicator using the control panel and confirm the reset was successful.
Use Control Panel Buttons
Locate the control panel on the front of the refrigerator. Press and hold the “Reset Filter” or “Filter Reset” button. Hold it for about 3 to 5 seconds until the indicator light starts blinking or turns off. Some models may require pressing and holding the “Ice/Water” button instead. Check your user manual if unsure. This resets the filter status in the system.
Verify Reset Completion
After resetting, check the filter indicator light. It should be off or show a normal status. Open the refrigerator door and look at the display panel. If the light remains on, repeat the reset process. A successful reset means the fridge recognizes the new filter and tracks it properly.
Troubleshoot Common Issues
Sometimes, even a simple task like changing a Whirlpool refrigerator filter can run into hiccups. Troubleshooting common issues helps you fix problems quickly and keeps your fridge running smoothly. Let’s look at two frequent challenges you might face and how to solve them effectively.
Filter Not Fitting Properly
If the new filter doesn’t fit right, double-check you have the exact model designed for your Whirlpool fridge. Filters often look similar but have subtle differences that affect fit.
Inspect the filter housing for any debris or leftover parts from the old filter. Dirt or bits left behind can prevent the new filter from seating correctly.
Try these tips:
- Align the filter carefully with the slots before pushing it in.
- Don’t force the filter; if it resists, remove and examine the filter and housing again.
- Verify that the filter is inserted in the correct orientation—look for arrows or labels.
Have you ever forced a filter only to find it leaks water later? Taking a moment to double-check fit can save you that hassle.
Water Flow Problems
After installing a new filter, you might notice slow or no water flow from the dispenser. This is frustrating but often fixable without professional help.
First, check if you have fully opened the water valve behind the fridge. A partially closed valve reduces flow dramatically.
Other causes include:
- Air trapped in the water line—dispense water for a few minutes to clear it.
- A clogged or frozen water line—inspect the tubing for kinks or ice buildup.
- An incorrectly installed filter blocking water passage.
If your water flow is still weak after these checks, try resetting the fridge’s filter indicator and see if that helps. Could a simple reset be all it takes?

Credit: www.searshomeservices.com

Credit: www.youtube.com
Frequently Asked Questions
How Often Should I Change My Whirlpool Refrigerator Filter?
You should change the filter every 6 months for optimal performance. Regular changes ensure clean water and fresh ice, preventing clogs and bad odors.
How Do I Locate The Filter In My Whirlpool Fridge?
The filter is usually inside the fridge, near the top right corner or in the base grille. Check your model’s manual for exact location.
Can I Use Any Filter For My Whirlpool Refrigerator?
No, always use filters designed specifically for Whirlpool models. Using the wrong filter can cause leaks and damage your fridge’s water system.
What Are The Signs That My Filter Needs Changing?
Signs include slow water flow, bad taste or odor, and the water filter indicator light turning on. Replace the filter promptly when these appear.
Conclusion
Changing a filter in your Whirlpool refrigerator keeps water clean and fresh. It only takes a few minutes and simple steps. Regular changes help your fridge work better and last longer. You will notice better taste and clearer ice. Keep track of when to replace the filter next time.
This small task makes a big difference in daily use. Easy to do, good for health, and saves money. Try it today and enjoy fresh water every day.