Are you craving that perfect, crispy garlic bread but unsure how long to cook it in your toaster oven? Getting it just right can turn your meal from good to unforgettable.
Too short, and it’s soggy; too long, and it burns. In this guide, you’ll discover the ideal cooking time and tips to achieve golden, flavorful garlic bread every single time. Keep reading to unlock the secrets that will make your toaster oven your new favorite kitchen tool.

Choosing The Right Bread
Choosing the right bread is key to making perfect garlic bread in your toaster oven. The type of bread affects texture, flavor, and how well it soaks up the garlic butter. Picking a bread that crisps nicely on the outside while staying soft inside makes your garlic bread irresistible.
Best Bread Types For Garlic Bread
Not all bread types work equally well for garlic bread. Look for breads with a sturdy crumb that can hold up to butter without becoming soggy.
- Baguette:Classic choice with a crunchy crust and soft interior. Its shape is perfect for easy slicing and toasting.
- Italian Bread:Slightly denser than a baguette, it absorbs flavors well and crisps up beautifully.
- Sourdough:Offers a tangy flavor and chewy texture that adds depth to garlic bread.
- French Bread:Similar to baguette but often larger, great for making garlic bread for a crowd.
If you prefer softer bread, try ciabatta. It’s airy yet holds garlic butter without falling apart. Have you tried using sandwich bread? It can work in a pinch but may not give you the same crunch.
Slicing Tips For Even Cooking
How you slice your bread impacts how evenly it cooks in the toaster oven. Thicker slices can stay soft inside but might take longer to toast fully.
A good rule is to slice bread about 1/2 to 3/4 inch thick. This size allows the heat to reach the center without burning the edges.
- Use a serrated bread knife for clean cuts that don’t crush the loaf.
- Cut slices uniformly to ensure all pieces toast evenly.
- If using a baguette, slice at a slight diagonal to increase the surface area for garlic butter.
Ever noticed some slices get too crispy while others stay soft? That’s often uneven slicing. Taking a few extra minutes to slice carefully pays off with perfectly cooked garlic bread every time.
Preparing Garlic Butter Spread
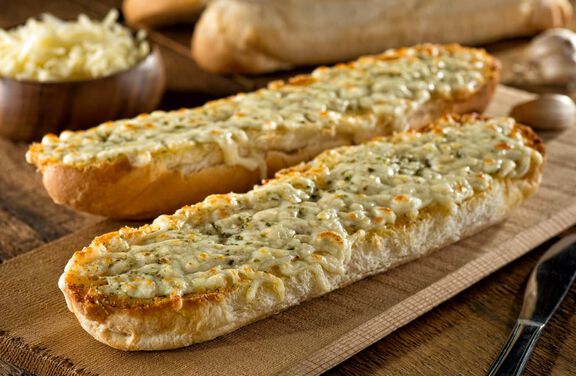
Preparing the garlic butter spread is the heart of making perfect garlic bread in your toaster oven. The right spread not only adds flavor but also ensures your bread gets that irresistible aroma and golden crisp. A well-made garlic butter is simple yet impactful, turning ordinary bread into a snack that everyone will ask for again.
Essential Ingredients
Start with these basic ingredients to create a rich garlic butter spread:
- Butter:Use unsalted butter for control over saltiness. Room temperature butter blends easily.
- Garlic:Fresh minced garlic or garlic paste gives the best punch. Avoid garlic powder for a less fresh taste.
- Parsley:Fresh chopped parsley adds color and a fresh, herbal note.
- Salt:Just a pinch to enhance all the flavors.
- Optional extras:A squeeze of lemon juice for brightness or a sprinkle of chili flakes for heat.
Mixing For Maximum Flavor
How you mix your ingredients affects the taste and texture of your spread. Softened butter is key—too cold, and the garlic won’t blend well; too melted, and it won’t stick properly to the bread.
Use a fork or a small whisk to mash the garlic into the butter gently. This method releases garlic’s natural oils without overpowering the butter’s creaminess.
After mixing, let your spread sit for about 10 minutes at room temperature. This resting time lets the flavors meld, making each bite more flavorful. Have you noticed how a little patience in preparation can elevate your cooking results?
Setting Up Your Toaster Oven
Setting up your toaster oven correctly is key to making perfectly crispy, golden garlic bread every time. It’s not just about tossing bread in and waiting; the right temperature and rack placement make a huge difference. Let’s break down how to get your toaster oven ready for this simple yet satisfying treat.
Ideal Temperature Settings
Choosing the right temperature is crucial. Most toaster ovens work best for garlic bread at around 375°F to 400°F (190°C to 200°C). This range allows the bread to toast evenly without burning the garlic or butter topping.
Try setting your toaster oven to 400°F if you like a crunchier texture, but watch closely after the 5-minute mark. Lower temperatures can take a bit longer but reduce the risk of burning. Have you noticed how small temperature tweaks change the taste and texture?
Rack Placement For Crispiness
Where you place the rack affects how crispy your garlic bread turns out. Positioning the rack in the middle or upper thirdusually gives the best results. This placement exposes the bread to enough heat to toast the surface without overheating the bottom.
If your toaster oven has a broil function, placing the rack near the top can add extra crunch. However, be cautious—broiling can burn garlic quickly. Have you experimented with rack heights before? Finding the sweet spot can transform your garlic bread experience.
Cooking Time Guidelines
Garlic bread is a delightful addition to any meal. Cooking it in a toaster oven is quick and efficient. Understanding the right cooking time ensures you achieve that perfect golden crust. This section provides guidelines to help you cook garlic bread to perfection.
Standard Baking Duration
For most garlic bread, bake at 350°F for 8-10 minutes. This time frame usually gives a golden, crispy surface. Ensure the bread is heated through but not burnt. Keep an eye on it to prevent overcooking.
Adjusting Time Based On Bread Thickness
Thicker slices require a bit more time to cook thoroughly. Add 2-3 minutes if your bread is thicker. Thinner slices might need slightly less time. Check the bread at 7 minutes to avoid burning. Adjust based on your preference for crispiness.
Achieving Perfect Crisp
Achieving the perfect crisp on garlic bread in a toaster oven requires attention to detail. It's not just about cooking time but how heat interacts with the bread's surface. Getting that ideal crunch while keeping the inside soft and buttery is a balance you can master with a few simple tricks.
Using Foil For Even Browning
Wrapping your garlic bread loosely in aluminum foil can help distribute heat evenly. The foil traps steam, preventing the bread from drying out too fast while allowing the edges to brown nicely. Try folding the foil to cover the bread partially, leaving some exposed areas for direct heat to create a golden crust.
From my experience, using foil made a huge difference when toasting thicker slices. Without it, the outside would burn before the inside warmed up. The foil acts like a shield, so your bread cooks through without harsh spots.
Flip Or Not To Flip?
Flipping the garlic bread halfway through cooking can enhance crispness on both sides. However, if you’re using foil or cooking thinner slices, flipping may not be necessary. It depends on how your toaster oven distributes heat.
Ask yourself: does the top heat source in your toaster oven cause uneven browning? If yes, flipping helps. If the heat is well balanced, leaving the bread on one side can save time and maintain that buttery texture inside.
Try testing both ways with a small batch to see what works best for your appliance. This simple check can improve your results dramatically and prevent overcooking or sogginess.
Troubleshooting Common Issues
Cooking garlic bread in a toaster oven is quick and easy. Still, some common problems can affect the final result. These issues usually involve texture and doneness. Fixing them helps you enjoy perfectly toasted garlic bread every time.
Understanding these problems and their solutions saves time and prevents waste. Below are tips for fixing burnt bread and avoiding soggy texture.
Burnt Garlic Bread Fixes
- Lower the toaster oven temperature by 25°F (about 15°C).
- Reduce cooking time by a minute or two.
- Place garlic bread on a middle rack for even heat.
- Use aluminum foil to cover the bread halfway through baking.
- Check the bread frequently near the end to avoid burning.
Avoiding Soggy Texture
- Use dry or lightly toasted bread before adding garlic butter.
- Spread garlic butter thinly and evenly to prevent sogginess.
- Cook bread directly on the rack for better air circulation.
- Keep the toaster oven door closed to maintain heat.
- Allow bread to cool briefly on a wire rack to keep crispness.
Serving Suggestions
Serving garlic bread fresh from your toaster oven is always a treat. But what you serve alongside it can make your meal truly memorable. Let's look at some tasty ideas that will elevate your garlic bread experience and keep your taste buds excited.
Pairing With Dips And Sauces
Garlic bread pairs wonderfully with a variety of dips. You might enjoy a classic marinara sauce for a rich, tangy contrast. Creamy ranch dressing or a zesty pesto can also add a fresh twist.
If you love bold flavors, try a spicy sriracha mayo or a warm cheese dip. These options can turn simple garlic bread into a party snack or a satisfying appetizer.
- Tomato basil marinara
- Garlic herb butter
- Spinach and artichoke dip
- Buffalo chicken dip
- Olive tapenade
Complementary Meal Ideas
Garlic bread is not just a side; it can be part of a well-rounded meal. Think about pairing it with soups like tomato bisque or creamy mushroom. These warm, comforting soups highlight the bread’s crispy, buttery texture.
For a heartier meal, serve garlic bread alongside pasta dishes such as spaghetti carbonara or fettuccine Alfredo. The bread soaks up sauces beautifully, making every bite satisfying.
Have you tried garlic bread with grilled vegetables or a fresh salad? This combo adds balance and keeps your meal light but flavorful.
Frequently Asked Questions
How Long To Cook Garlic Bread In A Toaster Oven?
Typically, cook garlic bread in a toaster oven for 8-10 minutes at 350°F. Check for golden edges and melted butter. Adjust time based on bread thickness and toaster oven model for perfect crispiness.
Can I Toast Frozen Garlic Bread In A Toaster Oven?
Yes, you can toast frozen garlic bread in a toaster oven. Increase cooking time to 12-15 minutes at 350°F. This ensures thorough heating and a crispy texture without burning.
What Temperature Is Best For Garlic Bread In Toaster Oven?
The ideal temperature for cooking garlic bread in a toaster oven is 350°F. This temperature crisps the bread evenly and melts the garlic butter without burning.
How To Avoid Burning Garlic Bread In A Toaster Oven?
To avoid burning, cook garlic bread at 350°F and monitor after 8 minutes. Use foil to cover bread if edges brown too fast. Adjust cooking time based on bread thickness.
Conclusion
Cooking garlic bread in a toaster oven takes just minutes. Set the temperature right, usually around 350°F to 400°F. Toast for about 5 to 10 minutes until golden and crispy. Watch closely to avoid burning. Fresh, warm garlic bread is ready fast.
Perfect for snacks or meals anytime. Simple steps bring tasty results every time. Enjoy your delicious garlic bread with ease.