Is your gas stove not lighting up like it used to? A faulty igniter might be the reason.
Replacing an igniter may sound tricky, but with the right steps, you can fix it yourself quickly and safely. In this guide, you’ll learn exactly how to replace your gas stove igniter without any hassle. Keep reading, and you’ll have your stove working perfectly again in no time.
Signs Of A Faulty Igniter
Knowing the signs of a faulty igniter can save you time and frustration in the kitchen. An igniter that doesn’t work properly can make your gas stove unreliable and even unsafe. Paying attention to these signs helps you spot the problem early and decide when it’s time to replace the igniter.
Clicking Sound Without Spark
You might hear a continuous clicking noise when you try to light your burner, but no spark appears. This constant clicking can be annoying and indicates the igniter is trying to work but failing. It’s often caused by dirt, moisture, or a damaged igniter tip.
Have you noticed the clicking goes on longer than usual before you give up? That’s a clear sign the igniter isn’t producing the spark needed to ignite the gas. Checking this early helps you avoid delays in cooking or unsafe gas buildup.
Burner Won't Light
If your burner won’t light at all, the igniter might be dead. This means you won’t hear the clicking sound, and the gas won’t ignite. It’s a straightforward sign that the igniter needs attention or replacement.
Sometimes, people try to light the burner manually with a match, but this is only a temporary fix. Igniters are there for safety and convenience, so fixing or replacing a non-working igniter should be a priority.
Intermittent Ignition
When the igniter works sometimes but fails at other times, it’s called intermittent ignition. This inconsistency can confuse you because the stove seems fine one moment and won’t light the next.
This issue might be due to a loose wire connection, dirt buildup, or a partially worn-out igniter. Observing when and how often the problem happens can help you diagnose if the igniter is the cause or if it’s something else.
Tools Needed For Replacement
Before you start replacing the igniter on your gas stove, gathering the right tools is crucial. Having everything on hand makes the job smoother and safer. You don’t want to be halfway through the repair only to realize you’re missing a key tool.
Screwdrivers
Screwdrivers are essential for removing the screws that hold the stove’s components together. Usually, you’ll need both a flathead and a Phillips screwdriver. A magnetic screwdriver can be a real help to avoid dropping screws into tight spaces.
Multimeter
A multimeter helps you test the igniter to confirm if it’s actually faulty. This tool measures electrical current, voltage, and resistance. It’s a simple way to avoid replacing parts unnecessarily, saving you time and money.
Replacement Igniter
Make sure you have the exact replacement igniter designed for your stove model. Using the wrong part can lead to poor performance or safety issues. Check your stove’s manual or the manufacturer’s website to find the correct igniter before starting the repair.
Safety Precautions
Turn off the gas supply and unplug the stove before starting. Ensure the area is well-ventilated to avoid gas buildup. Use tools carefully to prevent damage or injury.
Replacing an igniter on a gas stove can seem daunting, but with the right safety precautions, you can handle it with confidence. Safety is paramount when dealing with gas and electricity, so it's crucial to take preventive measures before you begin. By ensuring you follow each step carefully, you can protect yourself and your home from potential hazards.
Disconnecting Power
Before you even think about touching the stove, make sure to disconnect the power. Locate the electrical outlet your stove is plugged into and unplug it. If the plug is not accessible, turn off the power at the circuit breaker. Doing this prevents accidental electric shocks while you're working. It might seem like a simple step, but it’s one that can save lives. Can you imagine the consequences of ignoring this?
Turning Off Gas Supply
Turning off the gas supply is another critical precaution. Locate the gas shut-off valve behind your stove or in the basement. Turn the valve to the "off" position, which is typically a 90-degree turn. This step ensures no gas is flowing to your stove while you’re working on it. The smell of gas can be alarming, and for good reason—it signals a potential leak. Wouldn’t you rather spend a few extra minutes ensuring the gas is off than risk a dangerous leak? By making these safety precautions a priority, you set the stage for a smoother and safer igniter replacement process.
Credit: www.searspartsdirect.com
Locating The Igniter
Locating the igniter on your gas stove is the first important step toward fixing a spark issue. The igniter is a small but crucial part that creates the spark needed to light the gas. Knowing where it sits can save you time and avoid unnecessary frustration.
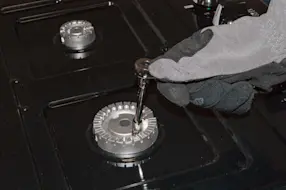
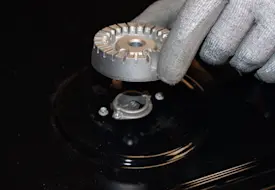
Removing Burner Grates
Before you can see the igniter, you need clear access to the burner area. Start by lifting off the burner grates—they usually just sit on top and can be lifted without tools. Be careful as grates can be heavy or awkwardly shaped.
Once the grates are out, the burners themselves may need to be removed or moved aside. This gives you a better view of the igniter and the ignition assembly beneath. Have a soft cloth ready to place removed parts on, so they don’t get scratched or damaged.
Accessing The Igniter Assembly
Look closely near the burner base; the igniter is often a small, ceramic-tipped electrode sticking out near the gas outlet. It’s connected by thin wires that lead to the stove’s ignition system. If you can’t see it clearly, check your stove’s manual or look for a small metal bracket holding the igniter in place.
Sometimes, you may need to remove screws or clips holding the assembly. Use a screwdriver that fits well to avoid stripping screws. Take note of how the igniter is positioned before removal—taking a photo can help you put it back correctly.
Removing The Old Igniter
Removing the old igniter from your gas stove is a task that requires care and attention. It’s important to handle each step with precision to avoid damaging any parts. Let’s look closely at how you can safely take out the igniter so your stove can be ready for a new one.
Unscrewing The Igniter
Start by locating the screws holding the igniter in place. These are usually small and may be hidden under burner caps or plates. Use a screwdriver that fits well to avoid stripping the screws.
Gently remove the screws and keep them somewhere safe. This way, you won’t lose them during reassembly. If a screw feels stuck, try applying a little penetrating oil and wait a few minutes before trying again.
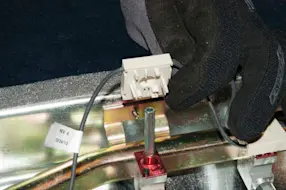
Disconnecting The Wiring
Once the igniter is free, carefully look for the wiring connected to it. These wires provide the electrical spark needed to light your stove. Before touching, make sure your stove is unplugged or the gas supply is turned off for safety.
Gently unplug or unscrew the wire connectors. Sometimes, wires might be stuck due to age or dirt, so don’t force them. If you encounter resistance, wiggle the wires slightly or use a pair of needle-nose pliers to loosen them.
Have you noticed how small details like wiring can affect your stove’s performance? Handling them with care can save you from extra repairs later.
Installing The New Igniter
Installing the new igniter is a key part of fixing your gas stove. It needs careful handling to work well and safely. This process involves connecting the wiring and securing the igniter firmly. Each step must be done with attention to detail.
Connecting The Wiring
Begin by matching the new igniter’s wires with the stove’s connectors. Check the color codes or labels on each wire. Connect the wires by pushing them firmly into the terminals. Use a small screwdriver to tighten screws if needed. Avoid loose connections; they can cause sparks or failure. Make sure no wires touch metal parts directly. Double-check all wiring before moving to the next step.
Securing The Igniter In Place
Position the igniter in its original spot inside the burner assembly. Align the mounting holes on the igniter with the stove’s frame. Use screws or clips to fasten the igniter securely. Tighten screws enough to hold the igniter steady but avoid over-tightening. The igniter should not move when gently pushed. Ensure the igniter tip sits close to the burner for proper ignition. A stable igniter improves stove performance and safety.
Testing The New Igniter
Testing the new igniter is a crucial step that ensures your gas stove lights safely and efficiently. Without a properly functioning igniter, you risk gas buildup or ineffective ignition, which can be dangerous. Taking the time to carefully test the igniter will give you peace of mind and save you from future headaches.
Restoring Power And Gas
Before testing, make sure the gas supply is turned back on. Locate your stove’s gas valve and slowly open it to allow gas flow. At the same time, restore electrical power by plugging the stove back in or switching the circuit breaker back on.
Double-check that all connections are secure and that no gas smell lingers. If you detect any unusual odor, stop immediately and ventilate the area. Safety should be your top priority during this process.
Checking For Proper Spark
Turn the burner knob to the ignite position and watch closely for the spark. A strong, consistent blue spark near the igniter tip indicates it’s working correctly. If the spark is weak or absent, the igniter may not be installed properly or could be faulty.
Try adjusting the igniter gap slightly if you don’t see a spark. The gap should be about 1/8 inch from the burner. Sometimes, a small adjustment can make a big difference in spark quality.
Have you noticed your stove struggling to light before? This simple test might reveal why. Taking a moment to confirm the spark saves you from mystery flameouts and uneven cooking later on.
Troubleshooting Common Issues
Troubleshooting common issues after replacing an igniter on a gas stove can save you time and frustration. Even with careful installation, problems like no spark or intermittent ignition might occur. Understanding why these issues happen helps you fix them quickly and get your stove working safely again.
No Spark After Installation
If your stove doesn’t spark after installing the new igniter, check the connection first. Loose or improperly connected wires are often the cause. Make sure the igniter wire is firmly attached to the spark module and the igniter itself.
Also, inspect the spark electrode for cracks or damage. Sometimes a new igniter can be faulty, so testing with a multimeter can confirm if it’s working. Don’t forget to verify that the stove’s power supply is on and the circuit breaker hasn’t tripped.
Intermittent Ignition Problems
Intermittent sparks can be tricky because they happen sporadically. Dirt, grease, or moisture on the igniter tip can stop it from sparking consistently. Clean the igniter gently with a soft cloth and rubbing alcohol to remove buildup.
Another cause could be a worn-out spark module or ignition switch. Have you noticed if the spark is weak or slower than usual? Testing these components or swapping with a known good part can reveal the culprit. Pay attention to how often the problem occurs—does it worsen after cleaning or only during certain conditions?
Maintenance Tips For Longevity
Replacing a gas stove igniter keeps your appliance safe and working well. Carefully remove the old igniter and install the new one following the stove’s instructions. Regular checks and gentle cleaning help extend your stove’s life.
Maintaining your gas stove's igniter is crucial for ensuring its long lifespan and efficient performance. A little attention to maintenance can save you from unexpected costs and inconvenience. But what does this maintenance involve? Let’s break it down into manageable steps.
Regular Cleaning
Regular cleaning is vital in keeping the igniter in top shape. Ensure that your stove is cool before you start cleaning. Use a damp cloth to gently wipe away any food particles or grease around the igniter. Consider using a toothbrush to reach tight spots. A small brush can work wonders in dislodging stubborn grime. Consistent cleaning prevents buildup that can affect the igniter's functionality.
Periodic Inspections
Make it a habit to inspect your igniter periodically. Look for any visible signs of wear or damage. An igniter that looks worn out may fail at the most inconvenient time. Check if the igniter sparks consistently when you turn on the stove. If the spark is weak or erratic, it might be time to consider replacing the igniter. Regular inspections can help you catch potential issues early, saving you time and money. Taking these simple maintenance steps can significantly extend the life of your gas stove’s igniter. Why not make it a part of your routine? Your kitchen will thank you!
Credit: www.searspartsdirect.com
Credit: www.searspartsdirect.com
Frequently Asked Questions
How Do I Know If My Gas Stove Igniter Needs Replacement?
If your stove doesn’t spark or ignite, the igniter may be faulty. Listen for clicking sounds; no click often means replacement is needed.
What Tools Are Required To Replace A Gas Stove Igniter?
You typically need a screwdriver, pliers, and sometimes a multimeter to test the igniter before replacement. Always unplug the stove first.
Is It Safe To Replace A Gas Stove Igniter Myself?
Yes, if you follow safety precautions like turning off gas and power. However, if unsure, consulting a professional is safer.
How Much Does It Cost To Replace A Gas Stove Igniter?
The igniter part usually costs between $10 and $50. Labor fees vary if you hire a technician.
Conclusion
Replacing an igniter on a gas stove is simple and saves money. Turn off the gas and unplug the stove first. Remove the old igniter carefully to avoid damage. Install the new igniter by following the steps closely. Test the stove to ensure the igniter works well.
Regular checks keep your stove safe and efficient. This small fix helps your stove light quickly every time. Try it yourself and enjoy cooking without delays.