
Have you ever wanted to bake a delicious pie but didn’t have a food processor to make the crust? You’re not alone.
Making pie crust by hand might sound tricky, but it’s easier than you think. Imagine creating a flaky, buttery crust that holds your favorite fillings perfectly—all without any fancy kitchen gadgets. You’ll learn simple, step-by-step methods that anyone can follow.
By the end, you’ll feel confident enough to make a pie crust from scratch using just basic tools you already have. Ready to impress yourself and your loved ones with homemade pie? Let’s get started!
Ingredients Needed
Making pie crust without a food processor is simple with the right ingredients. Each component plays a role in creating a flaky, tender crust. Understanding these ingredients helps you choose what works best for your taste and texture.
Flour Choices
- All-purpose flour is the most common for pie crusts.
- Pastry flour creates a softer, more tender crust.
- Whole wheat flour adds a nutty flavor and more fiber.
- A mix of flours can balance texture and taste.
Types Of Fat
- Butter gives rich flavor and flakiness.
- Shortening creates a tender, crumbly texture.
- Lard produces a very flaky, traditional crust.
- A combination of fats can improve both flavor and texture.
Liquid Options
- Cold water is the classic choice to bind the dough.
- Milk or cream adds richness and tenderness.
- Vinegar or lemon juice helps tenderize the dough.
- Keep liquids cold for a flaky crust.
Optional Additions
- Salt enhances flavor and balances sweetness.
- Sugar adds a slight sweetness to the crust.
- Eggs can enrich dough and improve structure.
- Herbs or spices add unique tastes for savory pies.

Tools Required
Making a pie crust without a food processor needs a few simple tools. These tools help mix, cut, and roll the dough easily. You do not need expensive or fancy gadgets. Basic kitchen items work well for this task. Here is a list of tools required to make pie crust by hand.
Mixing Bowls
Use a large mixing bowl to combine your ingredients. A glass or metal bowl is best because it is easy to clean. Make sure the bowl is big enough to hold all the flour and butter. This gives enough space to mix without spilling. Having two bowls can help—one for dry ingredients and one for wet.
Pastry Cutter Alternatives
A pastry cutter helps cut butter into flour. Without one, use a fork to mash the butter into small pieces. Another option is two knives. Cross them to chop the butter into flour quickly. You can also use your fingers. Rub the butter and flour together until it looks crumbly. Avoid letting the butter get too warm.
Rolling Pin Options
A rolling pin flattens the dough evenly. Use a wooden rolling pin for best results. If you do not have one, try a clean glass bottle. Make sure it is smooth and strong. Wrap the dough in plastic wrap before rolling to prevent sticking. Roll gently and turn the dough often for even thickness.
Measuring Equipment
Measure ingredients carefully for a good crust. Use dry measuring cups for flour and sugar. Use a liquid measuring cup for water or milk. A kitchen scale is helpful for accuracy but not required. Level off dry ingredients with a knife for exact amounts. Proper measurements keep the dough from being too dry or wet.
Mixing Dough By Hand
Mixing pie crust dough by hand is a simple and rewarding process. It lets you feel the texture and control the dough's consistency. This hands-on method connects you to the baking and helps create a tender crust. Follow these steps for the best results.
Combining Dry Ingredients
Start by sifting flour, salt, and sugar into a large bowl. Use a whisk or fork to mix them well. This ensures even distribution and avoids clumps. A smooth blend of dry ingredients sets a solid base for your dough.
Cutting In The Fat
Use cold butter or shortening cut into small pieces. Add it to the dry mix. Use a pastry cutter, two forks, or your fingers to break the fat into the flour. Work quickly. Aim for pea-sized pieces mixed throughout. This creates a flaky texture in the crust.
Adding Liquid Gradually
Pour cold water slowly over the mixture. Use a spoon or your hands to combine. Add just enough water for the dough to hold together. Avoid making it sticky or wet. The dough should feel firm but pliable, not dry or crumbly.
Avoiding Overworking The Dough
Handle the dough gently and briefly. Overmixing can cause toughness. Press and fold the dough just until it forms a ball. Chill the dough before rolling to relax the gluten. This keeps the crust tender and flaky after baking.
Credit: www.ourhappymess.com
Chilling And Resting
Creating pie crust without a food processor is simple. Use a fork or pastry cutter to mix flour, butter, and water. Work quickly to keep the butter cold, ensuring a flaky crust.
Chilling and resting your pie dough are crucial steps that can make the difference between a flaky crust and a disappointing one. Imagine crafting a pie crust without the convenience of a food processor, using your hands to blend the butter and flour. With all that effort, you certainly want to ensure your pie turns out perfect. This is where chilling and resting come into play. These steps are not just about following tradition—they’re about achieving a texture that’s both tender and crisp.
Why Chilling Matters
Chilling your dough is essential for a few reasons. First, it firms up the butter, allowing it to create layers within the dough. These layers are what give your crust that beautiful flakiness once baked. Additionally, chilling helps relax the gluten in the flour. This prevents your crust from shrinking too much in the oven. Ever wondered why some pie crusts lose their shape during baking? Skipping the chill is often the culprit.
Recommended Resting Time
You might be tempted to rush this step, but patience is key. Ideally, your dough should rest in the refrigerator for at least 30 minutes. For even better results, consider letting it chill for a couple of hours or even overnight. This extended resting time enhances flavor development, making your pie crust even more delicious.
Wrapping And Storing Dough
Proper wrapping is crucial to prevent your dough from drying out or absorbing unwanted odors from the fridge. Use plastic wrap to tightly seal the dough, pressing out any air pockets. For longer storage, consider placing the wrapped dough in a resealable plastic bag. This method ensures your dough stays fresh and ready for when you're set to roll it out. So, next time you're making pie crust by hand, give these chilling and resting techniques a try. You might find that taking a little extra time leads to a pie that's not only beautiful but also bursting with flavor. What’s your go-to tip for achieving the perfect pie crust?
Rolling Out The Dough
Rolling out pie dough without a food processor can feel tricky, but it’s all about your technique and preparation. Getting this step right ensures your crust bakes evenly and holds together perfectly. Let’s look at how to make your rolling experience smooth and effective.
Preparing The Work Surface
Start with a clean, flat surface like a wooden or marble countertop. Lightly dust the area with flour to prevent the dough from sticking, but don’t overdo it—too much flour can dry out your crust. If you prefer, use a large piece of parchment paper or a silicone baking mat to roll your dough on; it makes cleanup easier and helps control sticking.
Techniques For Even Rolling
Place your dough ball in the center of your work surface and press it down gently with your hands to form a flat disk. Roll the dough outward from the center, turning it a quarter turn after every few rolls to maintain a round shape.
Apply even pressure and avoid pressing too hard. If you feel resistance, let the dough rest for a few minutes; this relaxes the gluten and makes rolling easier. Have you noticed how rolling from the center outward creates a more uniform thickness? Try to keep the dough about 1/8 inch thick for a balanced crust.
Preventing Sticking
Sticking is one of the biggest frustrations when rolling pie dough by hand. To prevent this, sprinkle a small amount of flour on both your rolling pin and dough surface. If the dough still sticks, try chilling it in the fridge for 10-15 minutes—it firms up and becomes less sticky.
Another tip is to use a rolling pin cover or wrap your rolling pin in plastic wrap. This creates a barrier and reduces sticking without adding extra flour. Have you ever tried flipping your dough over during rolling? It helps spot any sticking and ensures even thickness on both sides.

Credit: www.gimmesomeoven.com
Transferring And Shaping
Transferring and shaping pie dough without a food processor can feel tricky. The dough is soft and delicate, so handle it with care. Moving it gently prevents cracks and tears. Shaping it right ensures an even, beautiful pie crust that bakes well.
Lifting The Dough Safely
Use your hands or a rolling pin to lift the dough. Avoid stretching it too much. If the dough sticks, dust your hands and surface with flour. Slide a spatula or bench scraper under the dough to help lift it. Fold the dough in half or quarters to move it easily. Keep the dough cool to prevent it from getting too soft.
Fitting Into Pie Dish
Gently place the dough into the pie dish. Press it lightly to fit the bottom and sides. Avoid pressing too hard, which can cause uneven thickness. Smooth out wrinkles by gently pushing the dough from the center toward the edges. Let the dough hang over the dish’s edge for trimming later. If the dough shrinks, let it rest for 10 minutes before trying again.
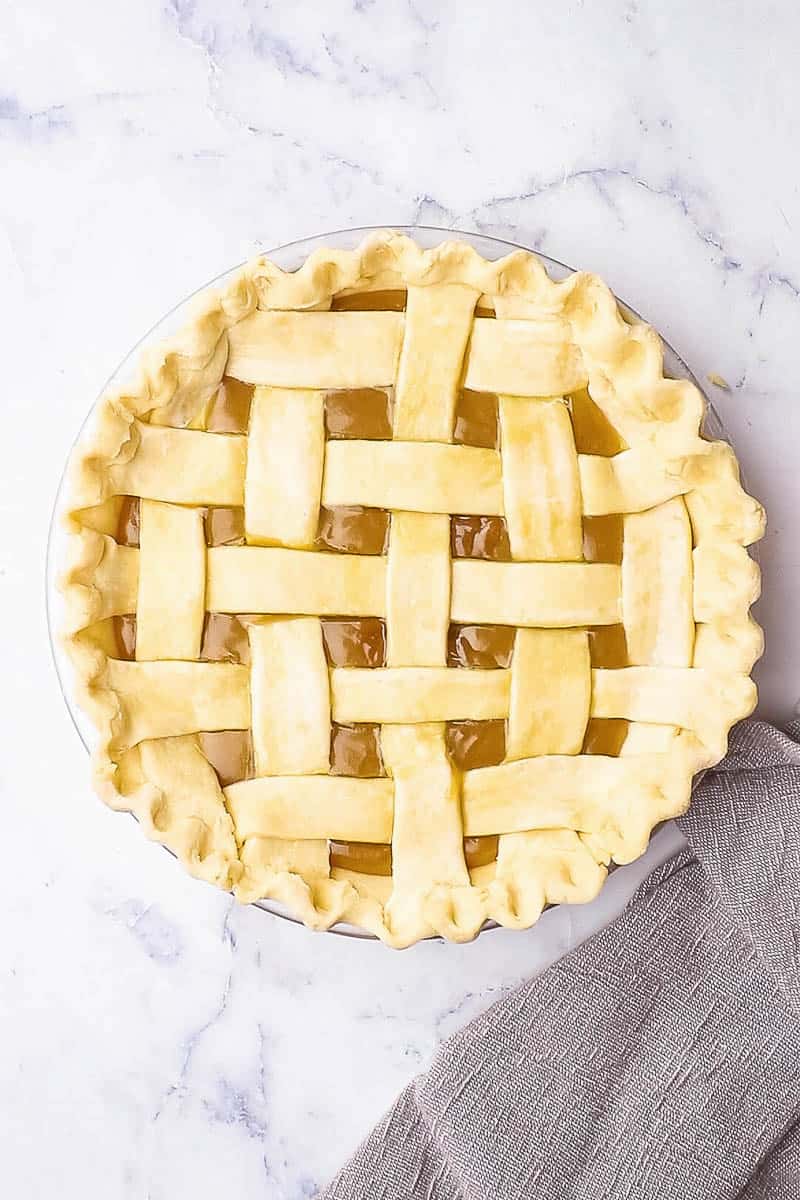
Trimming And Crimping Edges
Trim the excess dough, leaving about a half-inch overhang. Use kitchen scissors or a knife for a clean cut. Fold the extra dough under itself to create a thick edge. Pinch the dough between your thumb and index finger to crimp the edges. This creates a decorative border and helps hold the crust in place during baking. Keep the edges even for a neat look and even cooking.
Common Mistakes To Avoid
Making pie crust without a food processor can be simple, but some mistakes can ruin the dough. Avoiding these errors will help you get a flaky, tender crust every time. Here are common pitfalls to watch out for.
Overmixing Dough
Mixing the dough too much develops gluten. This makes the crust tough, not flaky. Stop mixing as soon as the ingredients come together. Small lumps of butter in the dough are okay. They create a light, crumbly texture after baking.
Using Warm Ingredients
Warm butter or water melts the fat before baking. This causes a greasy, dense crust. Use cold butter and ice-cold water. Keep ingredients chilled until just before mixing. Cold fat creates pockets in the dough that puff up when baked.
Skipping Chilling Step
Resting the dough in the fridge is essential. It lets the flour hydrate and the fat firm up. Skipping chilling makes the dough sticky and hard to roll. Chill the dough for at least 30 minutes. This step also helps prevent shrinking during baking.
Tips For Flaky Crust
A flaky pie crust is the heart of every delicious pie. Achieving this texture without a food processor is possible with the right techniques. Small details make a big difference in the crust’s flakiness and taste.
Keeping Ingredients Cold
Cold ingredients create steam pockets, making the crust flaky. Chill flour, butter, and water before starting. Use ice water to mix the dough gently. Avoid warming butter; it should stay solid in small pieces. Work quickly to keep everything cold during mixing and rolling.
Using Shortcuts Wisely
Shortcuts save time but can affect texture. Use cold butter cut into small cubes instead of melted butter. Try freezing butter and grating it into flour for better mixing. Avoid over-mixing, which warms the dough and reduces flakiness. Use minimal water to bind ingredients without making dough sticky.
Handling Dough Gently
Gentle handling keeps butter pieces intact, creating layers in the crust. Use a light touch when mixing and rolling. Press dough together without kneading too much. Roll dough evenly to avoid thin spots. Rest the dough in the fridge to relax gluten and keep it tender.

Credit: mosthungry.com
Frequently Asked Questions
How Can I Make Pie Crust Without A Food Processor?
You can make pie crust by hand using a pastry cutter or two knives. Combine flour and cold butter, cut until crumbly, then add cold water. Mix gently and chill before rolling out. This method creates a flaky crust without needing a food processor.
What Tools Replace A Food Processor For Pie Crust?
A pastry cutter, two knives, or your fingers work well to cut butter into flour. These tools help create the crumbly texture needed for pie crust. Use cold ingredients and minimal mixing for the best results without a food processor.
How Do I Keep Pie Crust Flaky Without A Processor?
Keep butter and water cold to maintain flakiness. Cut butter into small pieces and mix quickly to avoid melting. Chill the dough before rolling out. These steps ensure a tender, flaky crust even without a food processor.
Can I Use A Fork To Mix Pie Crust Dough?
Yes, a fork can mix pie crust dough gently. Use it to combine flour and butter until crumbly. Then add cold water slowly. Avoid overmixing to keep the crust tender and flaky without a food processor.
Conclusion
Making pie crust without a food processor is simple and fun. Use your hands or a fork to mix ingredients well. Keep the dough cold for a flaky texture. Practice helps you get better each time. Fresh homemade crust makes pies taste great.
Try this method for a classic, tasty crust. No fancy tools needed, just basic kitchen items. Enjoy baking and sharing your delicious pies.


