Grilling a ham on your gas grill might sound tricky, but it’s easier than you think. Imagine biting into juicy, smoky ham with a perfect caramelized crust, all made right outside on your grill.
You want to impress your family and friends with a delicious meal that feels special without spending hours in the kitchen. You’ll learn simple steps to cook a ham on your gas grill that tastes amazing every time. Keep reading, and you’ll soon be the grill master everyone talks about.
Choosing The Right Ham
Choosing the right ham is the first step to delicious grilled ham. The type of ham influences cooking time and flavor. Picking a ham that suits your grill and taste makes the process easier and more enjoyable.
Types Of Ham For Grilling
Different hams work well on a gas grill. Bone-in hams offer more flavor but take longer to cook. Boneless hams cook faster and are easier to slice. Spiral-cut hams heat evenly and are great for serving.
- Bone-in ham: rich flavor, longer cooking
- Boneless ham: quick cooking, easy slicing
- Spiral-cut ham: heats evenly, convenient serving
Pre-cooked Vs. Raw Ham
Pre-cooked ham only needs heating on the grill. It reduces cooking time and risk of undercooking. Raw ham requires full cooking to reach safe temperatures. This type offers more control over flavor and texture.
- Pre-cooked ham: heat through, less grilling time
- Raw ham: cook thoroughly, customize taste
Size And Weight Considerations
Size affects grilling time and grill space. Larger hams take longer to cook and need indirect heat. Smaller hams cook faster and fit easily on the grill. Choose a size that matches your guest count and grill capacity.
| Ham Size | Ideal For | Grilling Time |
|---|---|---|
| 5-7 lbs | Small gatherings | 1.5 to 2 hours |
| 8-12 lbs | Medium groups | 2.5 to 3.5 hours |
| 12+ lbs | Large parties | 3.5+ hours |

Credit: www.youtube.com
Preparing The Ham
Getting your ham ready for the gas grill is a crucial step that sets the stage for juicy, flavorful results. Proper preparation not only enhances the taste but also ensures even cooking. Let’s break down how to prepare your ham perfectly before it hits the grill.
Thawing And Trimming
If your ham is frozen, allow plenty of time to thaw it safely in the refrigerator. This can take several days depending on the size, so plan ahead. Avoid rushing the process by using a microwave or hot water, as this can affect texture and taste.
Once thawed, inspect the ham carefully. Trim off any thick layers of fat that might cause flare-ups on the grill. Removing excess fat also helps the glaze soak in better, giving you a balanced flavor.
Scoring The Surface
Scoring the ham means making shallow cuts in a diamond pattern across the surface. This simple technique allows heat to penetrate evenly and helps the glaze seep deeper into the meat.
Be careful not to cut too deeply—just enough to break the skin and reach the fat layer beneath. You’ll notice that scoring also adds a professional look to your finished ham, making it visually appealing for guests.
Applying A Glaze Or Rub
Adding a glaze or rub before grilling brings out the ham’s natural sweetness and adds a layer of complexity. You can use store-bought mixes or make your own with ingredients like brown sugar, mustard, honey, and spices.
Apply the glaze generously over the scored surface. If you want extra flavor, let the ham sit for 30 minutes to an hour to absorb the rub or glaze before placing it on the grill.
Have you ever tried mixing unexpected ingredients like pineapple juice or bourbon into your glaze? These can add surprising depth and make your ham stand out at any cookout.
Setting Up The Gas Grill
Setting up your gas grill correctly is the foundation of cooking a perfectly juicy ham. Without the right preparation, you risk uneven cooking or drying out your meat. Let’s look at how to get your grill ready for success.
Cleaning And Preheating
Start by giving your grill a thorough clean. Remove any leftover debris or grease from previous grilling sessions to prevent flare-ups and unwanted flavors.
Once clean, preheat your grill with the lid closed for about 10-15 minutes. This step ensures the grates reach the right temperature and helps sear the ham’s surface quickly, locking in moisture.
Creating Indirect Heat Zones
Setting up indirect heat zones is key to cooking ham evenly without burning the outside. Turn on only one or two burners on one side of the grill, leaving the other side off.
Place the ham on the side with no direct flame. This allows the heat to circulate around the ham gently, cooking it slowly and thoroughly. Have you tried this technique before? It often makes the difference between a dry ham and a tender, flavorful one.
Optimal Temperature Settings
Keep your grill temperature steady between 250°F and 300°F for the best results. This moderate heat lets the ham cook through without rushing it.
Use a grill thermometer to monitor the temperature closely. Fluctuations can cause uneven cooking, so adjusting burners as needed will help maintain that perfect heat zone.
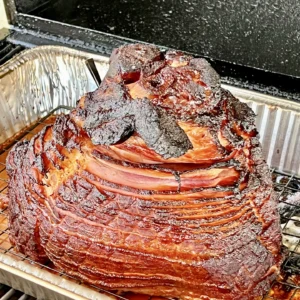
Credit: grillnationbbq.com
Grilling Techniques For Ham
Grilling a ham on a gas grill brings out a wonderful smoky flavor and creates a crispy outer layer that makes every bite delightful. To get the best results, you need to use specific grilling techniques that ensure your ham cooks evenly and stays juicy. Let's dive into the essential tips that will help you master grilling ham like a pro.
Placing The Ham On The Grill
Start by preheating your gas grill to medium heat. Position the ham away from direct flames to avoid burning the outside while the inside remains cold.
Place the ham on the cooler side of the grill, using indirect heat. This technique allows the ham to cook slowly and evenly.
Keep the lid closed as much as possible to maintain a steady temperature and infuse that smoky flavor.
Monitoring Internal Temperature
Use a meat thermometer to check the ham’s internal temperature regularly. Aim for an internal temperature of 140°F (60°C) if your ham is pre-cooked, or 160°F (71°C) if it's raw.
Insert the thermometer into the thickest part of the ham, avoiding bones which can give inaccurate readings.
Keeping an eye on temperature prevents overcooking and keeps the ham moist and tender.
Timing And Turning Tips
Grill the ham for about 10-15 minutes per pound, but remember, timing varies based on your grill and ham size.
Turn the ham every 20-30 minutes to ensure even cooking and avoid hot spots that could burn the meat.
Use tongs or a large spatula to turn the ham gently—piercing it with forks can let juices escape, making it dry.
Enhancing Flavor
Enhancing the flavor of ham on a gas grill makes the meal more delicious and enjoyable. Simple techniques can add smoky, sweet, and savory notes. These methods work well together for a balanced taste. Experimenting with these ideas can bring out the best in your grilled ham.
Using Wood Chips For Smoke
Wood chips add a natural smoky flavor to your ham. Soak the chips in water for at least 30 minutes before grilling. Wrap them in aluminum foil and poke holes in the top. Place the foil packet on the grill’s heat source. The smoke from the chips will infuse the ham with a rich aroma.
Basting With Glaze During Cooking
Basting keeps the ham moist and adds layers of taste. Use a brush to apply glaze every 15 to 20 minutes. Sweet glazes with honey, brown sugar, or maple syrup work great. Tangy glazes with mustard or citrus provide a nice contrast. The glaze caramelizes, creating a shiny, flavorful crust.
Adding Herbs And Spices
Herbs and spices bring depth to grilled ham. Rub the ham with spices like black pepper, paprika, or garlic powder before cooking. Fresh herbs like rosemary, thyme, or sage can be tucked under the skin or sprinkled on top. These ingredients enhance the ham’s natural flavor and aroma.
Serving Suggestions
Serve grilled ham with fresh vegetables or a light salad to balance the smoky flavor. Warm bread or mashed potatoes pair well for a hearty meal. A drizzle of honey mustard or glaze adds extra taste without overpowering the ham.
Cooking a ham on a gas grill is a delightful experience. The smoky flavor adds a special touch to the meat. Once you've grilled your ham to perfection, serving it right enhances the entire meal.
Resting The Ham
Let the ham rest before slicing. This allows juices to redistribute. Resting helps keep the meat moist. Cover it with foil and wait for 15 minutes. This simple step makes a big difference.
Slicing Tips
Use a sharp carving knife for even slices. Begin at the thicker end. Cut across the grain for tender pieces. Keep slices thin for better texture. Arrange them neatly on a platter for a pleasing look.
Pairing With Side Dishes
Choose side dishes that complement the ham’s flavors. Consider these options:
- Mashed potatoes with butter
- Steamed green beans with garlic
- Sweet potato casserole
- Cranberry sauce for a tangy twist
These sides add color and variety to your plate. Together, they create a balanced and satisfying meal.
Troubleshooting Common Issues
Cooking ham on a gas grill can bring great flavors but also some challenges. Troubleshooting common issues helps make your grilled ham tasty and enjoyable. Knowing how to handle problems like dryness, flare-ups, and uneven cooking improves your grilling experience.
Preventing Dryness
Dry ham ruins the taste and texture. Keep the grill temperature moderate, around 250°F to 300°F. Wrap the ham in foil to lock in moisture. Use a water pan inside the grill to add humidity. Baste the ham with a glaze or marinade every 20 minutes. These steps keep the ham juicy and tender.
Avoiding Flare-ups
Flare-ups burn the ham and create bitter flavors. Trim excess fat from the ham before grilling. Keep a spray bottle with water nearby to control flames. Avoid placing ham directly over open flames. Use indirect heat by turning off burners under the ham. This method prevents flare-ups and keeps cooking safe.
Fixing Uneven Cooking
Uneven cooking causes some parts to be overdone while others stay raw. Turn the ham regularly to cook all sides evenly. Use a meat thermometer to check internal temperature in multiple spots. Adjust the grill’s burners to balance heat distribution. Place thicker parts of the ham where the heat is higher. These tips ensure your ham cooks evenly throughout.

Credit: www.youtube.com
Frequently Asked Questions
How Do You Prepare Ham For Gas Grilling?
First, score the ham’s surface in a diamond pattern. Then, apply a glaze or seasoning. Preheat the gas grill to medium heat before placing the ham on indirect heat for even cooking.
What Temperature Should A Gas Grill Be For Ham?
Set the gas grill to medium heat, around 325°F (163°C). This temperature cooks the ham evenly without burning the outside. Use indirect heat for best results and avoid flare-ups.
How Long Does Ham Take To Cook On A Gas Grill?
Cook ham for about 10-15 minutes per pound on indirect heat. A 5-pound ham takes roughly 50-75 minutes. Use a meat thermometer to ensure the internal temperature reaches 140°F (60°C).
Should You Use Foil When Grilling Ham On Gas?
Yes, wrapping ham in foil helps retain moisture and prevents drying out. You can also place foil under the ham to catch drippings and ease cleanup. Remove foil during the last 10 minutes for caramelization.
Conclusion
Grilling ham on a gas grill adds great flavor and juiciness. Keep the heat low and watch the time carefully. Use a meat thermometer to check doneness. Basting with glaze or sauce gives a tasty finish. Rest the ham before slicing to keep it moist.
Enjoy your grilled ham with simple sides for a perfect meal. Now, you can confidently cook ham on your gas grill anytime.