
Are you ready to take your cake decorating skills to the next level? Imagine the satisfaction of creating beautifully iced cakes and cupcakes, impressing everyone with your homemade touch.
You don’t need to be a professional baker to achieve this. All you need is a simple icing bag, and the best part is, you can easily make one yourself at home! In this guide, we'll show you exactly how to make an icing bag with items you probably already have in your kitchen.
Whether you're gearing up for a special occasion or just experimenting for fun, mastering this simple skill will open up a world of creative possibilities. Keep reading to discover how you can transform your baking experience with this easy, budget-friendly technique.
Choosing Materials
Choosing the right materials is important for making an icing bag. The materials affect how easy it is to use and how well it works. Picking the best piping bag, nozzle, and tools makes decorating cakes simple and fun. Each material has different features and uses.
Types Of Piping Bags
Piping bags come in several types. Plastic bags are cheap and disposable. They work well for beginners or quick jobs. Cloth bags are reusable and strong. They offer good control and last long. Silicone bags are flexible and easy to clean. They are perfect for frequent bakers.
Selecting The Right Nozzle
Nozzles shape the icing flow. Different nozzles create different designs. Round nozzles are good for writing and dots. Star nozzles make ridged patterns and stars. Leaf nozzles form leaf shapes and petals. Choose a nozzle size based on the detail level needed.
Essential Tools Needed
- Scissors to trim the bag tip.
- Couplers to change nozzles easily.
- Spatulas for filling the bag neatly.
- Measuring cups to keep icing consistent.
- Cleaning brushes for maintaining tools.

Credit: www.youtube.com
Preparing The Bag
Preparing the icing bag is a crucial step that sets the foundation for smooth and precise decorating. If your bag isn’t ready, icing can spill or clog, ruining your design. Taking a few moments to prepare it properly will save you time and frustration later.
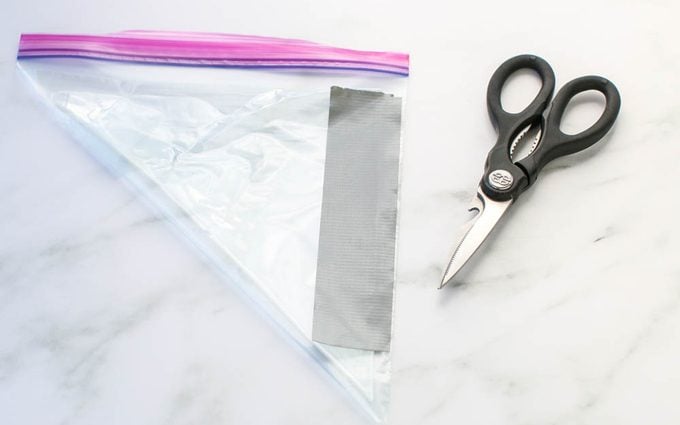
Cutting The Bag To Size
Start by trimming the tip of the icing bag. The size of the cut depends on the nozzle you plan to use—too big, and the icing will gush out uncontrollably; too small, and it will struggle to come through.
Hold your nozzle against the bag’s tip and cut just enough so the nozzle fits snugly inside. If you’re unsure, cut a little less first—you can always trim more if needed. Have you noticed how small adjustments here can change your icing flow dramatically?
Fitting The Nozzle
Slide the nozzle into the freshly cut tip of the bag. It should fit firmly without wobbling. A loose nozzle means uneven pressure and messy lines.
If your nozzle is loose, try twisting it slightly as you push it in. This creates a tighter seal. You want the nozzle to feel like part of the bag, not an add-on.
Sealing The Edges
Once the nozzle is in place, ensure the edges of the cut tip are sealed around it. This prevents icing from leaking out the sides.
You can gently pinch the bag’s tip around the nozzle or use a small piece of tape if the bag material is slippery. Think about how often leaks interrupt your flow—sealing those edges will keep your icing where it belongs.
Filling The Bag
Filling the icing bag might seem straightforward, but mastering this step makes a big difference in how smoothly your decorations flow. The right approach helps you avoid messes and frustration while giving you better control over your icing designs. Let’s look at how to get the best results when filling your bag.
Best Icing Consistency
The consistency of your icing affects how easily it moves through the bag and how clean your designs look. Aim for a smooth, spreadable texture that holds its shape but isn’t too thick to squeeze out.
Think of it like toothpaste—too runny and it’ll drip everywhere; too stiff and it’s a struggle to pipe. If your icing feels too thick, add a few drops of water or milk to loosen it slightly. If it’s too thin, mix in a bit more powdered sugar until it firms up.
Techniques For Filling
Filling the bag carefully saves time and prevents spills. Fold the top of your icing bag down to create a cuff—this keeps the bag open and your hands clean. Use a spatula to scoop the icing into the bag, pressing it against one side to minimize air pockets.
Don’t overfill; filling the bag about halfway gives you better control and less strain on your hands. Once filled, unfold the cuff and twist the top tightly to push the icing down and prepare for piping.
Avoiding Air Bubbles
Air bubbles cause uneven lines and can interrupt your flow while decorating. After filling, gently squeeze the bag to push out any trapped air through the tip before you start piping.
If you notice bubbles forming, stop and tap the bag gently on the counter or squeeze the tip lightly to release them. This simple step can save you from frustrating breaks in your icing lines.

Credit: bakabee.com
Piping Techniques
Piping techniques bring life to your icing bag creations. They help turn simple frosting into beautiful decorations. Learning these skills improves your baking presentation and adds fun to the process.
Basic Piping Strokes
Start with simple strokes to build confidence. Practice straight lines by squeezing the bag gently. Try dots by holding the tip close and releasing quickly. Use zigzags by moving the bag back and forth smoothly.
Creating Different Designs
Combine basic strokes to form patterns. Swirls make a classic rose shape. Shells add a border to cakes. Stars create texture and depth. Change pressure and speed for varied effects.
Tips For Steady Control
- Hold the bag firmly but relaxed.
- Use your dominant hand to squeeze.
- Guide with your other hand for better control.
- Keep your wrist steady and move your arm.
- Practice on parchment paper before decorating.
Cleaning And Storage
Keeping your icing bag clean and storing it correctly is just as important as making it. If you skip this part, you risk leftover icing hardening inside, which can ruin your bag and nozzle for future use. Taking a few extra minutes to care for your tools ensures they stay in great shape and ready for your next baking session.
Washing The Bag And Nozzle
After you finish decorating, immediately rinse your icing bag and nozzle with warm water. This helps prevent icing from drying and sticking inside. Use a small brush or pipe cleaner to scrub inside the nozzle, where icing often hides.
If your bag is reusable, wash it thoroughly with mild soap and warm water. Avoid harsh detergents that can damage the material. For disposable bags, it's best to toss them after use to avoid contamination.
Drying And Storing Properly
Drying your bag and nozzle completely is crucial. Moisture left inside can cause mold or unpleasant odors. Hang the bag upside down or open it wide to let air circulate freely.
Store your icing bag flat or rolled up gently in a clean, dry place. Keep the nozzle in a small container or bag to avoid losing it. Have you ever misplaced a tiny nozzle right when you needed it most? Proper storage prevents that frustration.
Maintaining For Reuse
If you plan to reuse your icing bag, check it regularly for cracks or tears. Even small damages can affect your icing flow and cause leaks. Replace any worn parts to keep your decorating smooth and hassle-free.
Consider labeling your bags if you use different types of icing for various projects. This simple step saves time and keeps your process organized. How much easier would your baking be with a neat, well-maintained setup?
Credit: www.tasteofhome.com
Frequently Asked Questions
What Materials Do I Need To Make An Icing Bag?
To make an icing bag, you'll need parchment paper or plastic wrap, scissors, and a clip or rubber band. These materials are easy to find and cost-effective. Using parchment paper is popular for its sturdiness and ease of cleaning.
How Do I Fold Parchment To Create An Icing Bag?
Fold the parchment into a triangle, then roll it into a cone shape. Trim the tip to your desired size. This method ensures the icing flows smoothly and gives you control over the piping width.
Can I Reuse A Homemade Icing Bag?
Yes, if made from durable materials like silicone or thick parchment, you can reuse it. Clean thoroughly after each use to prevent clogging and maintain hygiene. Disposable plastic bags are usually single-use.
How Do I Fill The Icing Bag Without Making A Mess?
Fold the top of the bag over your hand or a tall glass. Spoon the icing inside and unfold the top. This technique keeps the bag stable and reduces spills while filling.
Conclusion
Making an icing bag is simple and fun. You only need a few items found at home. Creating your own bag saves money and allows you to customize sizes. It helps you decorate cakes and cookies with ease. Practice a little, and your skills will improve fast.
Enjoy baking and sharing your sweet treats with friends. Try making an icing bag today and see the difference it makes.


